£5 OFF Orders over £50 | Use Code 585C

Finish

Varnishes are applied over a completed piece of work to change or unify the surface sheen and protect the painted surface from the environment and ultraviolet light.

There are many misconceptions about whether or not it is necessary to varnish an acrylic painting. As a general rule, you should always varnish your acrylic work when possible. Varnishes are applied over dry paint films and have several purposes. The first and most important function is to protect the painting surface from the environment and protect the pigments from ultraviolet light. Secondly, varnishes can be used to change or unify a painting’s surface sheen. Liquitex varnishes come in several different sheens, which can all be intermixed for a customized sheen.

Liquitex varnishes are either permanent or removable and can be applied to both flexible and rigid supports.


Archival Permanent (non-removable)

  • For interior use only

  • Excellent Levelling Properties

  • Non-yellowing

  • Translucent when wet – dries clear

Gloss Varnish

Attributes

  • Extremely clear, permanent varnish for acrylic paintings on flexible and rigid surfaces.

  • Greater clarity in the wet state than many acrylic varnishes.

  • Fluid viscosity with excellent levelling properties for brush stroke free application.

  • Permanent and durable for superior protection against the environment.

  • Flexible, archival, non-yellowing and water resistant when dry.

  • For interior use only

Application

  • Apply with a clean, flat, tightly packed varnishing brush or paint pad.

  • Use long, even strokes.

  • Do not brush vigorously over textured surface to avoid bubbles.

  • Do not brush back into areas while varnish is drying. Do not overlap into partially dried areas.

  • Apply one or more additional coats after each coat is thoroughly dry to the touch.

  • Do not shake the bottle prior to use.

  • Varnish surface and environment must be clean, dry, and dust free.

  • Application may be done by brush or spray. Generally a sprayed application will be thinner, smoother, and more even. Rolling or sponging application is not recommended.

  • Acrylic paintings must be completely dried and cured for 48-72 hours before varnishing.

  • Caution: Acrylic paints and mediums become increasingly brittle in cold weather. Do not apply below 60 degrees.

Brush and Paint Pad Application

  1. Use a wide, soft hair brush or paint pad (vacuum pad prior to use to remove lint). Size of area to be varnished will determine the size of the applicator. The smaller the surface area, the narrower the brush. Generally, a 1-4" flat brush is used.

  2. Apply varnish in 1-3 thin coats, rather than 1 thick coat. A thick coat will take longer to dry, may dry cloudy, may drip or sag during application and has a greater chance of showing brush strokes when dry.

  3. Horizontal surface application is best with less chance of varnish running. After varnishing, the surface should be shielded with a protective "tent". This will prevent any dust or airborne particles from settling into varnish as it dries.

  4. Apply varnish in slightly overlapping pattern that covers entire artwork. Apply in horizontal and vertical brush strokes, so that entire area is evenly coated.

  5. Do not rework areas you might miss, as the brush could pick up partially dried varnish and cause clouding. If areas are missed, wait until the varnish is dry and apply another coat.

Spray Application

Most even application method.

  • Use for textured surfaces (thick impasto, thick textures), where brush application may result in foaming and fragile surfaces (watercolour, tempera, graphite, pastel, gouache), where brush application may disrupt drawing or painted surface.

  1. Select air pressure (PSI) depending on air gun used and viscosity of varnish. Greater PSI permits thicker varnish to be sprayed, but may affect fragile surfaces.

  2. 2-3 light even coats are better than 1 thick coat.

  3. Spray a continuous film by moving the spray gun in a smooth motion from one side of the painting to the other. First coat horizontal, second coat, third coat horizontal, etc.

  4. During spray application, maintain same distance across the surface of the artwork. Move your body as well as your arm to avoid "arching" motion and uneven application.

Varnish Thinning

  • Thinning is not recommended for Gloss Varnish, however a small amount of Flow-Aid may be added to increase flow and penetration.

Varnish Removal

  • Not removable. Do not attempt to remove these varnishes with harsh solvents.

High Gloss Varnish

Attributes

  • Low viscosity, fluid.

  • Translucent when wet, clear when dry.

  • Increases gloss, depth and intensity of colours it is applied over.

  • 100% acrylic polymer varnish. Water soluble when wet. Good chemical and water resistance.

  • Dry to a non-tacky, hard, flexible surface that is resistant to retention of dirt.

  • Resists discolouring (non-yellowing, non-fogging) due to humidity, heat and ultraviolet light.

  • Depending upon substrate, allows moisture to pass through (breathable).

  • Not for use over oil paint.

  • Protects acrylic colour from harsh elements.

  • Hard, archival, non-yellowing and water resistant when dry.

  • For interior use only

Application

  • Apply as a final varnish over dry acrylic paint.

  • Varnish surface and environment must be clean, dry and dust free.

  • Acrylic paintings must be completely dried and cured for 48-72 hours before varnishing.

  • Application may be done by brush or spray. Generally a sprayed application will be thinner, smoother and more even. Rolling or sponging application is not recommended.

  • Caution: Acrylic paints and mediums become increasingly brittle in cold weather. Do not apply below 60 oF.

Brush and Paint Pad Application

  1. Use a wide, soft hair brush or paint pad (vacuum the pad prior to use to remove lint). Size of area to be varnished will determine the size of the applicator. The smaller the surface area, the narrower the brush. Generally, a 1-4" flat brush is used.

  2. Apply varnish in 1-3 thin coats, rather than 1 thick coat. A thick coat will take longer to dry, may dry cloudy, may drip or sag during application and has a greater chance of showing brush strokes when dry.

  3. Horizontal surface application is best with less chance of varnish running. After varnishing, the surface should be shielded with a protective "tent". This will prevent any dust or airborne particles from settling into varnish as it dries.

  4. Apply varnish in slightly overlapping pattern that covers entire artwork. Apply in horizontal and vertical brush strokes, so that entire area is evenly coated.

  5. Do not rework areas you might miss as the brush could pick up partially dried varnish and cause clouding. If areas are missed, wait until the varnish is dry and apply another coat.

  6. When applying Liquitex Matte Varnish or Satin Varnish, apply no more than 1-2 thin coats. A thick application may result in cloudiness when dry. If more than 2 coats are desired, first varnish with Gloss Varnish until desired thickness is achieved, then final varnish with matte or satin varnish.

Spray Application

  • Most even application method.

  • Use for textured surfaces (thick impasto, thick textures), where brush application may result in foaming and fragile surfaces (watercolour, tempera, graphite, pastel, gouache), where brush application may disrupt drawing or painted surface.

  1. Select air pressure (PSI) depending on air gun used and viscosity of varnish. Greater PSI permits thicker varnish to be sprayed, but may affect fragile surfaces.

  2. 2-3 light even coats are better than 1 thick coat.

  3. Spray a continuous film by moving the spray gun in a smooth motion from one side of the painting to the other. First coat horizontal, second coat, third coat horizontal, etc.

  4. During spray application. maintain same distance across the surface of the artwork. Move your body as well as your arm to avoid "arching" motion and uneven application.

Thinning

  • Do not thin, as it will weaken the varnish film and adhesion.

Removal

  • Not removable. Do not attempt to remove these varnishes with harsh solvents.

Matte Varnish

Attributes

  • Low viscosity - very fluid

  • Produces a matte finish

  • Does not drastically reduce colour depth as does Matte Medium.

  • 100% acrylic polymer varnish. Water soluble when wet. Good chemical and water resistance when dry.

  • Dry to a non-tacky, hard, flexible surface that is resistant to retention of dirt.

  • Resist discolouring (non-yellowing, non-fogging) due to humidity, heat and ultraviolet light.

  • Depending upon substrate, allows moisture to pass through (breathable).

  • Will not crack as surface expands and contracts during temperature and humidity changes. Applicable for any acrylic painted surface (flexible and rigid) on canvas, paper, wood, stone, Plexiglas, etc.

  • Not for use over oil paint.

  • Flexible, archival, non-yellowing and water resistant when dry.

  • For interior use only

Application

  • Apply as a final varnish over dry acrylic paint.

  • Varnish surface and environment must be clean, dry and dust free.

  • Acrylic paintings must be completely dried and cured for a minimum 48-72 hours before varnishing.

  • Application may be done by brush or spray. Generally a sprayed application will be thinner, smoother and more even. Rolling or sponging application is not recommended.

  • If more than 1 varnish coat is desired, apply 1-2 coats of Liquitex® Gloss Varnish before applying a final coat of Liquitex Matte Varnish.

  • Caution: Acrylic paints and mediums become increasingly brittle in cold weather. Do not apply below 60 degrees.

Brush and Paint Pad Application

  1. Use a wide, soft hair brush or paint pad (vacuum pad prior to use to remove lint). Size of area to be varnished will determine the size of the applicator. The smaller the surface area, the narrower the brush. Generally, a 1-4" flat brush is used.

  2. Apply varnish in 1-3 thin coats, rather than 1 thick coat. A thick coat will take longer to dry, may dry cloudy, may drip or sag during application and has a greater chance of showing brush strokes when dry.

  3. Horizontal surface application is best with less chance of varnish running. After varnishing, the surface should be shielded with a protective "tent". This will prevent any dust or airborne particles from settling into varnish as it dries.

  4. Apply varnish in slightly overlapping pattern that covers entire artwork. Apply in horizontal and vertical brush strokes, so that entire area is evenly coated.

  5. Do not rework areas you might miss, as the brush could pick up partially dried varnish and cause clouding. If areas are missed, wait until the varnish is dry and apply another coat.

  6. When applying Liquitex Matte Varnish or Satin Varnish, apply no more than 1-2 thin coats. A thick application may result in cloudiness when dry. If more than 2 coats are desired, first varnish with Gloss Varnish until desired thickness is achieved, then final varnish with matte or satin varnish.

Spray Application

  • Most even application method.

  • Use for textured surfaces (thick impasto, thick textures), where brush application may result in foaming and fragile surfaces (watercolour, tempera, graphite, pastel, gouache), where brush application may disrupt drawing or painted surface.

  1. Select air pressure (PSI) depending on air gun used and viscosity of varnish. Greater PSI permits thicker varnish to be sprayed, but may affect fragile surfaces.

  2. 2-3 light even coats are better than 1 thick coat.

  3. Spray a continuous film by moving the spray gun in a smooth motion from one side of the painting to the other. First coat horizontal, second coat, third coat horizontal, etc.

  4. During spray application maintain same distance across the surface of the artwork. Move your body as well as your arm to avoid "arching" motion and uneven application.

Thinning

  • Thinning increases penetration and can make it easier to apply varnish.

  • Over thinning may result in weak varnish film, poor adhesion, running and soaking into substrate.

  • Thin, if desired, with a small amount of water to allow the varnish to flow easily from the brush or airbrush.

  • Thin with small amount of Flow-AidTM/water to reduce brush marks or spray apply. Refer to Liquitex Paint Additives: Flow-AidTM Flow Enhancer.

Removal

  • Not removable. Do not attempt to remove these varnishes with harsh solvents.

Satin Varnish

Attributes

  • Low viscosity

  • Produces a non-glare, low sheen surface that will intensify colours.

  • Does not drastically reduce colour depth.

  • 100% acrylic polymer varnish. Water soluble when wet. Good chemical and water resistance.

  • Dry to a non-tacky, hard, flexible surface that is resistant to retention of dirt.

  • Resist discolouring (non-yellowing, non-fogging) due to humidity, heat and ultraviolet light.

  • Depending upon substrate, allows moisture to pass through (breathable).

  • Not for use over oil paint.

  • Protects acrylic colour from harsh elements.

  • Hard, archival, non-yellowing and water resistant when dry

  • For interior use only

Application

  • Apply as a final varnish over dry acrylic paint.

  • Varnish surface and environment must be clean, dry and dust free.

  • Acrylic paintings must be completely dried and cured for 48-72 hours before varnishing.

  • Application may be done by brush or spray. Generally a sprayed application will be thinner, smoother and more even. Rolling or sponging application is not recommended.

  • If more than 1 varnish coat is desired, apply 1-2 coats of Liquitex® Gloss Varnish before applying a final coat of Liquitex Satin Varnish.

  • Caution: Acrylic paints and mediums become increasingly brittle in cold weather. Do not apply below 60oF.

Brush and Paint Pad Application

  1. Use a wide, soft hair brush or paint pad (vacuum the pad prior to use to remove lint). Size of area to be varnished will determine the size of the applicator. The smaller the surface area, the narrower the brush. Generally, a 1-4" flat brush is used.

  2. Apply varnish in 1-3 thin coats, rather than 1 thick coat. A thick coat will take longer to dry, may dry cloudy, may drip or sag during application and has a greater chance of showing brush strokes when dry.

  3. Horizontal surface application is best with less chance of varnish running. After varnishing, the surface should be shielded with a protective "tent". This will prevent any dust or airborne particles from settling into varnish as it dries.

  4. Apply varnish in slightly overlapping pattern that covers entire artwork. Apply in horizontal and vertical brush strokes, so that entire area is evenly coated.

  5. Do not rework areas you might miss, as the brush could pick up partially dried varnish and cause clouding. If areas are missed, wait until the varnish is dry and apply another coat.

  6. When applying Liquitex Permanent Matte Varnish or Satin Permanent Varnish, apply no more than 1-2 thin coats. A thick application may result in cloudiness when dry. If more than 2 coats are desired, first varnish with Gloss Medium & Varnish until desired thickness is achieved, then final varnish with matte or satin varnish.

Spray Application

  • Most even application method.

  • Use for textured surfaces (thick impasto, thick textures), where brush application may result in foaming and fragile surfaces (watercolour, tempera, graphite, pastel, gouache), where brush application may disrupt drawing or painted surface.

  1. Select air pressure (PSI) depending on air gun used and viscosity of varnish. Greater PSI permits thicker varnish to be sprayed, but may affect fragile surfaces.

  2. 2-3 light even coats are better than 1 thick coat.

  3. Spray a continuous film by moving the spray gun in a smooth motion from one side of the painting to the other. First coat horizontal, second coat, third coat horizontal, etc.

  4. During spray application, maintain same distance across the surface of the artwork. Move your body as well as your arm to avoid "arching" motion and uneven application.

Thinning

  • Do not thin, as it will weaken the varnish film and adhesion.

Removal

  • Not removable. Do not attempt to remove these varnishes with harsh solvents.

Archival Removable

  • For interior and exterior use

  • Excellent leveling properties

  • Durable

  • non-yellowing

  • Archival

  • Clear in the wet state

  • Can be used on oil & acrylic paintings

  • Remove with mineral spirits or turpentine

  • Contains UV light stabilizers

Soluvar Matte Varnish

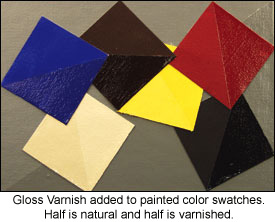
Archival Removable Varnish for Acrylic and Oil Painings. Contains UV Light Stabilizers for protecting colour.

Attributes

  • Low viscosity.

  • Apply as a final varnish over dry acrylic or oil paint.

  • Lowers intensity and depth of colour, while reducing the surface glare.

  • Also available in Gloss which may be intermixed for a variety of sheens.

  • Permanentremovable, final varnish for acrylic and oil paintings that protects painting surface and allows for removal of surface dirt, without damaging painting underneath. Once surface is clean, a new coat of Soluvar® may be reapplied to surface.

  • Thin with mineral spirits or turpentine. Do not use Odorless Mineral Spirits.

  • Dries to a clear, non-tacky, water resistant, hard film that is resistant to retention of dirt and prevents dirt and pollutants from contacting paint surface.

  • Self-levelling. Will not hold brush strokes.

  • Flexible. Will not crack as surface expands and contracts during temperature and humidity changes.

  • Resists discolouring (non-yellowing, non-fogging) due to humidity, heat and ultraviolet light.

  • For interior and exterior use

Application

  • Apply as a final varnish over dry acrylic or oil paint.

  • Good ventilation is required.

  • Application may be done by brush or spray. Generally a sprayed application will be thinner, smoother and more even. Rolling or sponging application is not recommended.

  • Painting surface and environment must be clean, dry and dust free. Allow oil paint to dry for 6 months to one year and acrylic paint for at least 72 hours. Thickness of application will determine exact length of time.

  • If an oil painting is not dry before it is sealed with a varnish, the result may be long-term problems such as cracking or blistering. Varnish may become non-removable if applied over a painting that has not completely dried and cured.

  • Intermix Gloss and Matte Soluvar Varnish for a variety of sheens. Soluvar Matte Varnish contains matting agents that settle during storage. Gently stir with brush handle or dowel until completely re-dissolved. Do not shake.

  • Apply 1-2 thin layers of Soluvar Varnish. Let each layer dry 24 hours between coats.

Over Acrylic Paint

  • Allow acrylic paintings to dry a minimum of 72 hours or longer if paint is very thick.

  • Apply 1-2 coats of Gloss Varnish as an isolation barrier. The barrier coat physically separates the painting from the Soluvar Varnish and seals the surface. This aids in a more even application of Soluvar Varnish and protects the painting if the Soluvar Varnish needs to be removed. Allow to dry for 3 days.

  • To insure proper adhesion, surface must be cleaned with lint free rag slightly dampened with mineral spirits.

  • Apply 1-2 layers of Soluvar Varnish. Let dry 24 hours between coats.

Brush and Paint Pad Application

  1. Use a wide, soft hair brush or paint pad (vacuum pad prior to use to remove lint). Size of area to be varnished will determine the size of the applicator. The smaller the surface area, the narrower the brush. Generally, a 1-4" flat brush is used.

  2. Apply varnish in 1-3 thin coats, rather than 1 thick coat. A thick coat will take longer to dry, may dry cloudy, may drip or sag during application and has a greater chance of showing brush strokes when dry.

  3. Horizontal surface application is best with less chance of varnish running. After varnishing, the surface should be shielded with a protective "tent". This will prevent any dust or air borne particles from settling into varnish as it dries.

  4. Apply varnish in slightly overlapping pattern that covers entire artwork. Apply in horizontal and vertical brush strokes, so that entire area is evenly coated.

  5. Do not rework areas you might miss as the brush could pick up partially dried varnish and cause clouding. If areas are missed, wait until the varnish is dry and apply another coat.

Spray Application

  • Most even application method.

  • Use for textured surfaces (thick impasto, thick textures), where brush application may result in foaming and fragile surfaces (watercolour, tempera, graphite, pastel, gouache), where brush application may disrupt drawing or painted surface.

  1. Select air pressure (PSI) depending on air gun used and viscosity of varnish. Greater PSI permits thicker varnish to be sprayed, but may affect fragile surfaces.

  2. 2-3 light even coats are better than 1 thick coat.

  3. Spray a continuous film by moving the spray gun in a smooth motion from one side of the painting to the other. First coat horizontal, second coat, third coat horizontal, etc.

  4. During spray application maintain same distance across the surface of the artwork. Move your body as well as your arm to avoid "arching" motion and uneven application.

  5. Good ventilation and a carbon dual filter mask are important.

Thinning

  • Thinning increases penetration and can make it easier to apply varnish.

  • Over thinning may result in weak varnish film, poor adhesion, running and soaking into substrate.

  • Thin with up to 25% mineral spirits or turpentine. Do not use Odourless Mineral Spirits.

Removal

  • Remove varnish in clean, well-ventilated area.

  • Wear a dual filter respirator (NIOSH approved) and neoprene gloves. Dampen a small piece of lint free, soft, white cloth with mineral spirits (not "odourless") or turpentine - nothing stronger. Do not use ketones or paint removers.

  • Work horizontally. Apply mineral spirits generously and allow it to lay on surface for 15-30 minutes. Check periodically. Longer time may be necessary, depending upon age of artwork and strength of mineral spirits. If varnish is not dissolving or dissolving slowly, use a higher strength mineral spirits or turpentine (cover with plastic to slow down evaporation of mineral spirits). Stronger mineral spirits are not labelled as such, but have a stronger odour.

  • Rub cloth gently over a small area 1-2 square inches until varnish starts to dissolve.

  • Using a clean cloth and clean solvent, rub the area again to remove residue. Repeat this procedure for the entire area to be cleaned. If any paint colour shows on the cloth, stop immediately and allow the surface to dry.

  • Allow painting to dry before reapplying a fresh coat of Soluvar Final Picture Varnish.

See our range of Liquitex Varnish