
Watercolour Tutorial: Capturing Shadows on Spring Lambs
It was the last normal day for us before the lock down so we called in at one of our favourite cafes the Hole-in-the-Hedge at Greatworth in Northamptonshire for a cup of tea. It’s a great place anyway but part of the appeal was that there was a field full of lambs next door and I was able to sketch and take a few photos of them frolicking in the warm spring sunshine.
Materials
A sheet any good watercolour paper, stretched (I used the Goldline 100 sheet Studio Pad)
Round watercolour brushes in sizes 8, 5 and 3 (I used Da Vinci Maestro Sable)
2B pencil
Putty eraser
Winsor & Newton Professional Watercolours (See below)
Tonal Sketch
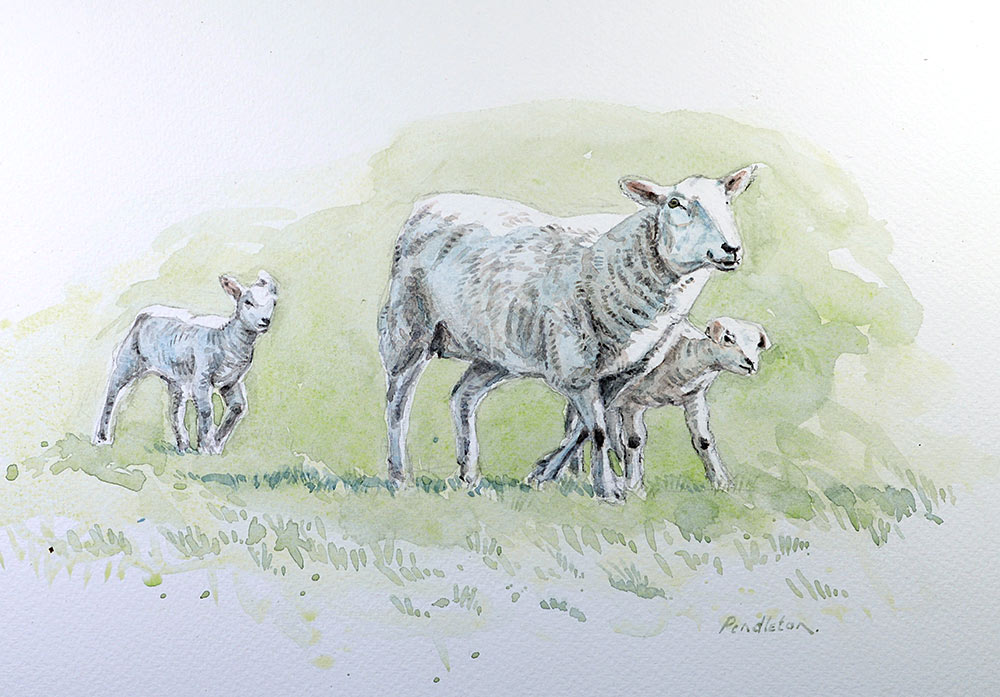
I had plenty of reference material and this watercolour painting is an amalgam of two or three impressions of the morning. I particularly liked the stance of the right-hand lamb peeping round his mother so I made a narrative of her being on something of a mission, striding forward with one lamb close to her while the other was left behind and having to play catch up.
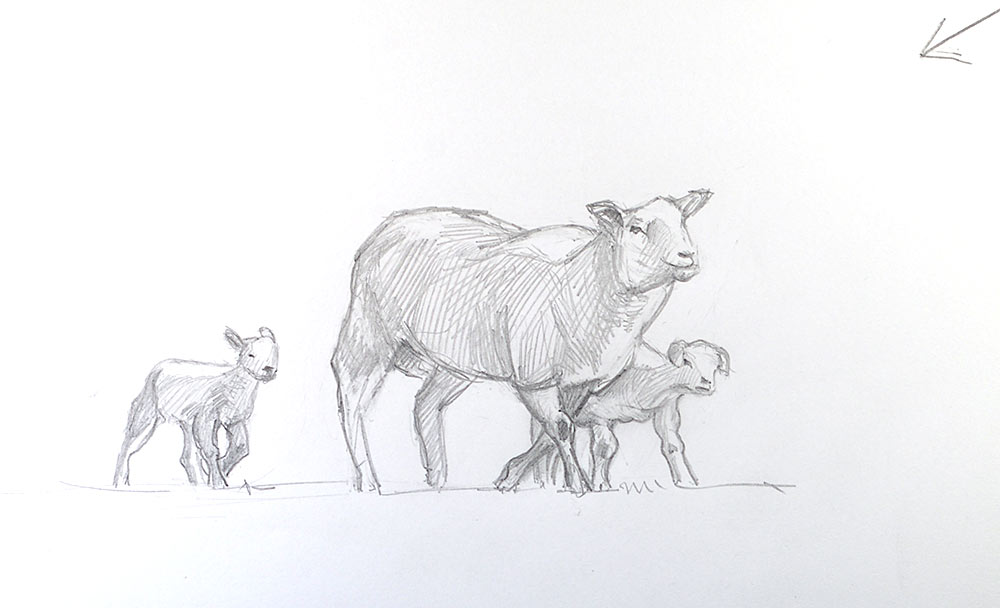
I always make a few thumbnail sketches to work out the best composition and quickly settled on this design and then did a more finished tonal drawing on a sheet of smooth cartridge paper. I identified the light source which was the strong sun of course and showed it with an arrow so I could always work out where shadows would be to give a good three dimensional effect.
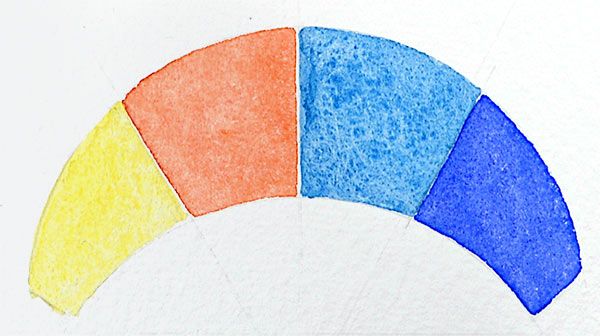
The main issue with painting sheep in pure watercolour is that they are pale and it’s all too easy to end up with a pale insipid painting so I had to jealously guard my white paper and yet try and be bold with shadows and colour. I used a very limited palette of colours and had to be particularly careful to get the right shade of yellowy/grey for the half tones on the sheep. I also wanted this to be a breezy loose watercolour in keeping with the lively subject matter.
Step 1
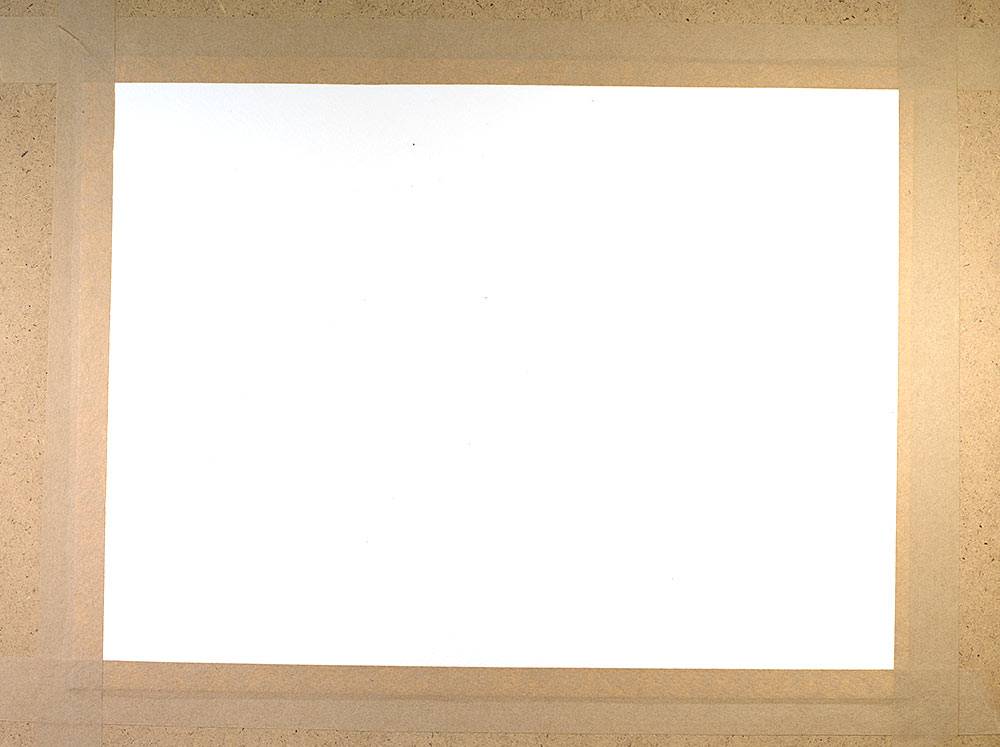
First I took a sheet of NOT watercolour paper and stretched it onto a piece of 3mm mdf by soaking it and, while it was still damp sticking down all four edges with water based gummed tape. I let it dry drum tight and was confident it would stay flat after I painted on it and when cut from the board.
Step 2
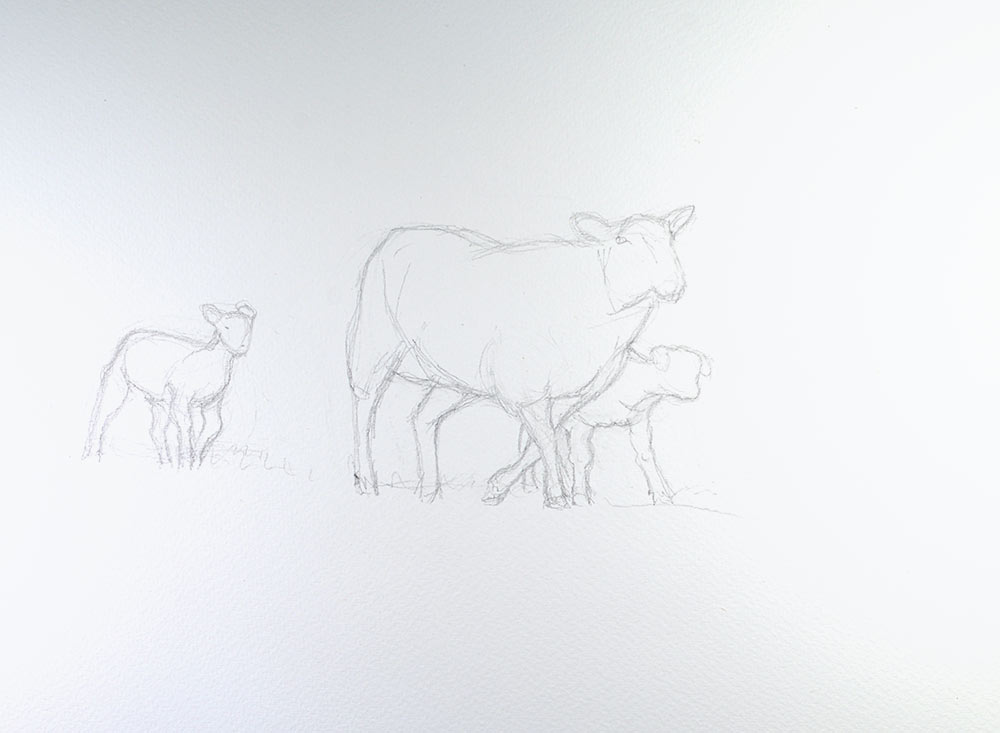
I loosely and lightly sketched out my design with a 2B pencil, and at this point I was only concerned with getting the shapes right, making sure the animals’ hooves were on the ground in the right places for instance, and that everything was to scale. Mistakes of draughtsmanship made at this point are almost impossible to fix later so before any watercolour goes on to paper it’s a good idea to step away and come back to it after a few minutes. It’s amazing how drawing errors become more obvious if you do this.
Step 3
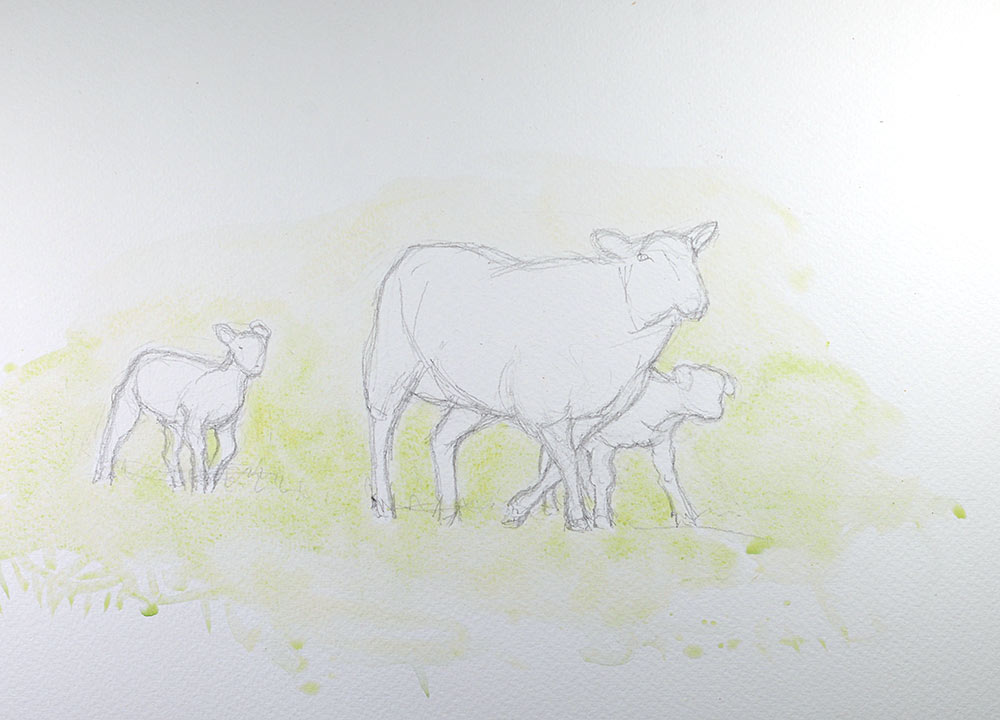
Next I very quickly but accurately laid in a loose background wash of spring-like green made of a mix of Cerulean Blue and Lemon Yellow using one of my more worn Da Vinci Maestro size 8 round sable brushes. I didn’t mind that this was an uneven wash but I always encouraged the wash into the darker areas under the animals that would be more shaded, and I vignetted the wash towards the edges of the painting by allowing pigment to flow into plain water washed on those areas. I was careful not to allow pigment onto the critical white areas on the backs and faces of the sheep. I also flicked on a few spots of pigment in the foreground and then stood the painting up so the pigment dried at the bottom of each of these drops, loosely hinting at the way individual tussocks of grass are shaded. I would be strengthening the background later.
Step 4
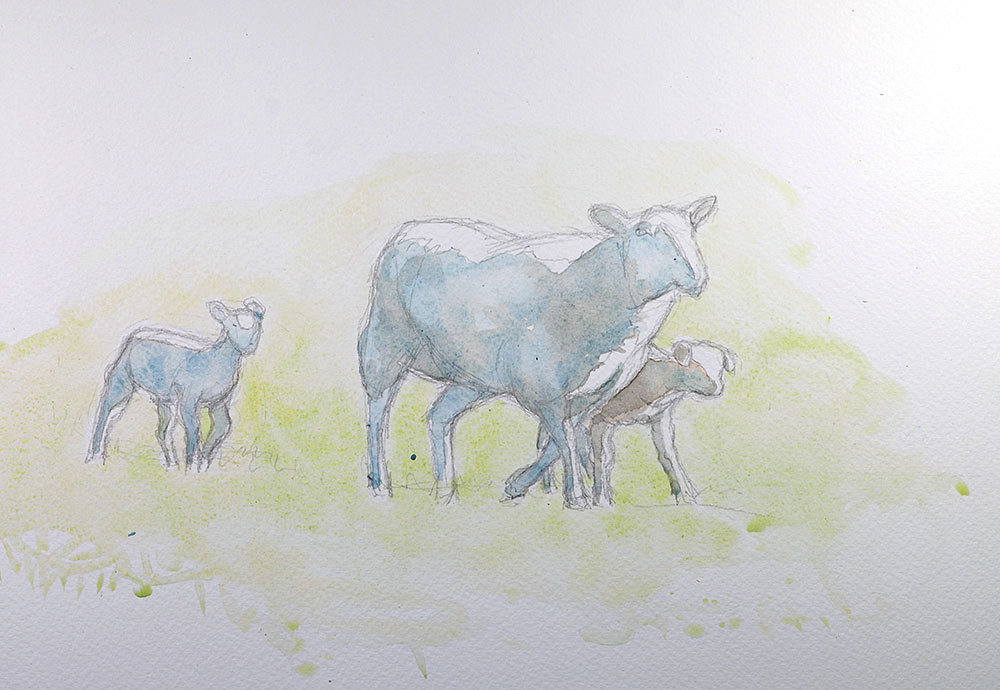
I mixed a greyish wash mostly of Cerulean Blue with a dab each of Ultramarine and Cadmium Red Pale and Lemon Yellow and, using a size 5 Da Vinci Maestro round brush laid it onto the animals, taking great care not to invade my white areas that I’ve marked out in pencil. As the wash dried I lifted out some areas I wanted paler with the semi-dried brush – I just squeezed the brush between my fingers to get most of the moisture out, lifted out the colour the washed the brush and repeated it until I was happy.
Incidentally I always have two jam-jars of water on the go, one with clean water to dilute pigment, the other for cleaning brushes so I can keep the colours as pure and un-muddied as possible. I also manipulated more pigment into the darker areas, and remembering the lamb nearest his mum was warmer in colour as he was taking light reflected from her fleece, dropped a touch of warmer grey into the wash there. I wanted the rearmost lamb to be cooler in colour to emphasise his absence from the cosy family group. I also dropped in a broken line of darker green made of ultramarine and lemon yellow to suggest the animals’ shadows on the turf.
Step 5
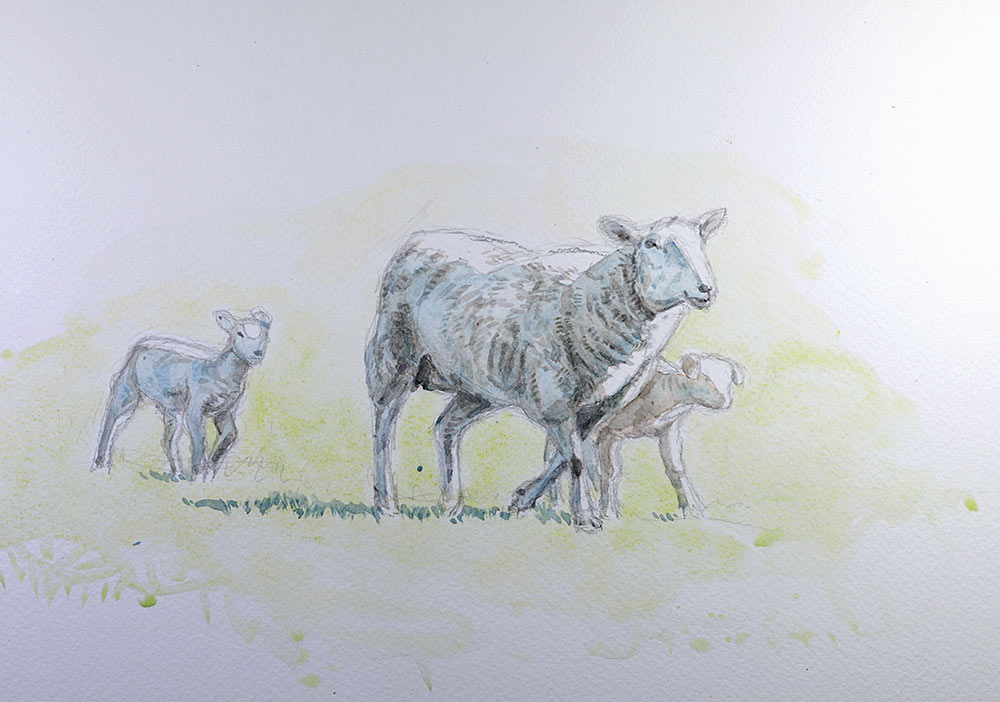
I now mixed up some darker grey from all four pigments, and with my size 3 Da Vinci Maestro round hinted at the creases in the ewe’s fleece and any other areas that needed more shadow. I always paint these kind of details sparingly and mostly in the areas I want attention to be drawn to such as around the heads and particularly the eyes. Detail is always best painted onto the mid-tones and not the very light or dark areas.
Step 6
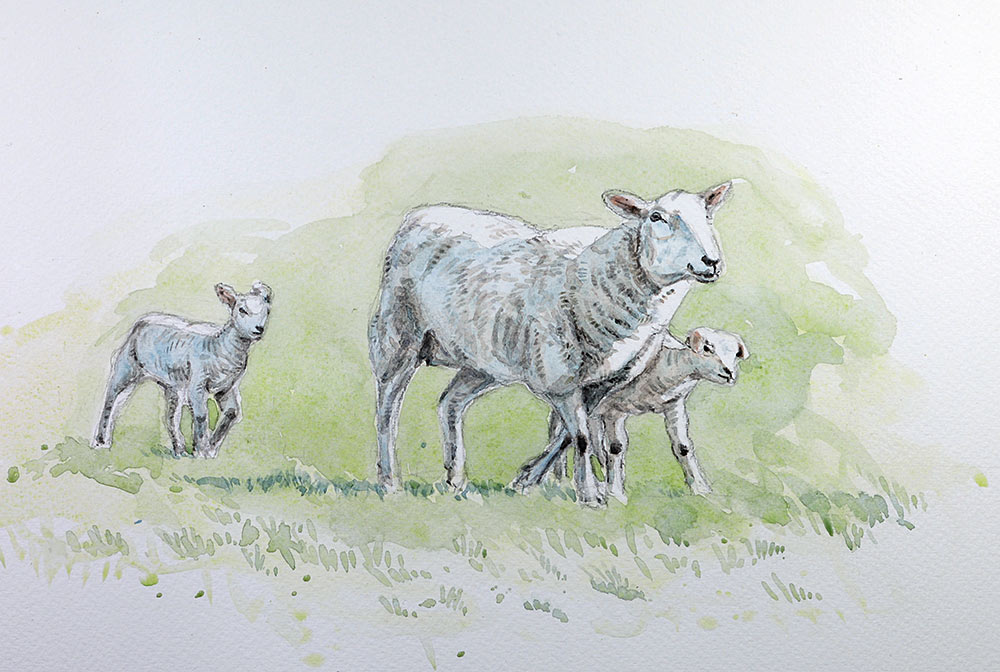
Then I laid in another wash of stronger mid green all around the group, again being careful to keep my white areas clean and hinted at grassy tussocks in the foreground with a few vertical strokes of the size 3 brush. I also added one or two extra details with a very dark mix, predominately made up with ultramarine which is a dark colour, onto the lambs’ knees and for the eyes and mouths, and then added hints of pale red on the animals’ ears.
Step 7
Finally, when I was certain the watercolour was dry, I erased nearly all the pencil marks with a soft putty eraser to reveal the clean contrast between the white areas and the green background. I made one or two tiny alterations but it’s always tempting to niggle further at this point and multiple disappointments – familiar to all watercolourists – have taught me when not to over-work and to stop, so I signed it in green watercolour and put down my brushes!


Lovely painting
I am new to watercolour and I am going to give this thank you
Really Appreciate your tutorials
Do not use gum tape upto the edge of your image. Leave a generous border 1/2 inch to 1 inch, then when you have finished your painting cut around the junction of your gummed tape and watercolour paper with a craft knife. This will leave a border of gummed tape around the extreme edge of the whole paper. Useful for strengthening the outside ege and corners until it is framed. If you really have to get rid of it trim it with scissors before you take it to the framers.
They make it look so easy. I thought that as a tutorial this is one of the best.
I absolutely loved this tutorial with every step clearly explained. I am tackling a small painting of two Herdwick sheep this afternoon! Thank you so much – the tutorial was a lovely diversion in these horrible lockdown times!
Very nice but how do you remove the gummed tape, I’ve always had a problem with that?
QUOTE: I let it dry drum tight and was confident it would stay flat after I painted on it and … WHEN CUT FROM THE BOARD.
See also : john williamson’s comment below … ; – )