
7 Oil Painting Techniques that Every Artist Should Know
If you have been experimenting with your oil paints for a while, now may be the time to take your art to the next level. Oil painting can be an incredibly versatile way of creating pictures and there are a number of oil painting techniques that can help you to vary your end result.

Before we get into those, there are three oil painting rules that you need to follow:
The 3 Rules of Oil Painting
Firstly, when painting with oils, it is important to adhere to the three rules of oil painting. These are ‘fat over lean’, ‘thick over thin’ and ‘slow-drying over fast-drying’.
This means that each layer of paint should be progressively more flexible, thicker and slow drying than the one below it. This stops the layers from cracking as you work and can be achieved by increasing the amount of paint on the brush with each new layer.
Once you have mastered the rules, you can start applying them with the different techniques:
Technique 1 – Chiaroscuro
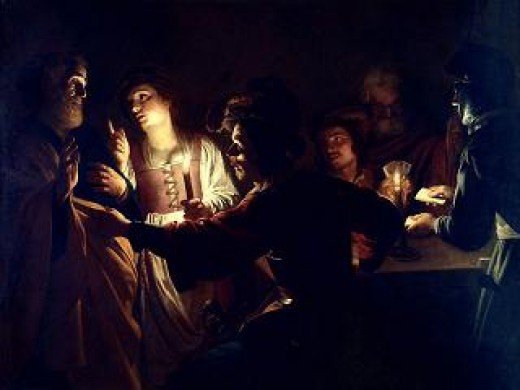
Offering a significant contrast between the lighter and darker aspects of a painting, Chiaroscuro was used a lot by renaissance artists such as Rembrant and Caravaggio. It really helps to increase the drama of a piece, pushing a subject into the foreground and creating a 3D illusion. When using this technique, it is a good idea to start with one light focus, such as a lamp, and work outwards from there.
Technique 2 – Scumbling
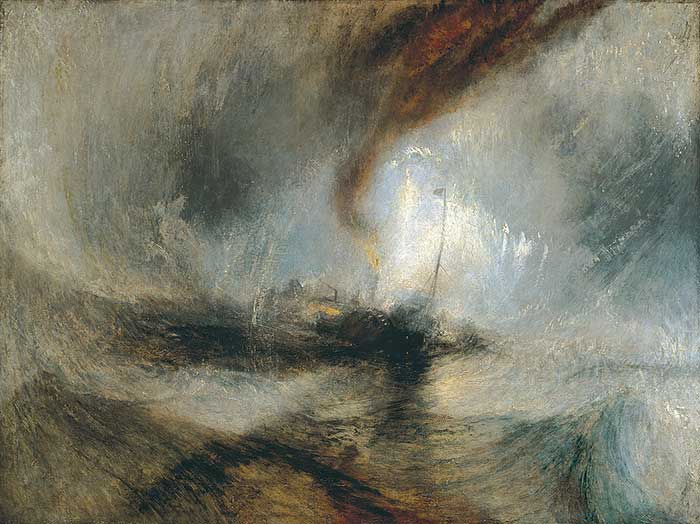
A great way for beginners to bring more texture to their work, Scumbling refers to the technique of using a dry, stiff brush to apply thin layers of paint to canvas. The result is that the image does not have a smooth finish, with some of the underpainting still exposed. Turner was a big fan of Scumbling.
Technique 3 – Alla Prima
For those artists in a hurry, Alla Prima can be a welcome technique. Painting in layers without letting the base layer fully dry, this is also known as ‘wet-on-wet’ and was favoured by experienced artists such as Van Gogh and Monet, allowing them to complete masterpieces within a single sitting.

Technique 4 – Glazing
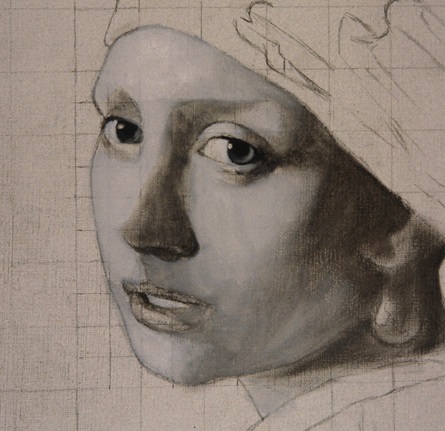
A great technique for beginners to master, Glazing refers to the use of transparent layers applied over an opaque base layer on the canvas. When subsequent layers of colour are applied, they have a glossier finish which creates an impressive multi-faceted look. Sometimes Glazing is also done over a thin paint layer to create added shine. This was an approach used by Vermeer in many of his works.
Technique 5 – Underpainting
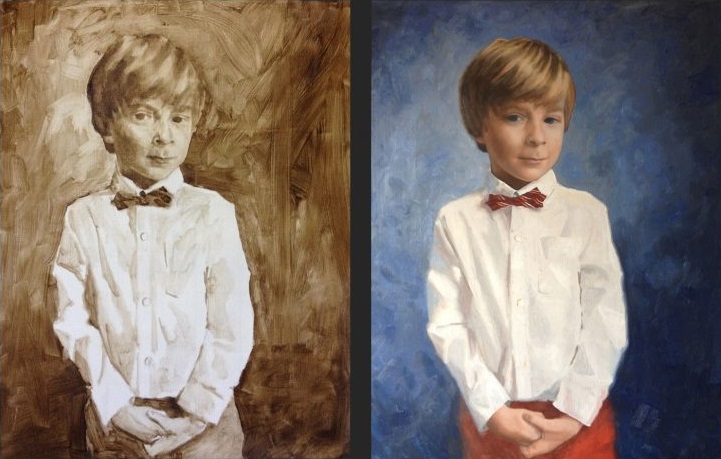
Beginners to oil painting might not like the idea of applying colour onto a completely blank canvas. Underpainting removes that fear factor, as it involves ‘sketching’ the subject in one very thin layer of paint and blocking out any background so that you’ll know where to put this later in the creative process. It is a tool used by Jan Van Eyck and Giotto.
Technique 6 – Impasto

An oil painting technique that might require a little more practice, Impasto painting was a key feature of many of Van Gogh’s works. Requiring deliberate strokes of thick paint, each mark of the paintbrush is clearly visible in the finished piece. Artists using this technique will often mix colours directly on the canvas. When using Impasto painting on significant parts of the artwork, rather than the whole canvas, it can help to make these areas more prominent. For thicker strokes, you could even use your palette knife instead of a brush.
Technique 7 – Grisaille
This way of oil painting is not as popular these days, but it was used regularly during the renaissance when portraying sculptures. The technique refers to the art of painting in monochrome, using black, white and grey to show light, dark and shading. With the huge variety of colour that is available in modern times, it has fallen out of favour, although it can be used to great effect in underpainting. Beginners may like to practice with this older skill, before moving on to bold, unpredictable colour.
Painting with oils is an exciting way to create art, offering a variety of techniques that ensures it never gets boring. One day you might find yourself painting a Scumbling masterpiece, while the next day you might prefer Impasto. Take the opportunity to experiment with these different oil painting techniques and remember to share your pictures with us on social media.


Thank you for the demonstration on glazing. I love the effect of the whole painting suddenly being joined up with this method. Can’t wait to try it out. Can I use it with water based oil paints to the same effect?
Hi Desiree. Thanks for your comment! Yes, you can use the same glazing techniques with water mixable oils. We sell a water-mixable glazing medium that you can use with water-mixable oil paints.
Love this article. Gives a sweet snapshot of the glories of oil painting. Thanks!
No problem! Glad to hear you enjoyed reading the article Anik.
I WILL BE STARTING TOMORROW AND WILL TRY THIS GLAZING TECHNIQUE. I HAVE ONLY PAINTED A COUPLE OF PICTURES BEFORE. I AM VERY EAGER TO LEARN! THANK YOU FOR EXPLAINING IN SIMPLE WAYS FOR US BEGINNERS TO UNDERSTAND. YOUR PAINTINGS ARE AMAZING!!!!
Hi Karen. Thanks for your comment! We’re glad to hear you found the blog post hepful. Hope you enjoy using some new techniques! Just let us know if you have any questions.
He empezado mi camino en la pintura,con óleo, he probado y con buenos resultados el acrílico y ahora la acuarela … Pero sin duda alguna me quedo con el óleo … Gracias por tu aportación.. es genial.. siempre aprendemos algo nuevo
I enjoyed your video. I’m at the beginning of my new hobby, oil painting. So need all the help l can get. Many thanks.
Hi Anthony. Glad to hear you’ve found the blog post useful!
Some very helpful tips here.
👍💙
Thank you so much for the wonderful lecture, we have learnt a lot from this. We will continue to tune in. Thanks
The technique you provided was very helpful. Thank you 🙏
I am new to oil painting and all of the information you provided was extremely helpful. I appreciate the effort you put into your work. Thank you.!
An excellent display and explanation of painting methods. As someone who has no education in art but simply enjoys doing it, I seek these things out.
Very helpful just come back to oil painting after many years
Thank you
Just started oil painting and found the bullet points of technique very helpful.
Same problem with some cleaning materials. Important to let them air, dry, and not pack down. The fire in the Wellington pub some years ago was caused by a pile of wet tea towels which spontaneous combusted .
I am lucky that I can add small bits to the woodburner.
Very good article. I’m wondering how other artists safely dispose of rags or paper towels that have anything flammable on them.
I always thought glazing was laying a thin layer of transparent paint over a dryish initial painting.. and that the under layer could be as opaque as you like… very thin and often scrubbed off to make even thinner, leaving paint in the brushmarks for texture.
Hi Mark, you are indeed correct. I have corrected that paragraph which should have said the transparent layers go over an opaque base layer.
how does that not crack on drying? would the medium be fairly thick?
Hi Susan. You shouldn’t have a problem with cracked glazes if you create your glazes using something like Blending and Glazing Medium. By using these mediums you’re essentially increasing the fat content of your paints, and so still working with the fat over lean principle. We have a video of on Using Oil Paints with a Glazing Medium on our Youtube channel that show this technique in practise.
Enjoyed very much thank you!
Very useful and to the point
An excellent display and explanation of painting methods. As someone who has no education in art but simply enjoys doing it, I seek these things out.
Thank you for the tuition. Excellent.