
The Magic of Derwent Inktense
Inktense pencils and blocks offer great versatility – use them dry like a colour pencil or bring the pigments to life by using them with water. Once they become activated and left to dry the colours become permanent allowing you to safely layer them many times. Their permanency and solubility makes them fabulous for using on their own to create loose punchy watercolour paintings. I have created this tutorial and video using Inktense pencils and paper, I hope you enjoy painting along!
What are Inktense?
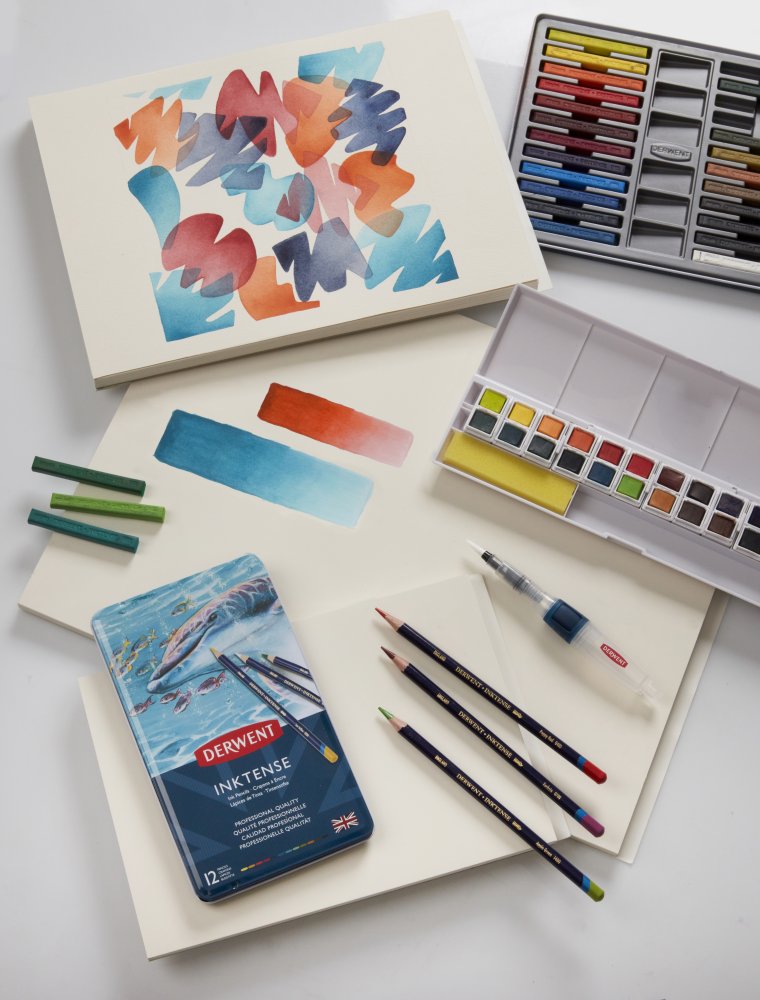
Derwent Inktense pencils are intensely vibrant, watersoluble pencils that have been formulated to dry permanently. They offer exceptional layering capability without dissolving previously dried layers of vivid colour. Colours are highly-pigmented and can be used dry, or mixed with water which is when the colour becomes even more intense. The colours retain vibrancy after drying, creating ink-like effects. Derwent Inktense can be used happily on traditional surfaces such as watercolour or mixed media paper. They also perform well on alternative supports such as wood, fabrics and some ceramics. They are ideal for using with other products to create multi faceted mixed media projects.
Derwent have created a wonderful Inktense Pad made of 100% 140lb cotton cold pressed sheets specifically for the pencils. The pad boasts archival quality natural white paper, designed to maximise the colour vibrancy of the pigments and withstand multiple layers.
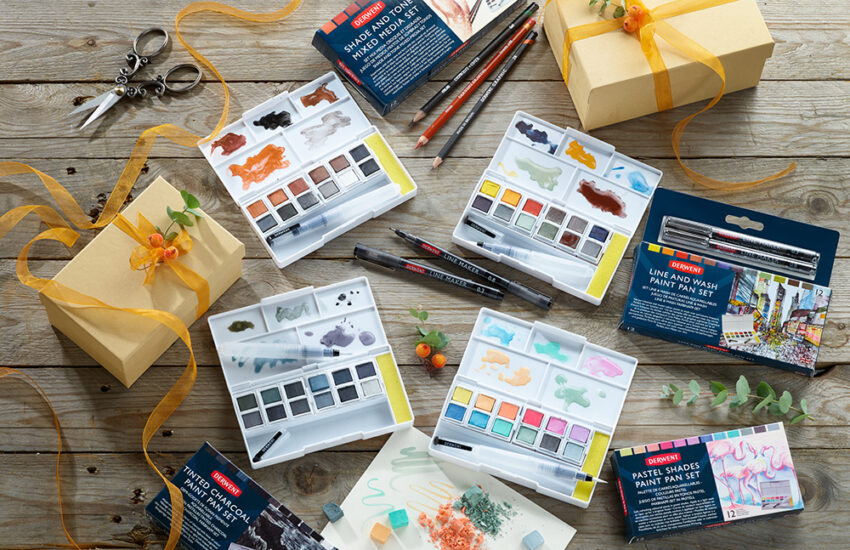
Materials needed for this tutorial
- Reference photo – ‘David Clode’ – Unsplash
- Line Drawing – Supplied so you can get to the fun bit … feel free to freehand if you wish
- Derwent Inktense Paper 12×16” (can also be substituted with a good quality heavy duty HP/NOT watercolour paper or mixed media paper)
- White Uniball Signo UM-153 (or similar ie Posca, Paint Pens etc)
- Inktense Pencils – Feel free to substitute with whichever colours you have. Inktense pencils can be optically mixed on the page (i.e. blue over yellow will give you green).
Ink Black | Antique White | Sicilian Yellow | Sherbet Yellow |
Spring Green | Apple Green | Hookers Green | Ionian Green |
Dusty Purple | Deep Rose | Willow | Madder Brown |
Dark Chocolate | Sepia Ink |
- Brushes – I find synthetic brushes work better with Inktense products … particularly brushes with a strong snap and spring. For this project I’m using a round in sizes 2 & 6 and a 1/2″ flat. Use whatever brushes you are comfortable with and suit the scale of your painting.
Note if you don’t have inktense pencils but have Derwent Inktense Blocks they are interchangeable … just maybe go bigger.
Techniques for using Derwent Inktense pencils
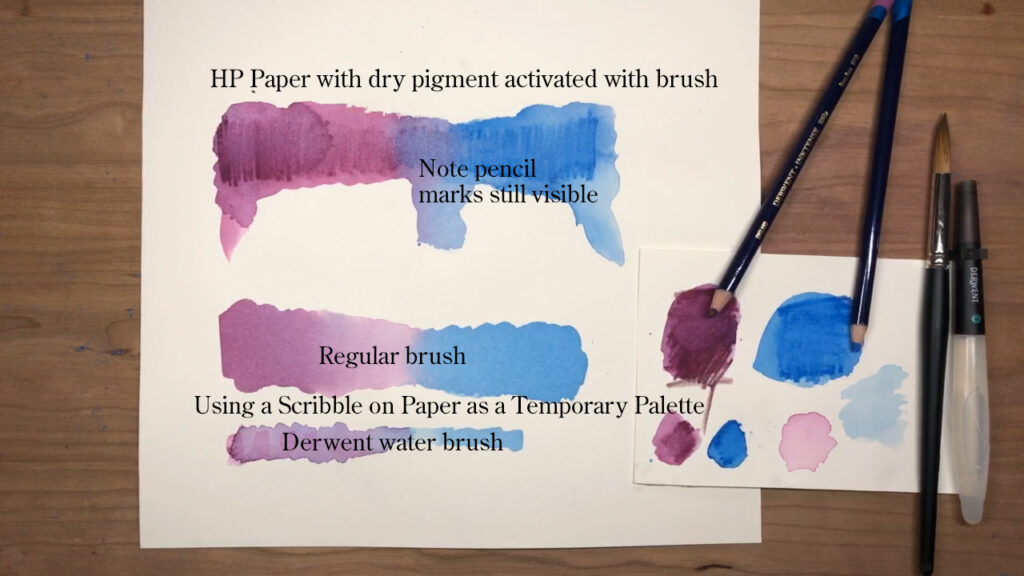
1. Directly wet the dry pigment that has been applied to the support to activate with water. Derwent waterbrushes are an ideal companion to activate, dissolve and spread the dry pigment. They come in a range of sizes and are fabulous for en plein air or simply taking along to your local art group in your bag.
2. Apply a wet brush to the tip of the pencil to pick up some colour and transfer to the canvas … great for early layers.
3. Use a piece of paper as an impromptu palette. Scribble heavily on a piece of paper or card and then lift the pigment off with a damp brush. You can mix colours this way too!
4. Grate the core pigment into a small pot and activate with water.
5. Apply the pencils directly to the surface and leave dry or activate with water.
Lifting the pigment from the tip of the pencil or creating a temporary palette in the early layers allows more control and blendability of the inktense colours. Going in with a dry pencil too soon can lead to a grainy and patchy look as the dry pigment is not often dispensed and activated evenly. It can also clog up the tooth of the paper resulting in fewer layers and a duller drawing.
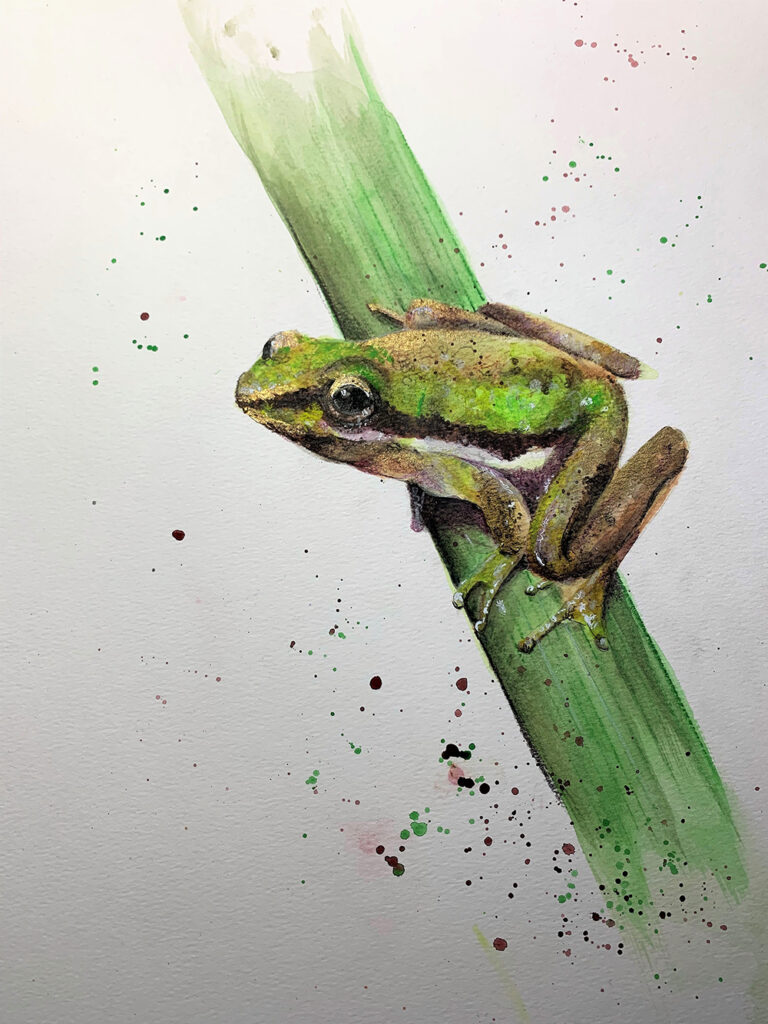
The tutorial
Step 1- The basic wash
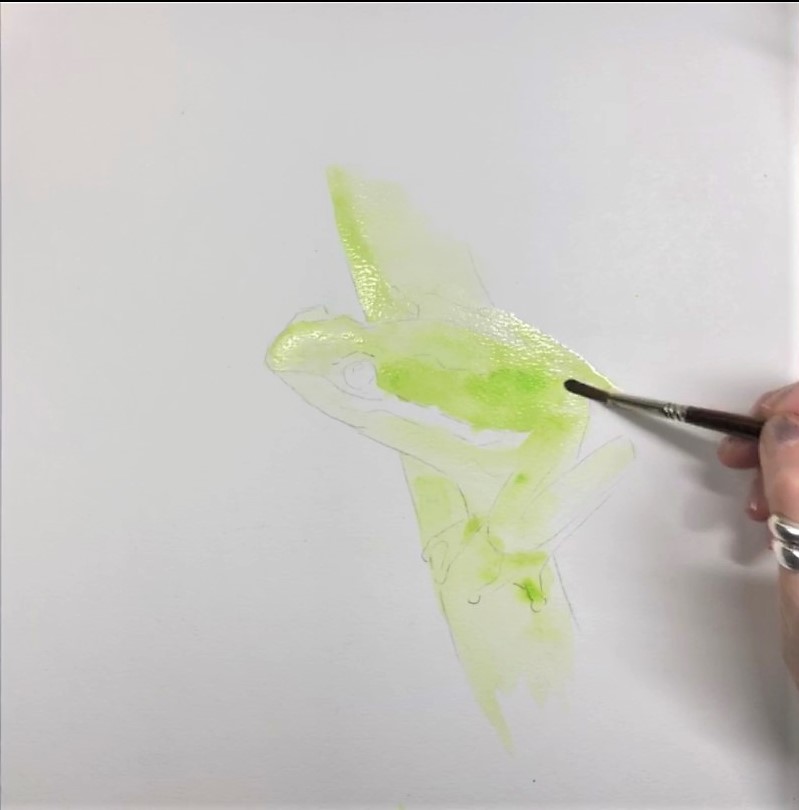
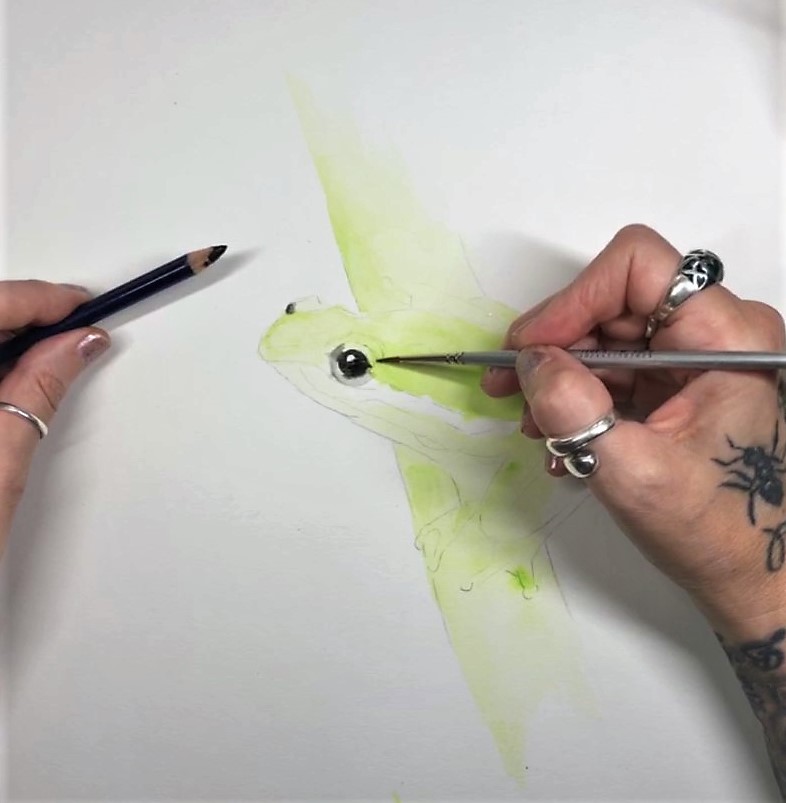
Transfer the line drawing onto your paper. If the lines are a little dark, knock them back with a kneadable eraser. If your pencil outlines get locked beneath any of the activated layers of dried ink they will not lift off later. With a large, round damp brush pick up the pigment from the tip of the Apple Green pencil. Create a light wash background to the frog as an underlying and unifying colour for your painting. Take care to preserve the eye and the white stripe along the body.
Continue the colour along the length of the foliage and fade out the pigment towards the top & bottom with clean water. Keep the pigment moving and your working area ‘wet’ to avoid it drying with hard lines. Whilst wet, drop more pigment into the wash on the frogs body and head to begin suggesting texture. Leave to dry. If any areas of the wash are too dark at this point use a thirsty brush to lift colour away before it dries. Once the wash dries it will remain permanent and you wont be able to move or lift the ink.
Step 2 – Rendering the eye
Begin adding colour to the eye using the Ink Black pencil and a smaller brush lifting pigment directly off the pencil. Pay close attention to creating crisp edges around the eye, leaving the lightest part of the eye as paper. Take your time to build up the tone and shape of the eye by increasing the amount of pigment used and decreasing the amount of water on the brush. Then with a weaker watery wash add some definition to the shadows below the eye. Allow the lighter shadow area to touch the darker eye wash in places this will unify the two and make it look more organic.
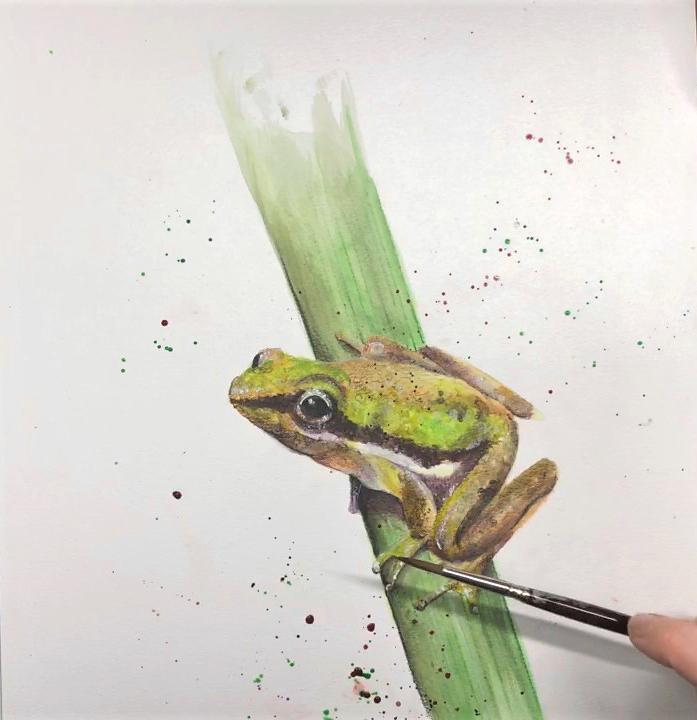
Image 3 – Frog stripe
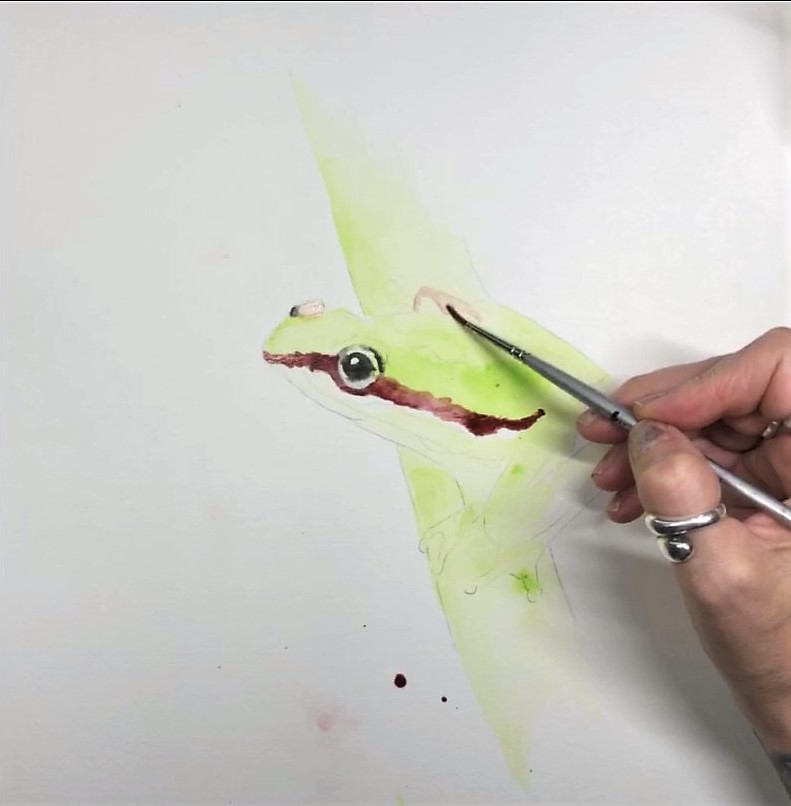
With an Ink Black pencil and brush, use a weak wash and begin to create definition around the top of the eye. Pay close attention to your reference. Add a suggestion of colour to the base of the furthest eye then use clean water to drag and fade out the colour towards the top.
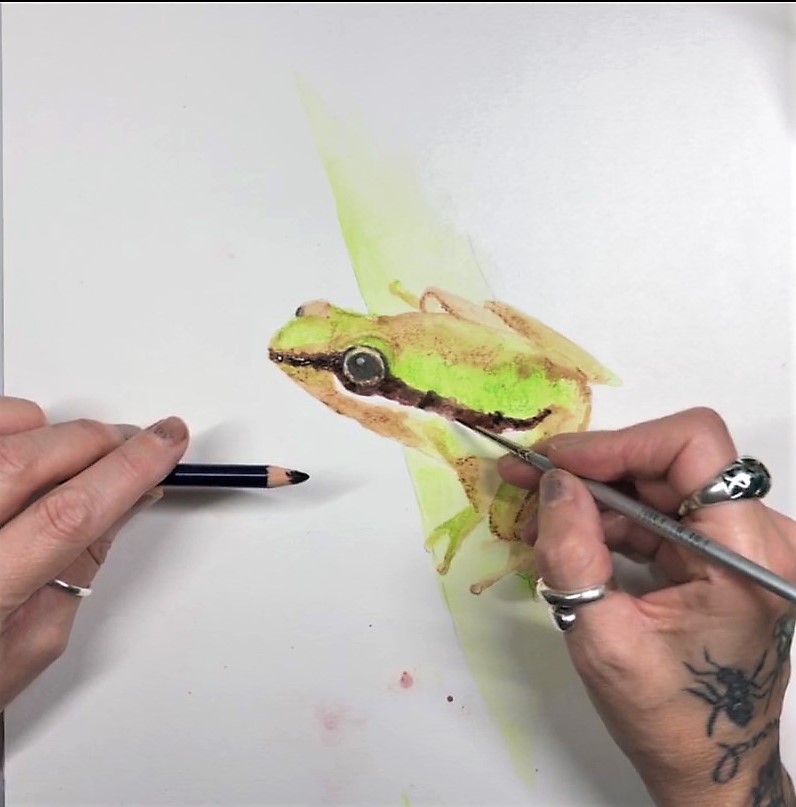
Next grab the Madder Brown pencil and create a wet variegated wash down the frog to suggest his lovely stripe. Use little scumbly brush strokes dragging your colour with you to create interest and texture. Pay close attention to where that colour is on your reference. Vary the intensity of the pigment creating dark and light areas within the stripe. Use a very weak wash of the Madder Brown to suggest form and shape on the back leg.

Step 4 – Soft shadows
Continue adding gentle shadows and areas of contrast with the Madder Brown around the eye, throat, body and feet. This will build up the frogs definition and form. Take your time and enjoy the process, gently layering and looking for lost and found edges. This is the ugly phase! Everyone’s painting will look pretty untidy and disjointed at this point, but that’s OK … just keep going. Concentrate on building up the foundations and shapes of your frog … the aesthetics will come later. Leave to dry.
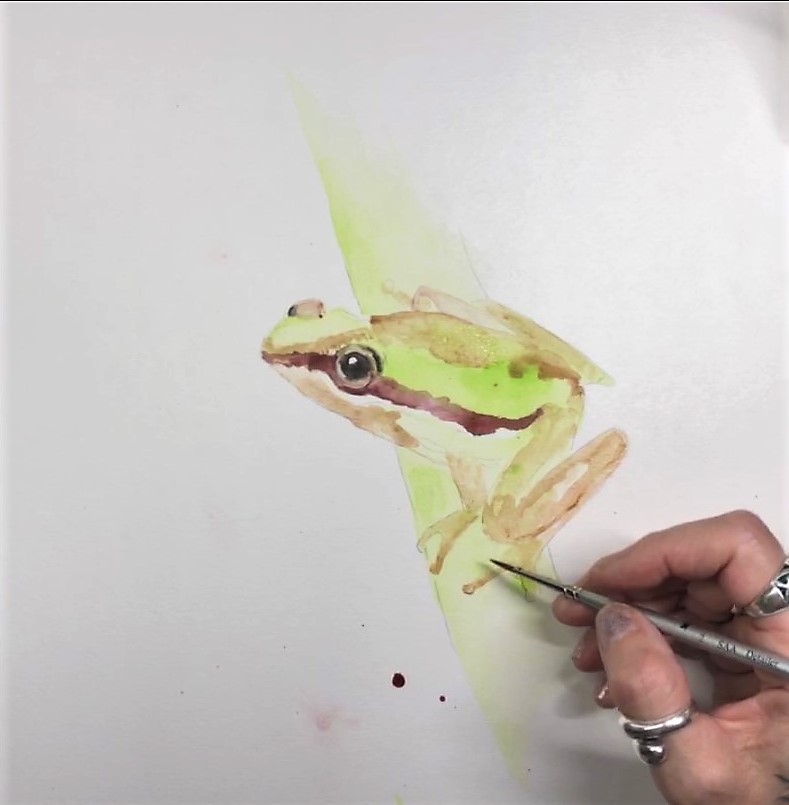
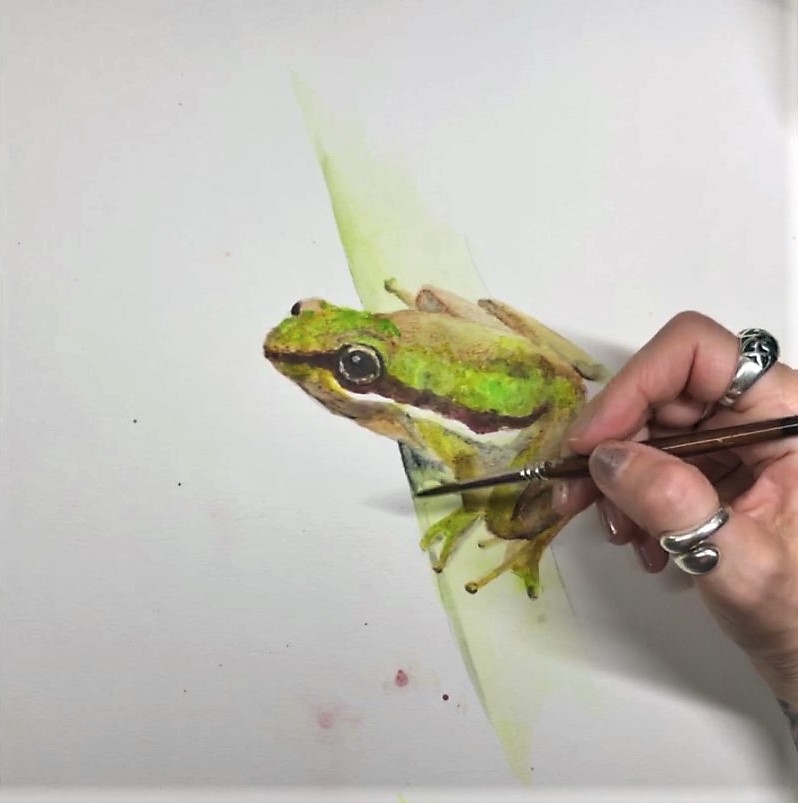
Step 5 – Greening the frog
Time to start creating a bit of texture and fleshing out your frog. Grab that Apple Green pencil again and start creating texture directly to the paper on the frogs skin. Suggest the shapes and marks that you see on the green areas of his head, side, legs and feet. Then take the larger round brush and activate the pigment smoothing out some of those marks. Try and keep your bush strokes loose and varied and always try to follow the frogs form. This will help to create the illusion of a 3D element and give your little chap body & presence. Allow some of that colour to layer over the browner areas of the frog to unify the piece. Leave to dry.
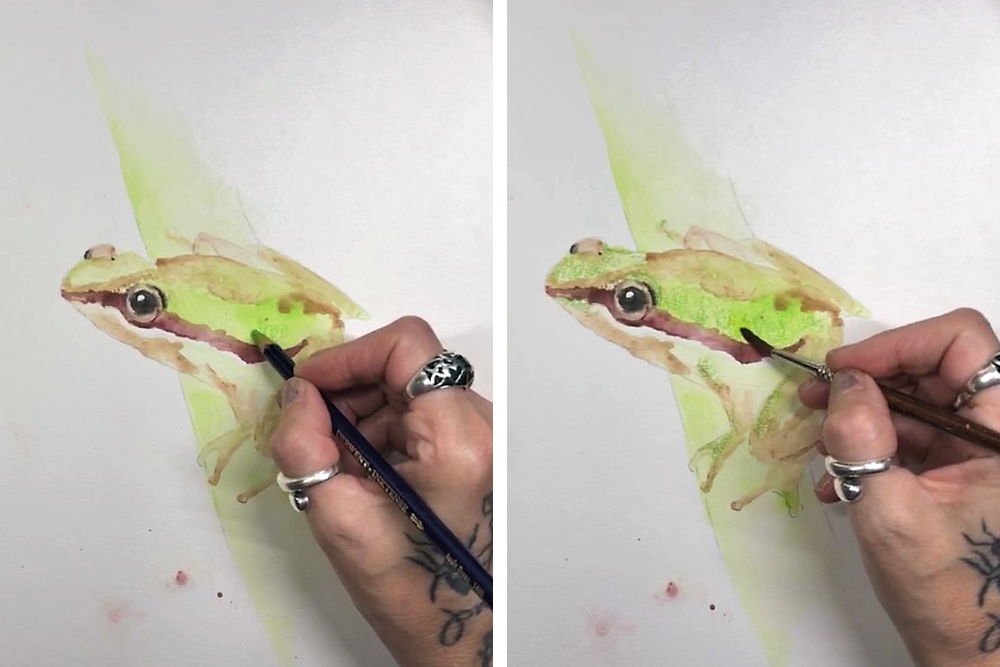
Step 6 – Adding form & texture
By now you should have the basic foundation of the frog and colour patterns marked out on your frog. So now we are going to make those colours more punchy and textured. Using the larger damp round brush lift the pigment off the Apple Green pencil and begin stippling his skin using a fairly concentrated mix. Look closely at his markings and how the light reflects on his skin. Try to loosely emulate what you see with the brush. Dropping concentrated pigment off the brush into small pools of wash will give you little hits and speckles of colour. Feel free to switch between the different green and yellow pencils, and altering mix consistencies (watery to strong) as you see fit. Darken down the eyes and the stripe with the appropriate pencil if you feel your frog needs it.
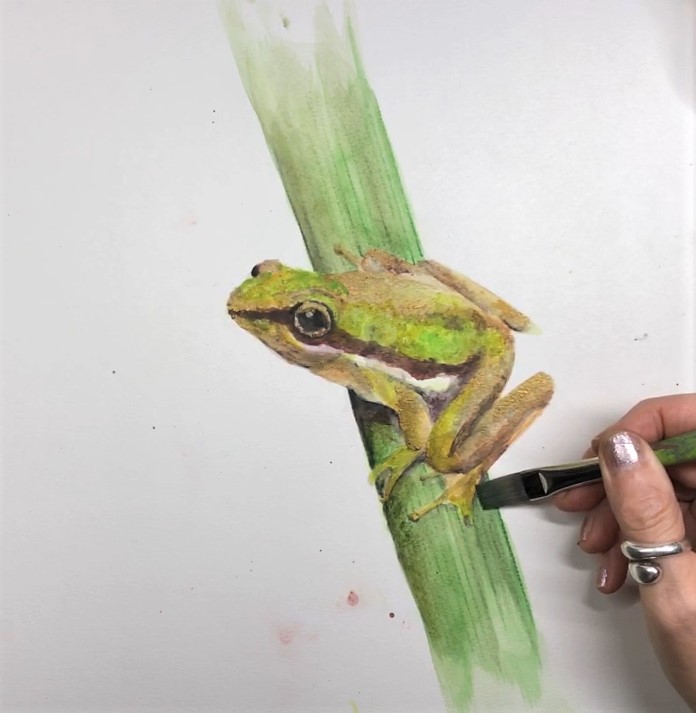
Step 7 – Shadows
To create the illusion of depth we need shadows. The cast shadows created by the frog on the reed is painted in with a weak wash of Ink Black. More colour can be dropped into the wash once its established. Follow this with the shadows on the frog using a Ink Black & Madder Brown mix (double dip with the brush on each pencil or scribble on a piece of paper to create a mini palette and activate). Be sure your frog is bone dry before you attempt the shadows! Look closely at the angle and shape of the shadows and paint what you see. Finally in this layer, drag some shadows along the left hand edge of the reed and feather it out as it comes towards middle with clear water.
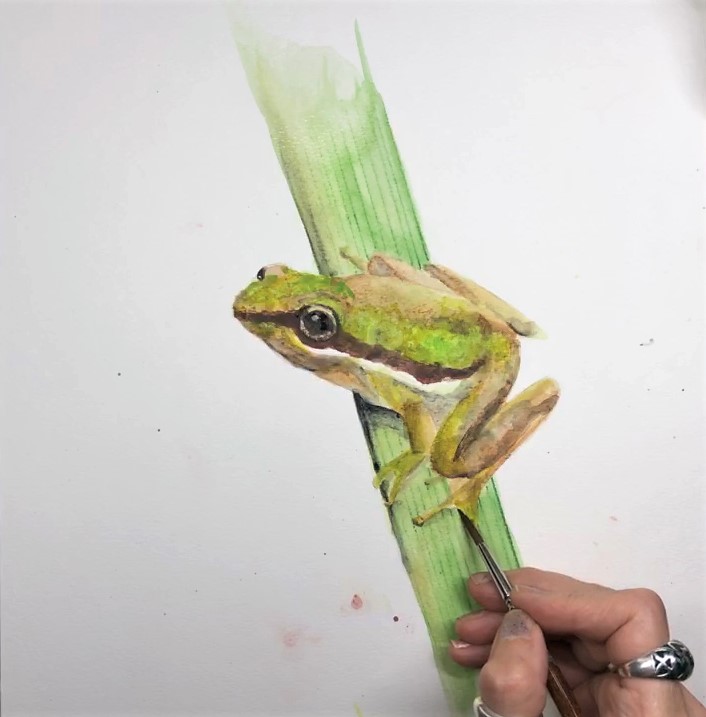
Step 8 – Starting the reed
We don’t want much detail in the background as we want our Frog to be the star of the show. However, we do want to build on that illusion of depth so we will now create interest on the reed.
Draw some lines along the length of the reed (avoiding the frog) using a Hookers Green pencil directly onto the paper using a ruler.
Switch to the Ionian Green towards the left side of the reed where it’s darker. Keep your lines at an equal distance and all running the same way. Using a wet brush (no6) to activate the pencil, move the pigment to create the shape of the reed (the lines will still show through). Drop in various browns and greens along the length to create interest and colour. Feather out the top and bottom with clear water. Leave to dry.
Step 9 – Creating depth
Revisit the shadows on the reed using the same process as before. Darken down areas under the body and those cute little toes using the smaller brush to take the pigment directly from the pencils. Pay close attention to the shape of those shadows and lost and found edges.
Step 10 – Creases & flexures

Continue to the body using mixtures of Madder Brown and Ink black in the shadows, crease and flexure’s to dial up that contrast and really start to bring your frog to life. Leave to dry
Image 11 – Flat brush
Switch to a flat brush to finish off the reed and create the illusion that the frog is just about to leap off. A flat brush is great to mark make at this point and it gives you a strong bold ‘edge’ to work with.
For larger areas you can continue to pick up the pigment from the tip of the pencil, or you may consider;
a. Grating the pigment into a palette and adding water to give you a conventional ink to dip your brush into
b. Scribbling the colour onto a piece of watercolour paper, activating and lifting from there (thus creating a temporary palette)
Either way, use a variety of greens and browns to suggest form and interest along the length of the reed. Pay close attention to the colour change along its curved surface and where the light and shadows fall. Leave to dry
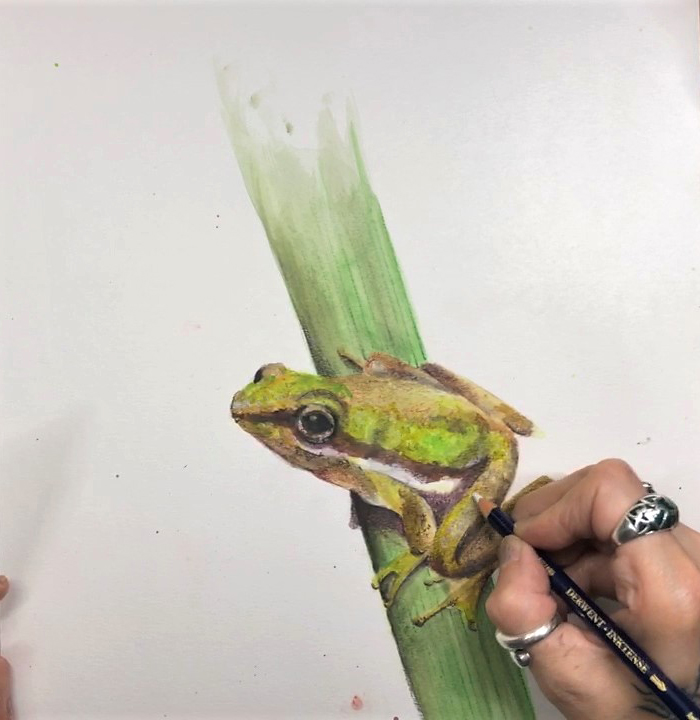
Step 12 – Warming up the shadows
Sharpen the Deep Rose pencil and add colour and definition directly to the paper on belly of the frog. Use a light loose scumbling action. Try to think of this application as mark making, not colouring in! Less is often more as once activated, the Inktense purples are very vibrant and powerful colours and you can always add more later but you can’t take it away. Warm up the shadows around the chin and legs in the same way and then activate and leave to dry.
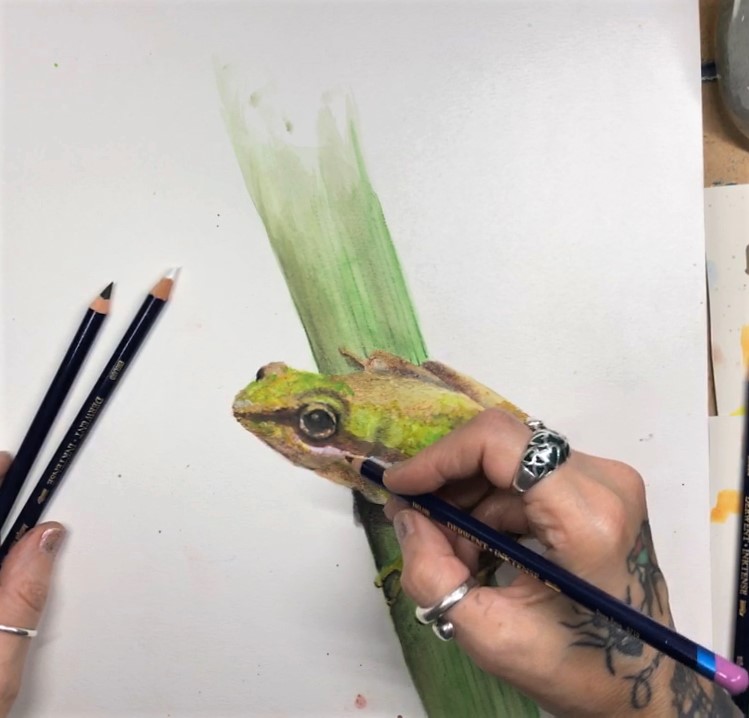
Step 13 – Final froggy flourishes
From now on in, the Inktense pencils will applied dry, directly to the paper and not activated. Use the colours to accentuate the markings and contrast on the frog. Use the white to re-establish his white stripe and the glistening wet areas of his skin on his legs and feet. Ramp up the contrast with the Dark Chocolate pencil in the darker areas. Then loosely suggest the dark liver spots on back.
Step 14 – Gel pen highlights
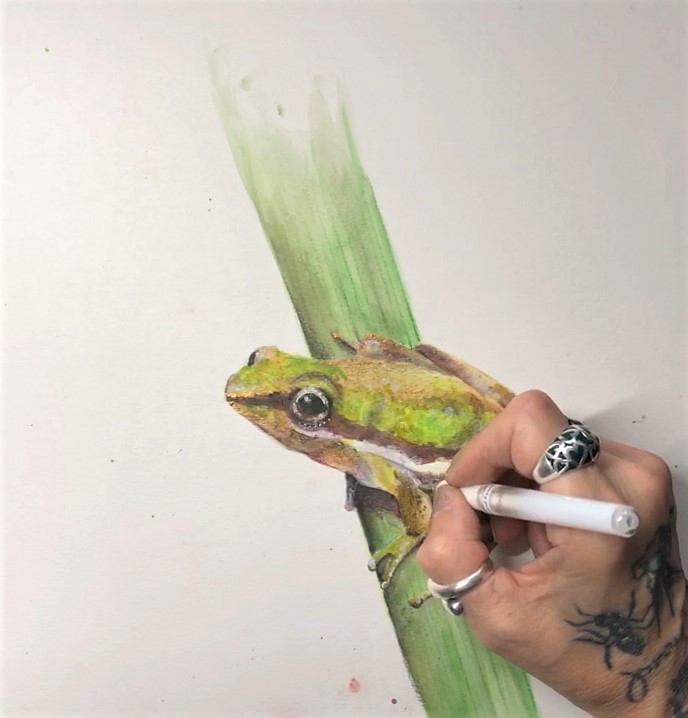
Once happy with the texture of his skin and your contrast, switch to the gel pen (or white marker) and add a few of the brightest highlights and marks. Pay particular attention to his eyes. Less is more !
Step 15 – Splattering
Splattering is another great Inktense technique and on our frog we’re using both the Madder Brown & Hookers Green. If you haven’t splattered before, try it out on a spare piece of paper before you commit.
To splatter take a very wet brush (No 6) and simply collect the pigment directly from the pencil. Then position the brush over your work, and splatter by gently tapping the back of the paintbrush. For larger pieces of work consider grating the pigment into a pot and adding water to create an ink mix. If the pot has a lid this mix can be saved for other paintings.
Splatter as much or as little as you like. Feel free to change the splatter colours to whatever you’d prefer to use… Good luck!
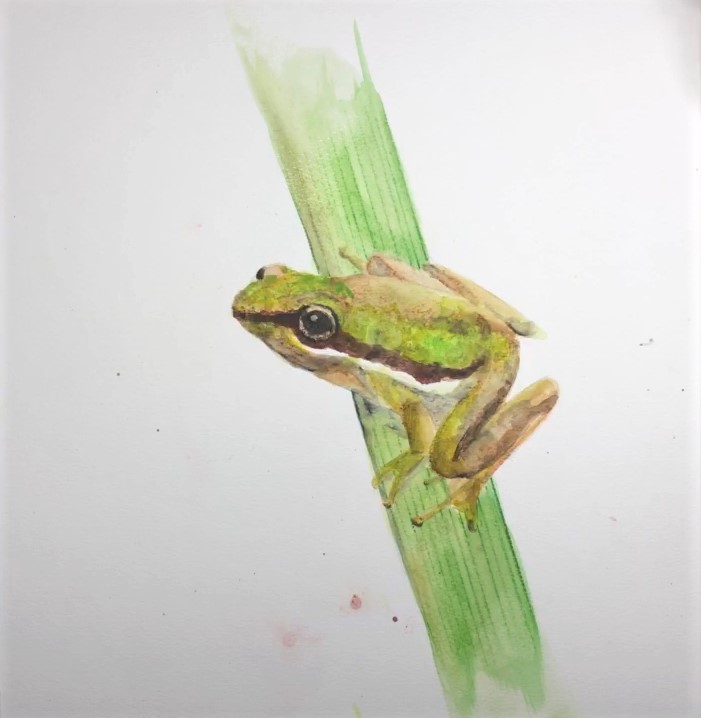
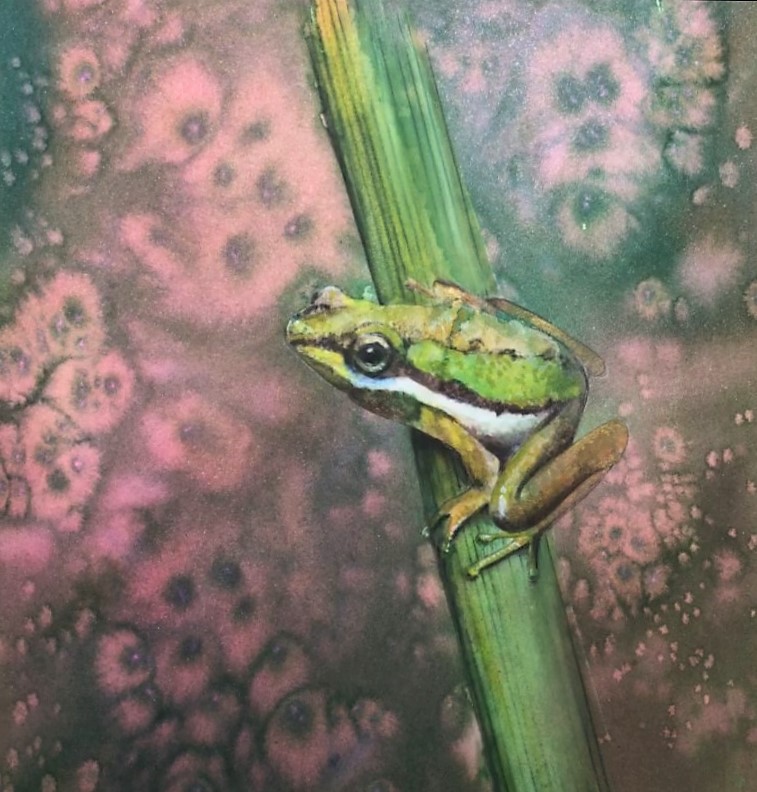
Here is the same frog with two different finishes…
Watch the video
I have created a time lapse video for the frog tutorial which you may enjoy watching
Bonus video
Inktense are a fabulous versatile pencil, great on their own or with mixed media. Mixed media processes used within this bonus video include;
- Derwent Charcoal
- Derwent Paint Pens or Posca pens can be used
- Derwent Metallic Pencils
- Acrylics (on canvas)
- Clear Gesso
- Pyrography(On Wood)
Materials used in the bonus video
- Saunders Waterford HP Paper 300gsm-140lb
- Canson XL Textured Mixed Media Pad 300gsm-140lb
- Mixed Media Paper 300g-Acid Free
- Derwent Inktense Paper 300g-140lb
- Wood panel
- Loxley Canvases
- Derwent Waterbrush
- Derwent Grate & Shake
- Assortment of synthetic brushes


This is a wonderfully detailed presentation.
One of your captions implied that the pencil marks will stay visible. Not true. In depends on the technique (hard vs soft strokes), the kind of paper (external sizing vs not), and the brushwork.
Amazing. I wasn’t unsure how to use them before I’ll now definitely have to get hold of these Derwent intense pencils or blocks. Thank you for tutorial.