
Old Frames for New Art
Three years ago, as a volunteer at St Catherine’s Hospice, I initiated the reuse of second hand frames for original paintings and photographs donated by local artists. Branded ‘In the Frame’, it has gone from strength to strength. With over 700 framings completed I am going to share with you some tips which may help you save some money on your next project.
Start with a frame not a painting!

It is essential to get a frame that complements your painting. I recommend having a frame in mind before you start painting as it can prove to be a more cost effective way of framing your artwork. Second hand frames with or without artwork are often found in charity or antique type shops. You can re-purpose these frames by removing any old paintings and then buying a new canvas board or another alternative surface to fit the frame. The high street is a great place to find new frames, they often sell framed prints which can be removed and replaced with your own painting!
Tips on selecting a frame
The size of the frame should allow for a uniform border of 3cm – 6cm. Bigger mounts just use more material in my case, but some people do like that look with the right painting. Unequal borders are possible if it suits the subject and looks ok overall. Equal top and sides with a wider bottom edge can look very effective too. Style and condition complete the picture. I prefer simple profiles with flat faces and square edges but not exclusively.
Fettling the frame

If you are happy with the profile of your re-used frame there are ways of completing the look. Minor scratches and dents in wood frames can be remedied with care and practice. I might use fine wire wool and Danish oil, wax sticks to fill indentations, damp cloth and iron to lift light dents or cut the surface back more and refinish! It’s all about trial, error and experience.
If it is a silver or gold finish, anything but a tiny scratch will render it unusable. Try using Treasure Gold to disguise minor scratches. If all else fails, virtually any surface can be painted successfully. I use two coats of Frenchchic Al Fresco furniture paint or you could use Liquid Leaf or Liquid Metal for a metallic finish. For wood surfaces I will give a light sanding with 240 grit paper and most other finishes a good rub with medium grade wire wool or sugar soap, if preferred. Imperfections can be filled with fine surface filler.
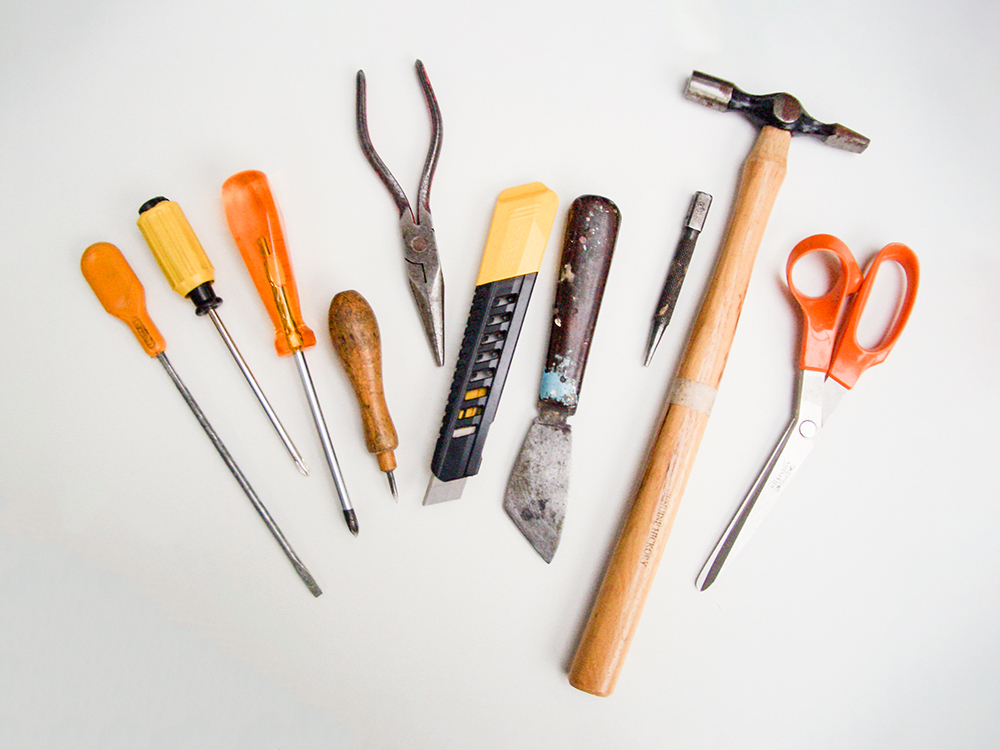
Dismantling the frame
The mechanics are not that difficult. The only tools I need are a couple of cross head screwdrivers, a straight head screwdriver, some long nosed pliers, a bradawl, a Stanley knife, scissors, a nail punch and small hammer and a stubby bladed putty knife (optional but handy). I haven’t yet found a frame that I can’t dismantle with the straight bladed screwdriver and long nosed pliers. Disassembly is intuitive but be careful with the glass! Removing different backboard fixings is a skill you learn on the job.
Prepare a mount
To prepare the painting for framing, the mount is crucial. You may be lucky and be able to reuse an old one, but unlikely. Colour depends on the frame, the picture and personal taste, a good standard bet is an ‘off white’. For a new mount you can buy ready-made (not easy), get a framing shop to cut you one, or buy your own mount board cutter and mount board sheets. If you are cutting your own don’t waste money on a cheap cutter. I have a Logan Compact Elite and couldn’t manage without it. All the instructions for use come with the product.
Assemble the frame
First I clean and polish the glass with lint free cloth.
Then I secure the painting to the mount using self adhesive framing tape or masking tape.
The hardest part on final assembly is ensuring there are no specks of dirt showing under the glass. Persevere until it is perfect.
Refitting the backboard depends on the fixings. If you are lucky the old frame will have fold over tags. If not I collect and reuse arrow headed flat tacks which I tap in with the nail punch, supporting the side of the frame as I do it against my thigh (works for me!)
Tape all round the back-board-to-frame join to keep out dust etc. and give a professional look.

For hanging I almost always use D-rings, securely screwed one third down the sides of the frame, and good quality cord or picture hanging wire tied to the rings with the cord ends taped over.
Re-sizing frames
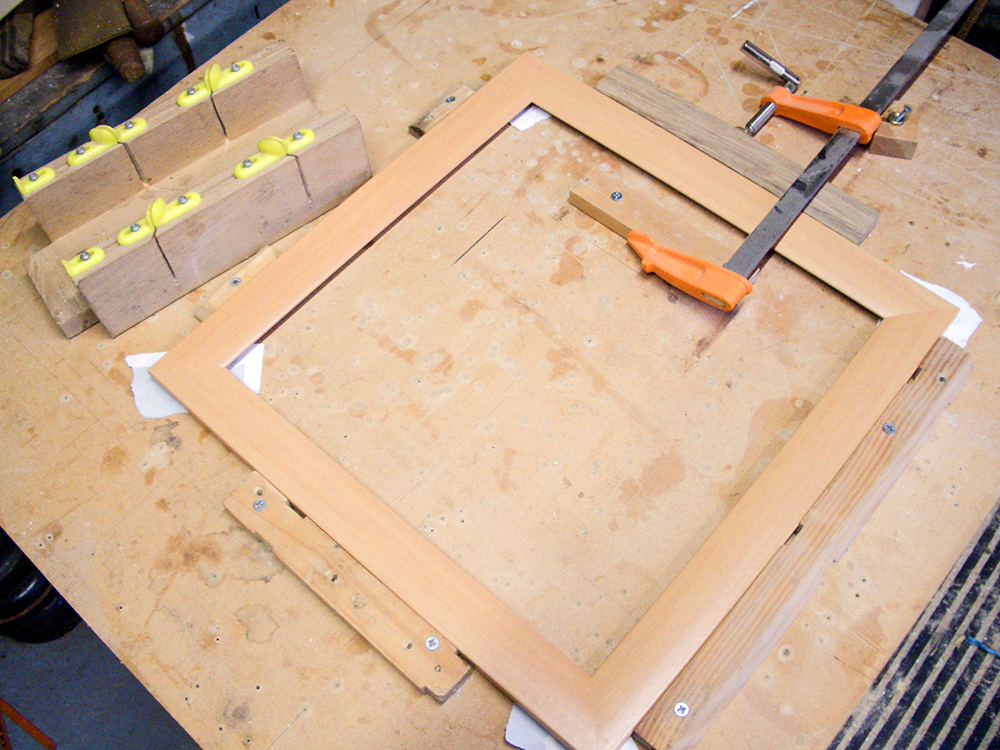
Finally, for those who feel confident, resizing of frames is possible with basic tools and practice. Use a tenon saw to cut mitres where required. A basic and inexpensive mitre box will ensure the correct angle. Lay the separate pieces on a thick, flat wooden board and use small wooden blocks screwed to the board to restrain three sides squarely in position. Use a thin paper to stop glued corners from contacting the restraining blocks or the base board. Apply epoxy adhesive (Araldite) to the new mating corners. Apply pressure on the fourth edge of the frame (pulling against a reaction block as shown). Clean off surplus adhesive before it dries.
Following the sad death of my wife I started volunteering at St Catherine’s Hospice. Very few of the many picture frames donated, with or without content, were readily saleable. Those that were saleable commanded a very low price. By inviting local artists and photographers to donate their work, matching it to donated frames and then re-assembling into final product, I was able to produce a ready-made and distinctive product at zero cost.
St Catherine’s adopted the idea and put their professional stamp on it, branding it ‘In the Frame’. Since its inception in 2019, over 500 framed paintings and photographs have been sold. The initiative has raised thousands of pounds for the charity’s specialised end-of-life care, which is provided at the hospice in Lostock Hall and in people’s own homes across Central Lancashire.
All the paintings are originals and finished products are competitively priced. ‘In the Frame’ is constantly in search of new event opportunities and artists and photographers willing to donate their work, if you can help please contact their trading team: 01772 313063 / [email protected].


Please can you supply information for your project. I support Cancer Research exhibitions in Cornwall.
I look forward to hearing from you.
Hi Barbara. The initiative is run by a Peter Frankish who is a volunteer at St Catherine’s Hospice. Here is a link to the initiative’s web page https://www.stcatherines.co.uk/shop/products/in-the-frame/ which includes a contact email address and telephone number for more information.