Derwent Chromaflow Fox Fur Tutorial
Artist Rosie Wallace shares this tutorial on how to recreate fox fur using Derwent’s new beginner pencil range ‘Chromaflow’. Chromaflow’s high pigmentation mean that they are beautifully vibrant even on dark surfaces. To illustrate this Rosie has selected Canson Mi-Teintes Touch paper in black for this step by step study.
Materials needed for this tutorial

- Derwent Chromaflow pencils (available individually or in sets) specific colours used have been highlighted in bold and listed here:
| Peach Sand | Spice | Redwood | Natural Brown |
| Coffee Bean | Parmesan | Black | White |
| Lavender Ash | Platinum | Red Storm | Slate Grey |
| Raisin | Melon | Sun Yellow | Sunflower |
| Golden Sun | Mango | Silver | Brown Sugar |
| Burnt Sienna | Autumn Blaze |
- Canson Mi-Teintes Touch (available in full sheets or in pads)
- A light coloured pastel pencil
- A kneadable eraser
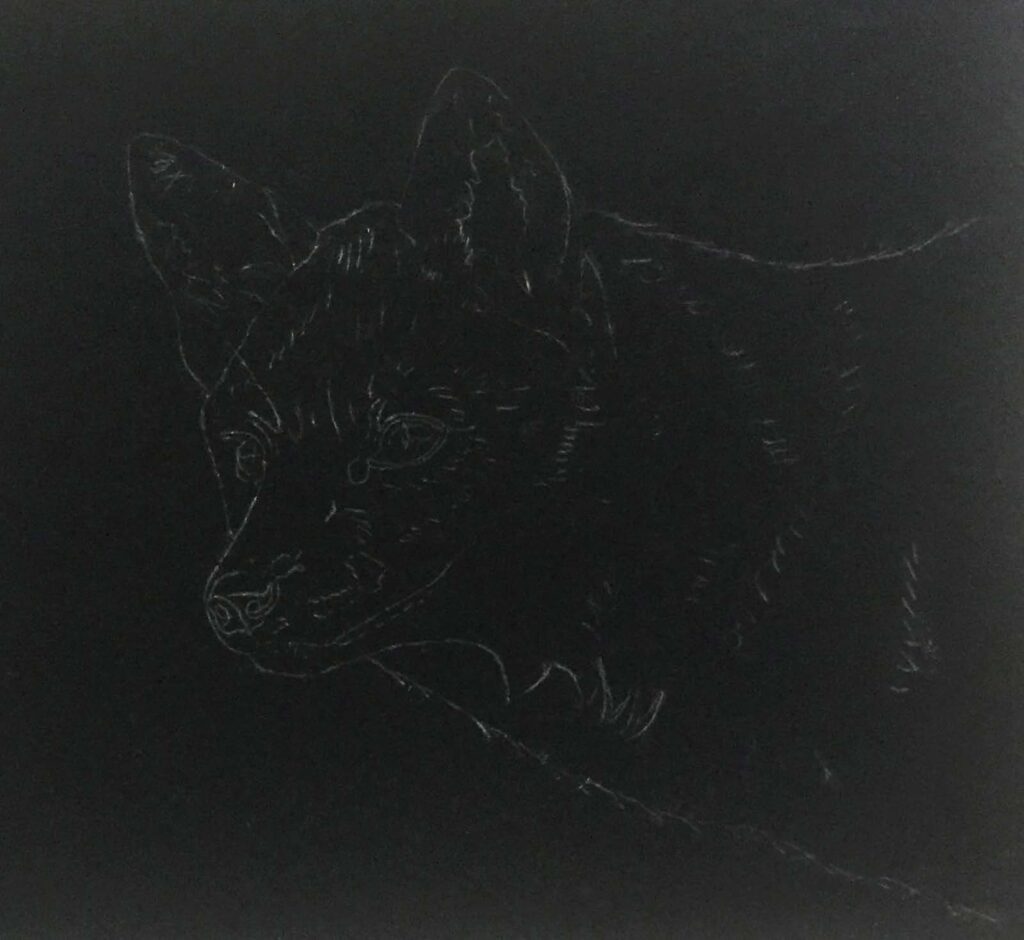
Step 1 – Map out the basic outline
Use a light coloured pastel pencil to map out the outline and key features. This is a dry, chalky, pigment and is easily erased with a kneadable eraser as you go along.
Step 2 – Complete the eyes and start to map out the fur directions
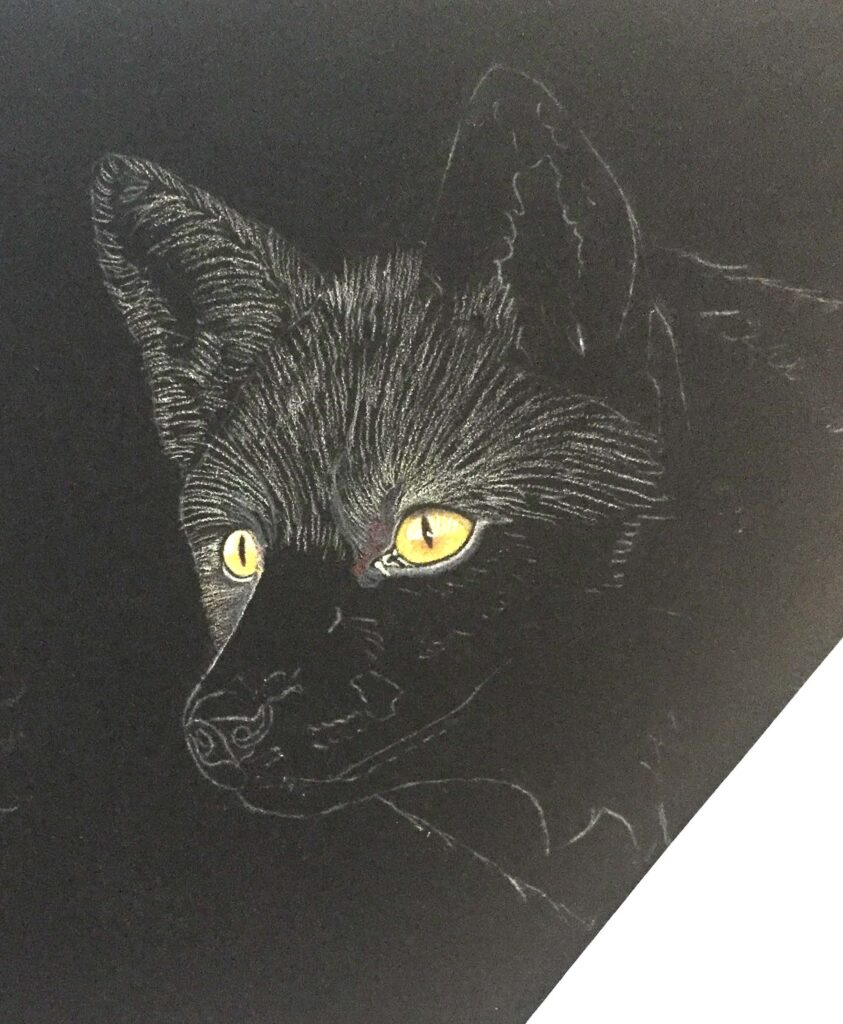
Completing the eyes first will connect you to the subject and provide a useful focal point.
Use light circular strokes to to create a base layer of Parmesan. Avoiding the highlight and pupil, blend together layers of Sun Yellow, Sunflower, Golden Sun and Mango. Draw in the pupil with Black. Check out my Cat’s Eye tutorial for tips to draw the eye. (link to go here)
After completing the eyes, use white to map out all the changes in fur direction. Start at the top of the head and work from left to right, using feather light pressure.
Step 3 – Complete the nose and map out the rest of the fur to the head
After completing the ear on the right, use Slate Grey and Black to draw in the nose, using Silver for the highlights.
Continue to use White to map in the fur around the nose, the snout and below the eye on the right. Be careful to avoid pencilling over the darkest areas such as the inside of the ears and the mouth-line.
Step 4 – The ears
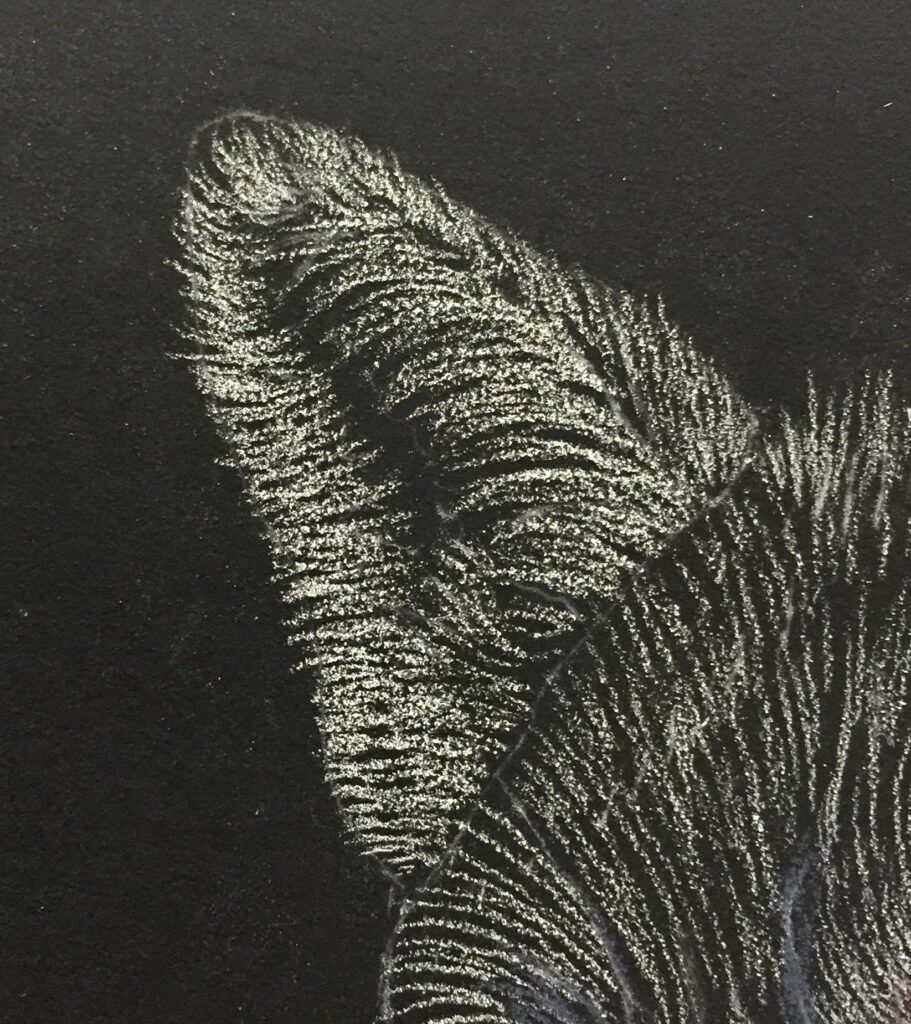
Using White, strengthen the fur strokes to the ear on the left. Use a sharp pencil and a flicking motion, lifting the pencil at the end of each stroke. The key to creating a realistic fur texture is to avoid having a solid outline.
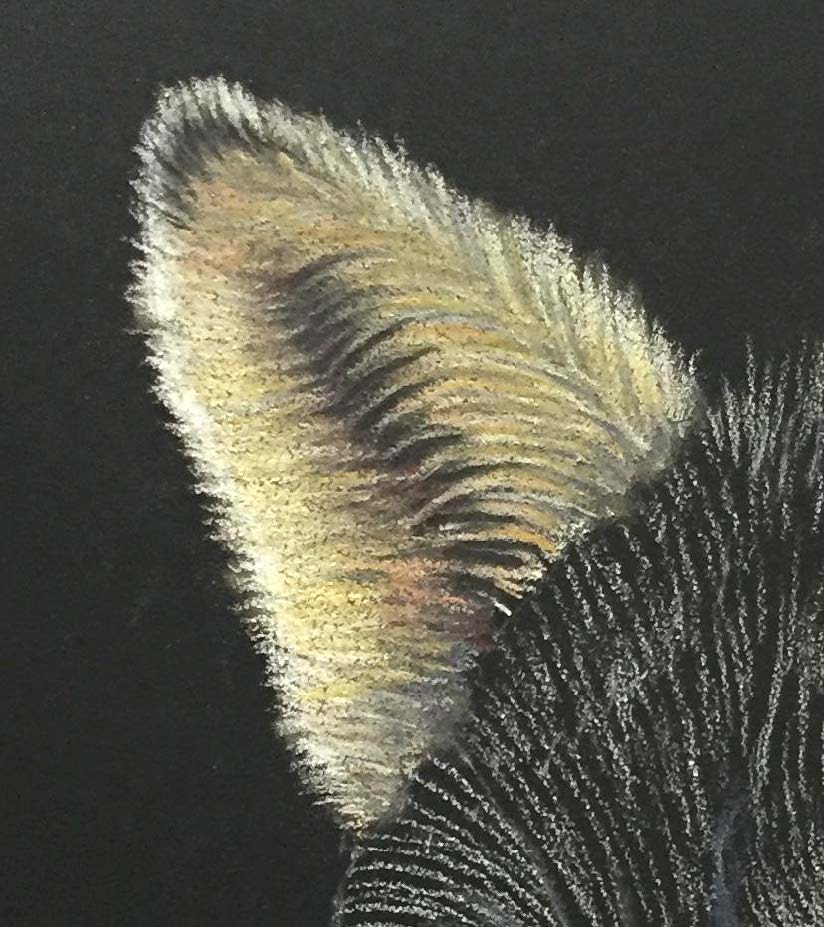
Following the fur contours already created, build up depth by adding alternating layers of Parmesan, Peach Sand, Brown Sugar and Golden Sun. Bring in a few strokes of Burnt Sienna once the tooth of the paper begins to fill. Go over the very outer edges with White and blend in Black at the very tip of the ear.
For the dark inside area of the ear, use Slate Grey and Black.
Work the ear on the right in the same way, this time blending in a touch of Raisin with the Slate Grey and Black in the centre.
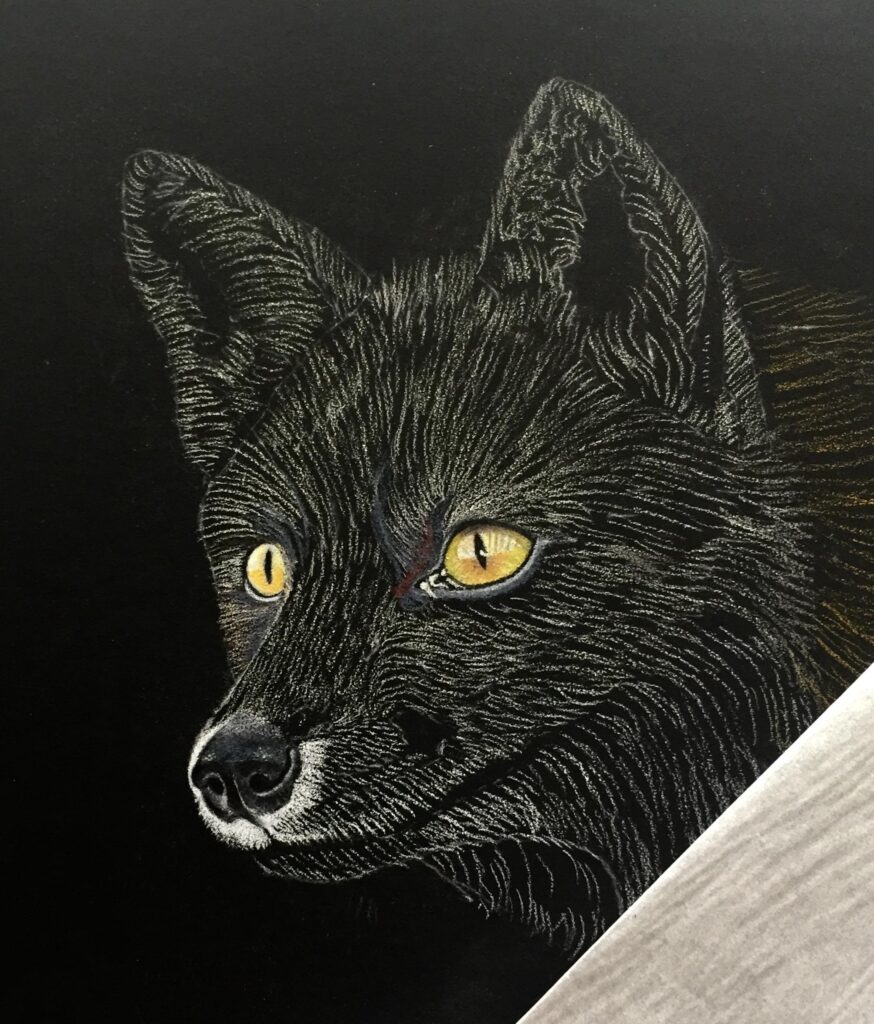
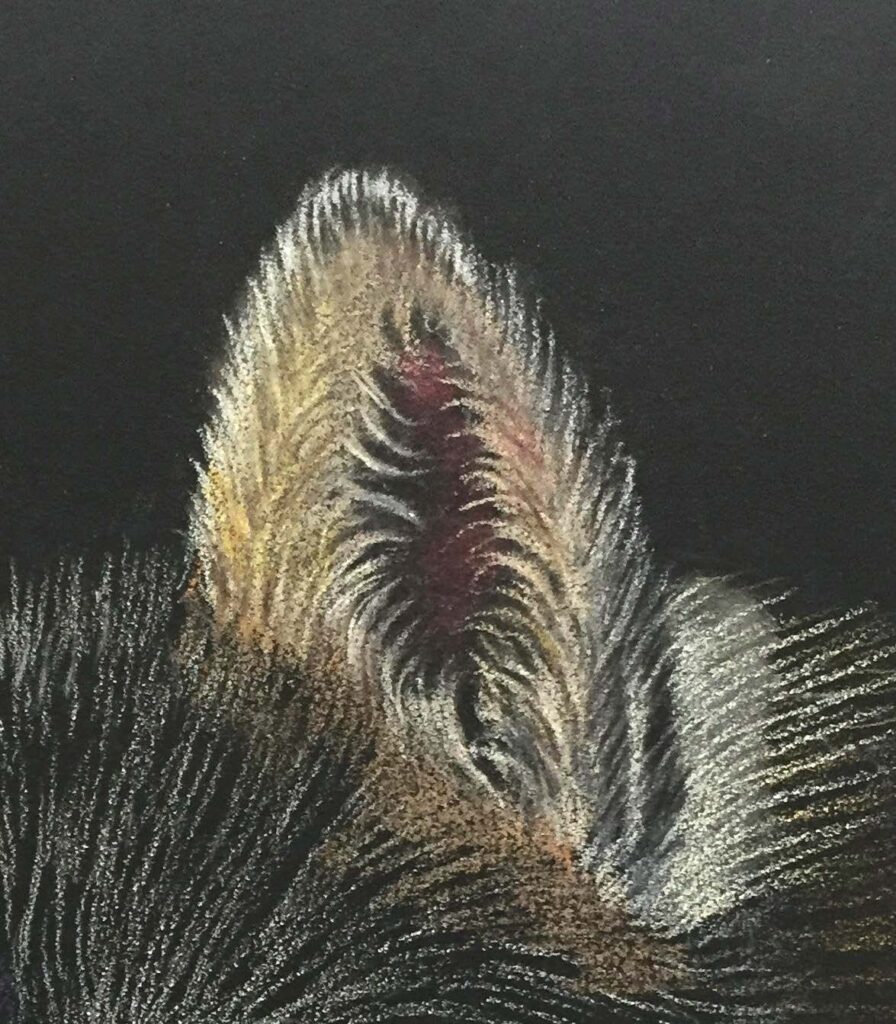
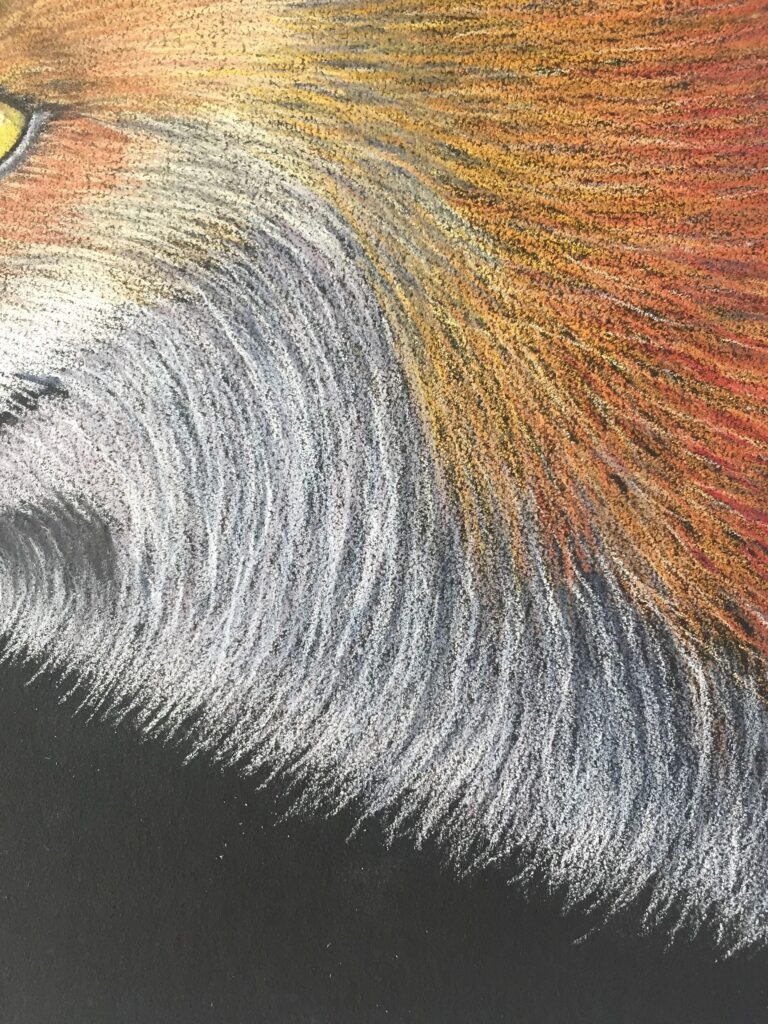
Step 5 – Top of the head
Using light pressure and maintaining the direction of the fur strokes, block in the white areas of the head. Next, blend in layers of Parmesan, Peach Sand, Brown Sugar, Spice, Golden Sun and Burnt Sienna. For the redder areas under the eyes, blend in Redwood and Autumn Blaze.
Continue to apply alternating layers of colour, keeping strokes shorter and closer together on the top of the snout. Then getting longer and flicking outwards as you progress around the top of the head.
As you eliminate the grain you will see the pencil strokes becoming smoother and the colours will begin to blend together. You can help this along a bit at this stage by very gently stroking with a cotton bud along the direction of the fur strokes.
With Coffee Bean and Natural Brown, create the dark area of skin at the side of the eye. Add in some darker fur strokes to create the deeper coloured fur strokes.

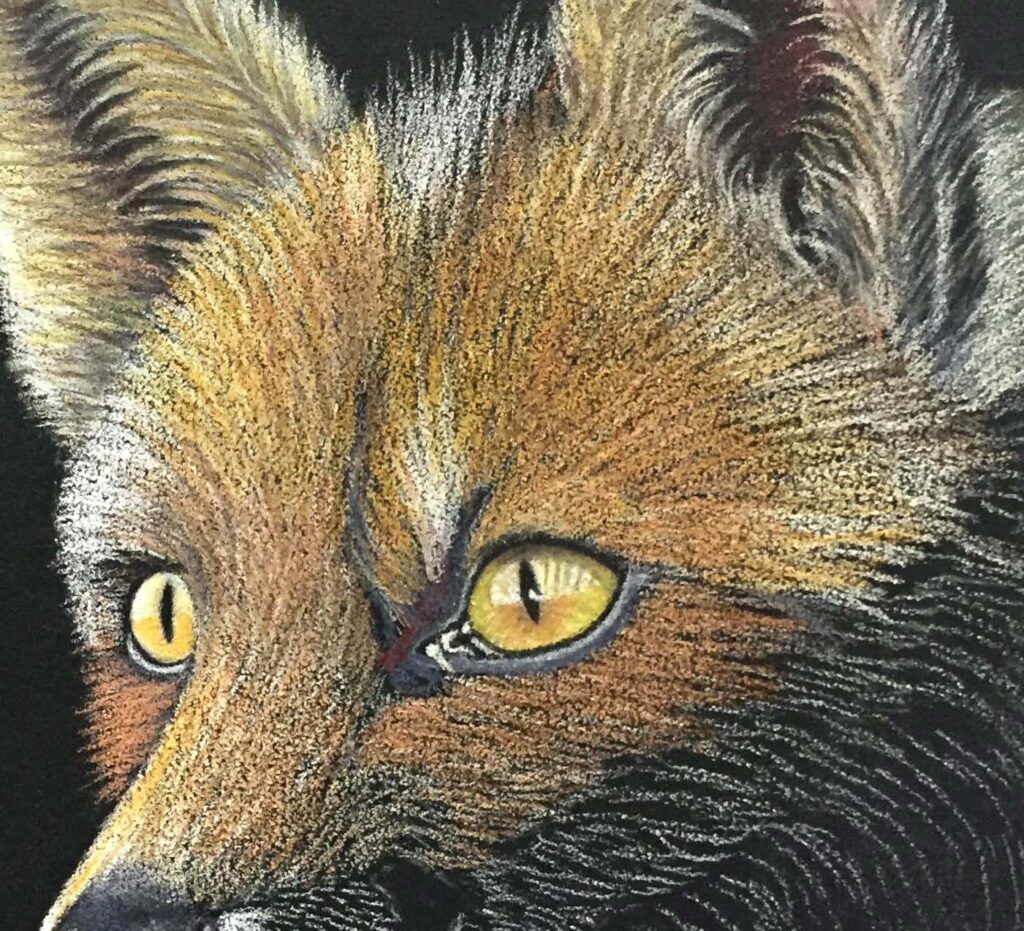
Step 6 – Muzzle area
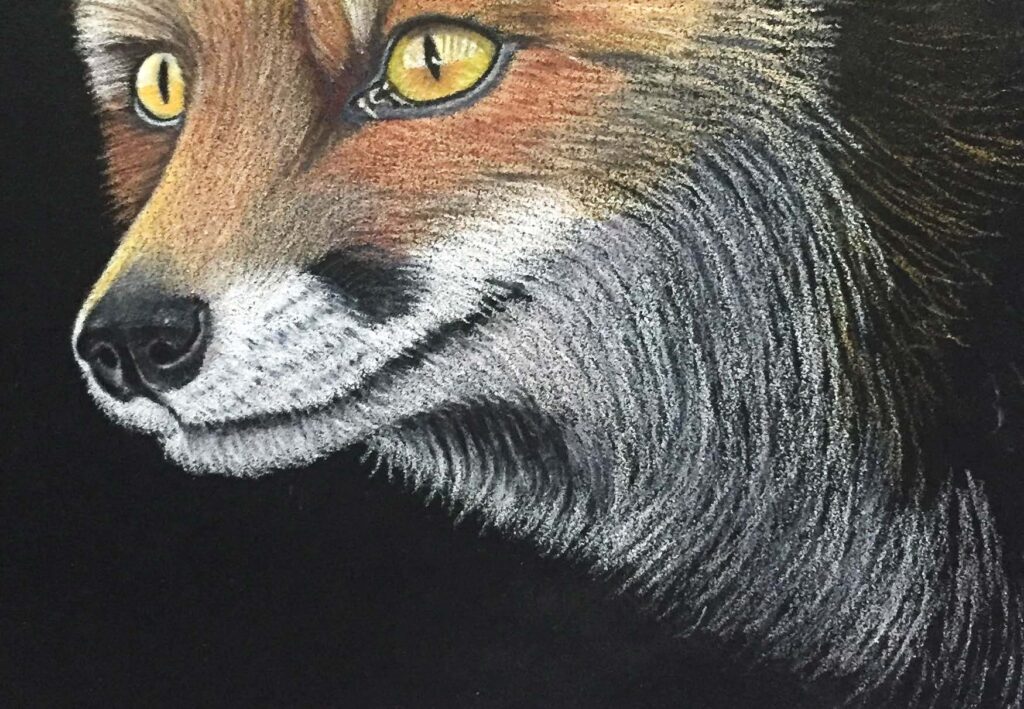
For the area above the mouth use White to create short, downward fur strokes, adding in the whisker marks with Slate Grey, working around the black patch of fur.
Use Black to create the mouth line, then work in downward strokes of White to create the lower jaw. Into the white of the lower jaw, blend in a layer of Red Storm, with some strokes of Platinum. Use longer, sweeping, strokes as you work downwards to create the longer fur in the neck area.
For the shadow area under the jaw, use Black, then blend in some lighter strokes with Red Storm.
Step 7 – Upper body fur
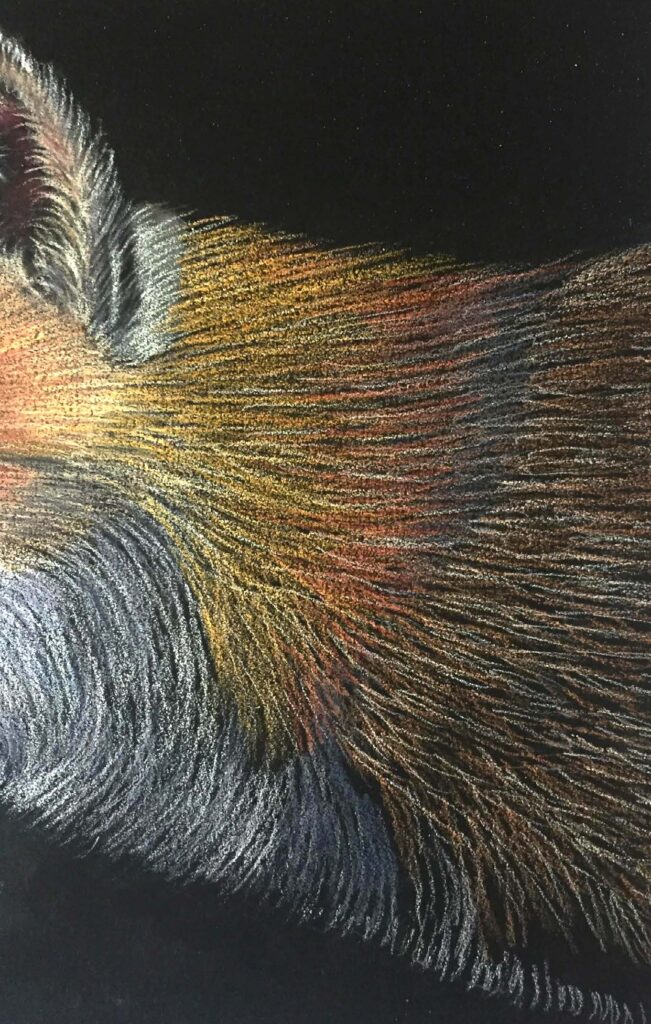
With Parmesan, plot in the coarse fur of the body, using light pressure and long strokes. As with the face, start to build up layers of colour, using Spice, Brown Sugar, Burnt Sienna and Golden Sun. For the redder area in the middle, bring in Redwood and Autumn Blaze.
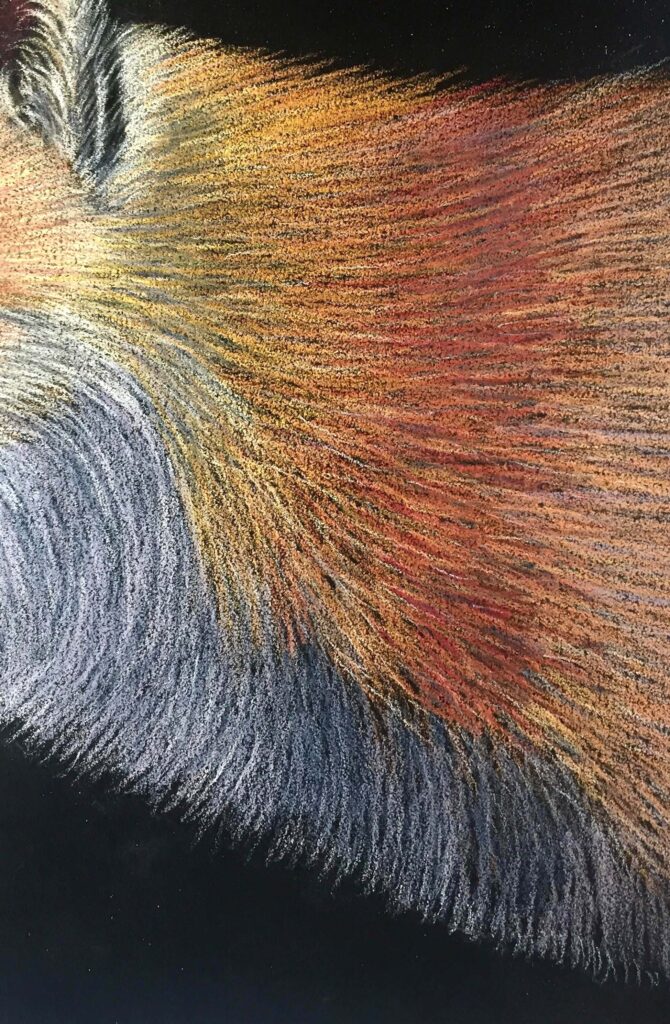
Vary the direction of your strokes slightly to create the impression of overlapping hairs.
By building up layers lightly and gradually, with this type of paper you will find that fabulous ‘opportunities’ will appear, creating depth within the hair strokes where the darkness of the paper shows through. Use this to your advantage! Use Coffee Bean (with a sharp point) to emphasise some of these tiny dark pockets within the fur.
For the lighter area under the neck/belly, use Lavender Ash, pulling some of the redder colours down to blend the areas together.
Using sharp White, sweep in some strong strokes using medium pressure to create the look of the soft, thick, fluffy, fur below the neck.
Strengthen the outer edges of the neck in white, flicking downwards and lifting the pencil at the end of each stroke
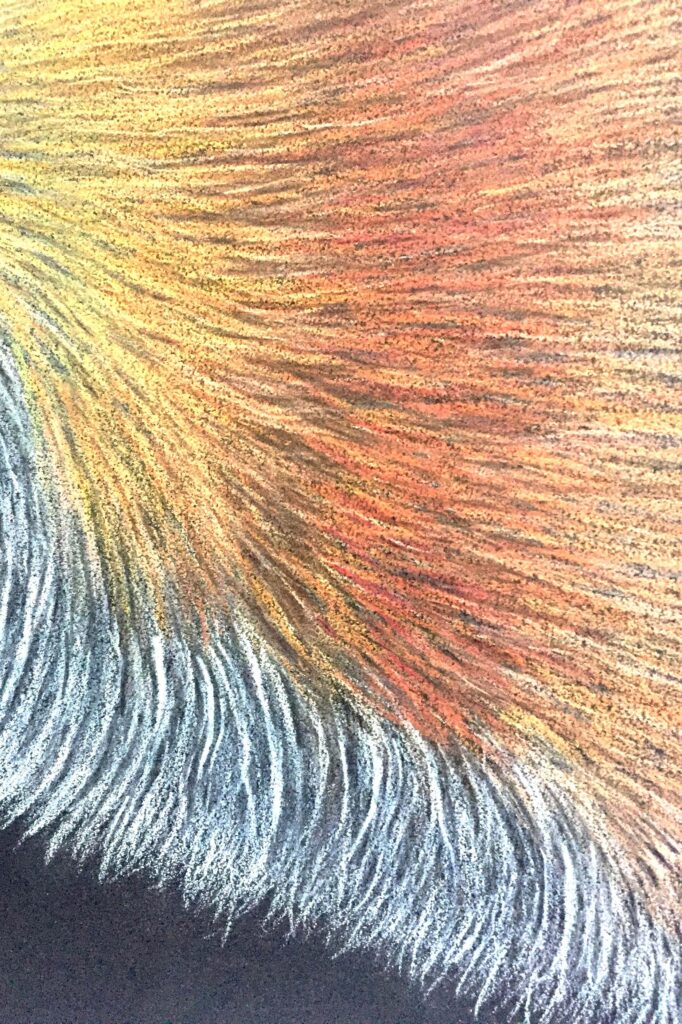
Look again for those lovely ‘opportunities’ to create depth where the hair strokes overlap, using Slate Grey to create the darker shadows in the fur.
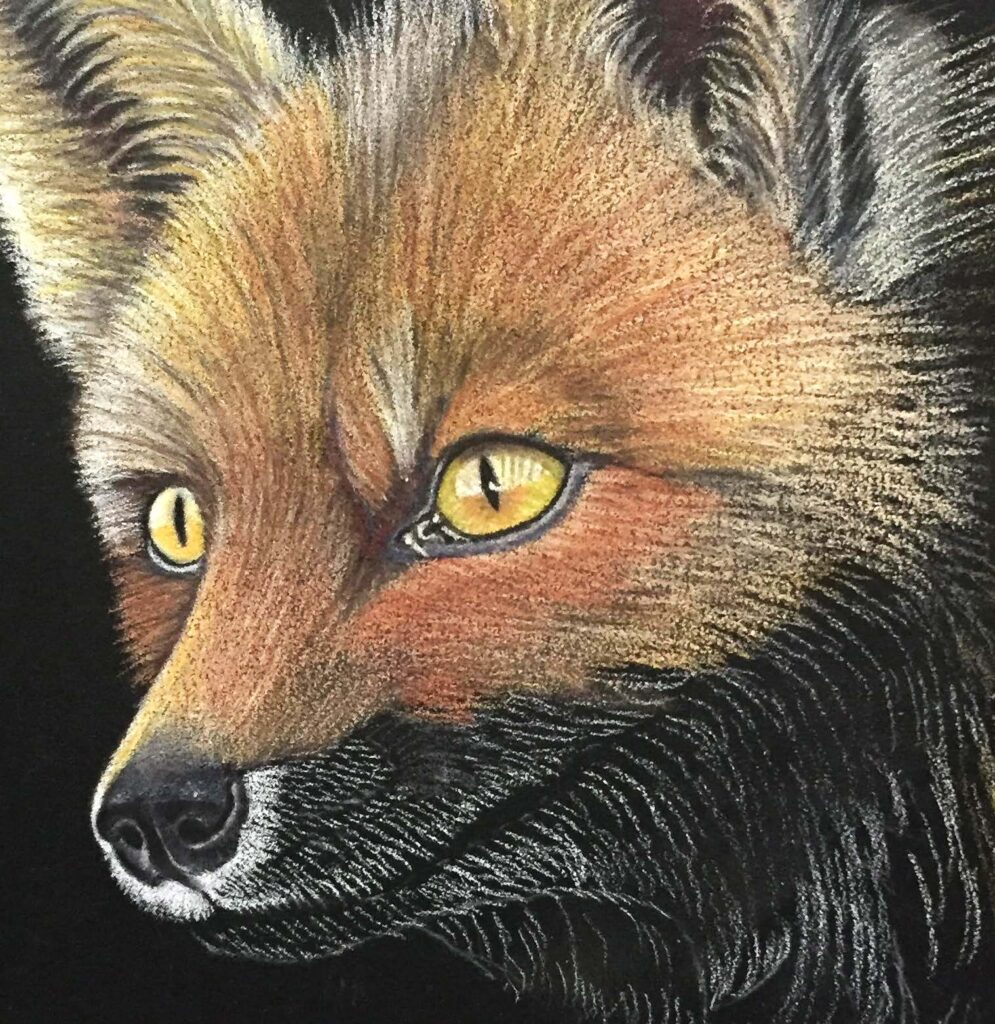
Step 8 – Finishing touches
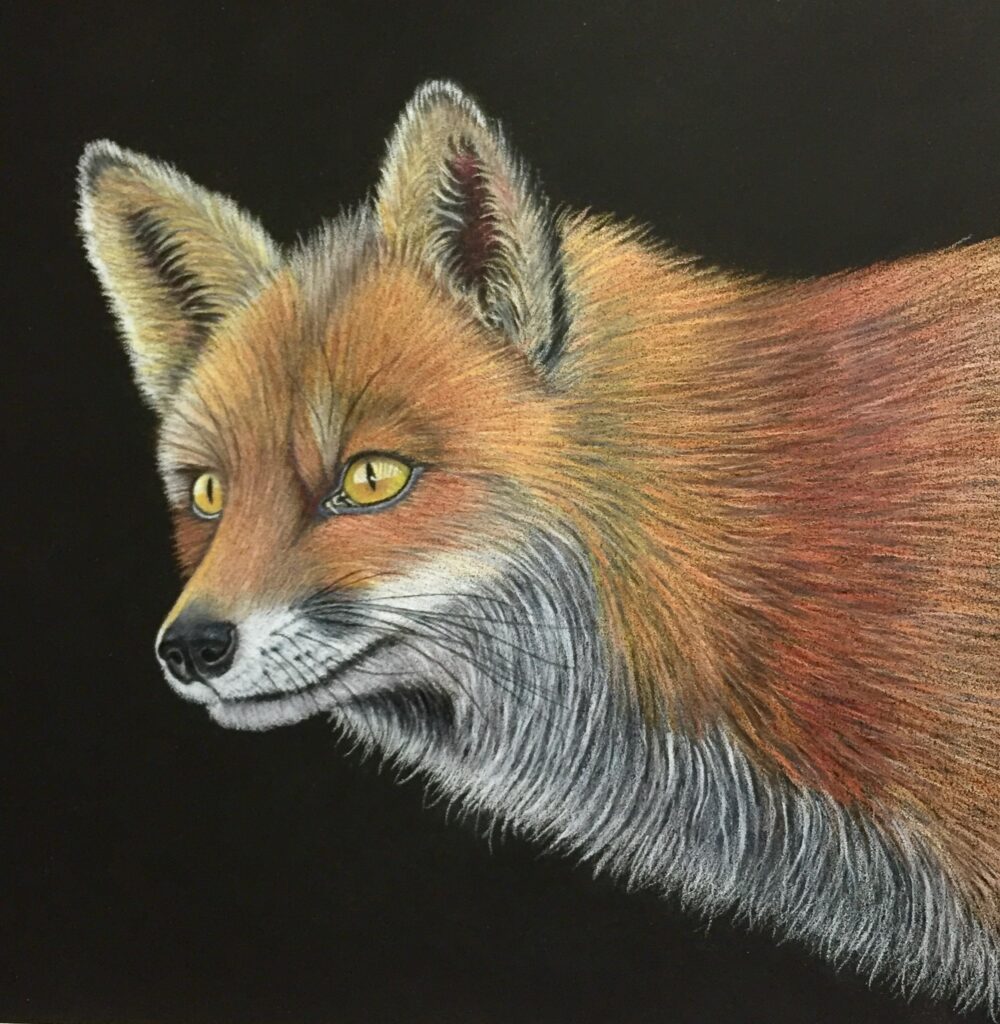
Take Melon and blend together the darker red areas of the body with the area to the far right.
Use a cotton bud to (very lightly) go over areas that need further blending, remembering to always follow the direction of the fur.
Add depth with Natural Brown to the base of the ears, where they join the head, and to the area to the left of the face, blending the side of the face into the body.
Flick in some dark ‘eyebrow’ hairs in Coffee Bean above the eyes and blend Slate Grey into the dark patch to the right of the nose.
Finally, add the whiskers using a very sharp black. Be prepared to re-sharpen your pencil between each whisker!

Find out more about Chromaflow pencils here. If you have enjoyed following this tutorial you might also be interested in Rosie’s other tutorials; How to Draw a Cat’s Eye and How to Draw Feathers.