
Alla Prima Portrait Painting with Oils Tutorial by Liam Dickinson
Stage 1 – Reference
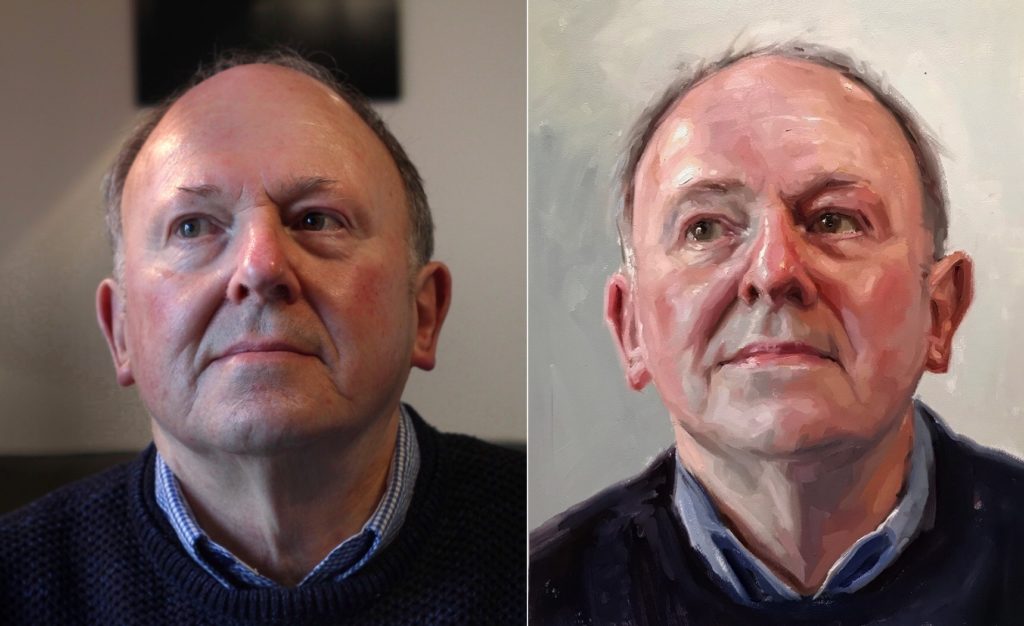
The whole process begins with a reference photo. I usually offer to meet a client at their own home, which I find puts them more at ease and also gives me something new to work with each time, be it an interesting background or lighting setup.
We go from room to room experimenting with different poses, angles and lighting. For me, the latter is particularly important, and I often find that a combination of cool natural light (from a window) at one side, and a warmer, ambient light from the other gives great results. Not only is the contrast of warm/cool/dark/light aesthetically pleasing, it also breaks up the subject’s face into more manageable parts, helping me navigate the painting much more easily.
I take all the reference material back to the studio, where I’ll often edit photographs until I’m happy with the composition.
Stage 2 – Surface/Palette Prep
For this portrait (and most of my other work) I’m working on a primed hardboard panel. I buy large sheets of hardboard which I prime and cut to size. I love the smooth, rigidity of a panel compared to the coarse, bounciness of a canvas, and priming it myself means I can manipulate the tooth of the surface. In this instance the primer has been applied with a foam roller, and then sanded slightly to produce a smooth, paper-like texture which will really help the oil paint glide across it.
My palette is essentially a sheet of glass, primed white on one side and stuck to a table top. It’s super easy to clean and won’t absorb any of the paint.
For this (and most other paintings) I’m using a fairly basic set of colours
- Titanium White
- Cadmium Yellow
- Flesh Tint
- Cadmium Red
- Alizarin Crimson
- Ultramarine Blue
- Burnt Sienna
- Burnt Umber
Whilst Flesh Tint is there purely for convenience, all the others will just about cover the whole colour spectrum when mixed accordingly. Keeping your paint arsenal to a minimum not only saves money, but it encourages you to mix and ultimately understand the varying properties of each paint/colour.
All my oil paints are Ken Bromley’s Artist brand, which have a lovely buttery consistency, strong pigmentation and are excellent value for money.
I’m not using any particular mediums; just turpentine for thinning. My brushes are fairly basic nylon brushes, typically associated with acrylic or watercolour painting, but I just prefer the way they glide compared to the stiff drag of a hog hair brush. With everything ready, we’re ready to dive in!
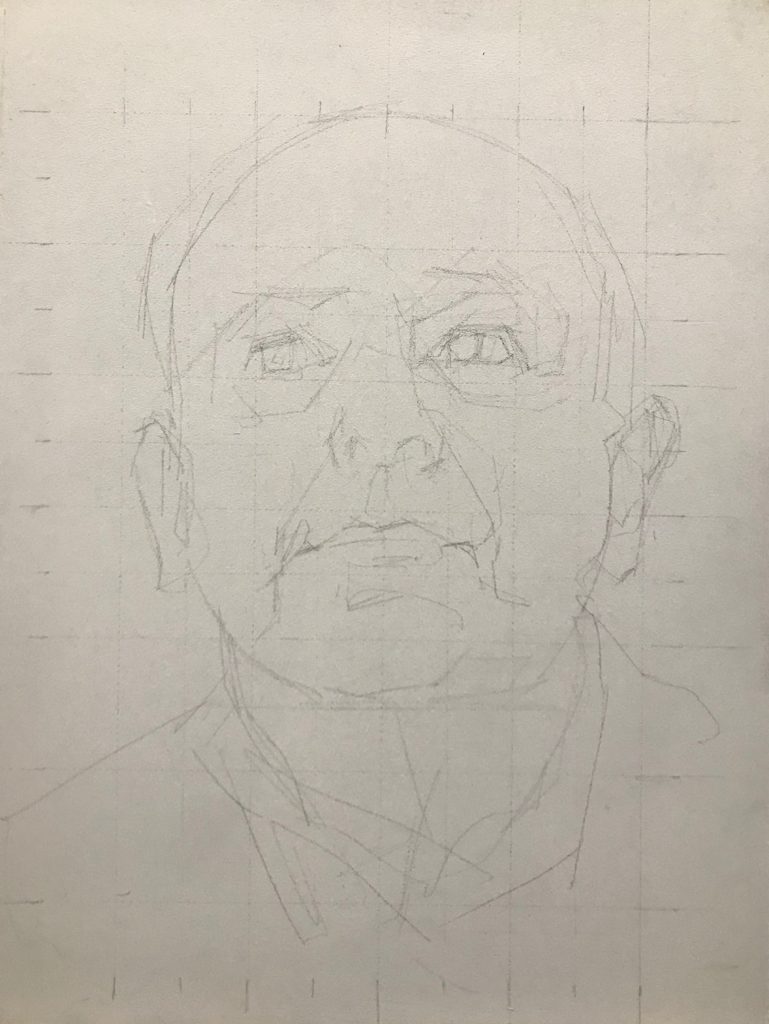
Stage 3 – Drawing
Before I begin painting, I do a little work with a pencil. Firstly, I’ve drawn a light grid onto the panel, which corresponds with a grid I’ve placed over the photo. I use the grid as a guide to help me place the drawing and nail down the likeness. This is entirely optional – personally I use the grid so that I’m not wrestling with the likeness when there’s paint on the canvas, as I find it muddies the colours. A grid all but ensures the proportions are correct, thus I can work cleanly and efficiently.
Try not to use too much pencil, as it can muddy the paint. Use light pencil strokes and rather than doing any shading in, simply outline the shadowy areas instead.
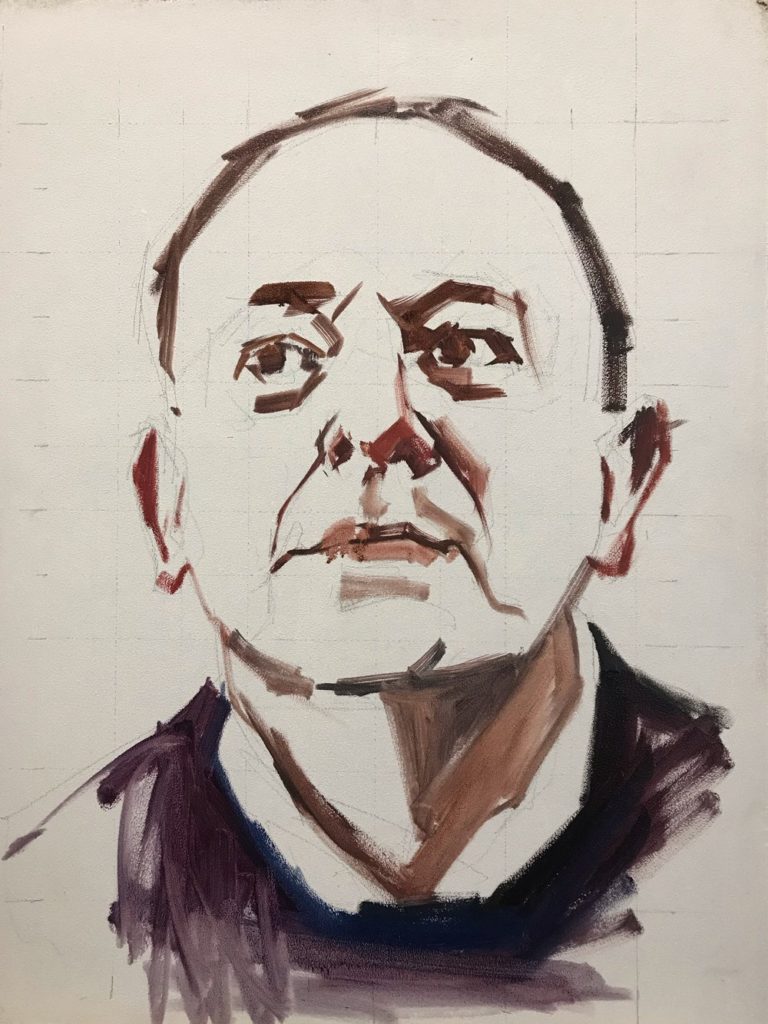
Stage 4 – Consolidate the drawing with some paint
At this point I like to consolidate certain parts of the drawing with a brief ‘under-painting’. I use some dark paint to block in the darkest/most prominent areas of the portrait. Essentially I’m establishing the two extremes – darkest areas with paint, and the brightest highlights (which already exist through the white of the surface). With this, I’ll find it easier to block in the mid-tones as I can compare the tonal values more easily.
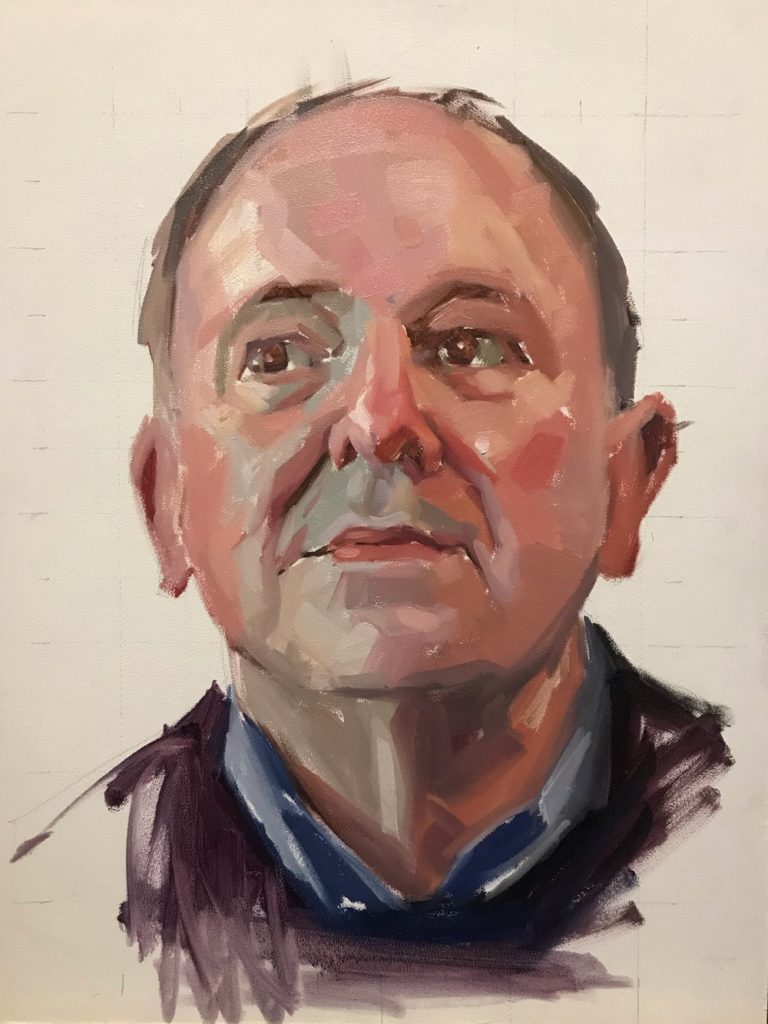
Stage 5 – Block in
This stage involves blocking in the majority of the portrait. Without focusing on any great detail, I try and pick out larger general shapes within the face, simplifying the whole structure into manageable parts. I’m working relatively quickly with a large brush so as not to get caught up in any details, blocking methodically from one section to the next, using each previous block of colour to inform the hue/value of the next. As much as I want the colour to be accurate, I’m still not overly concerned as I know it will be much easier to correct once the block in is complete.
Note: Over the course of the session your eyes will adapt to what’s in front of you and you should find it easier to identify colours/tonal values.
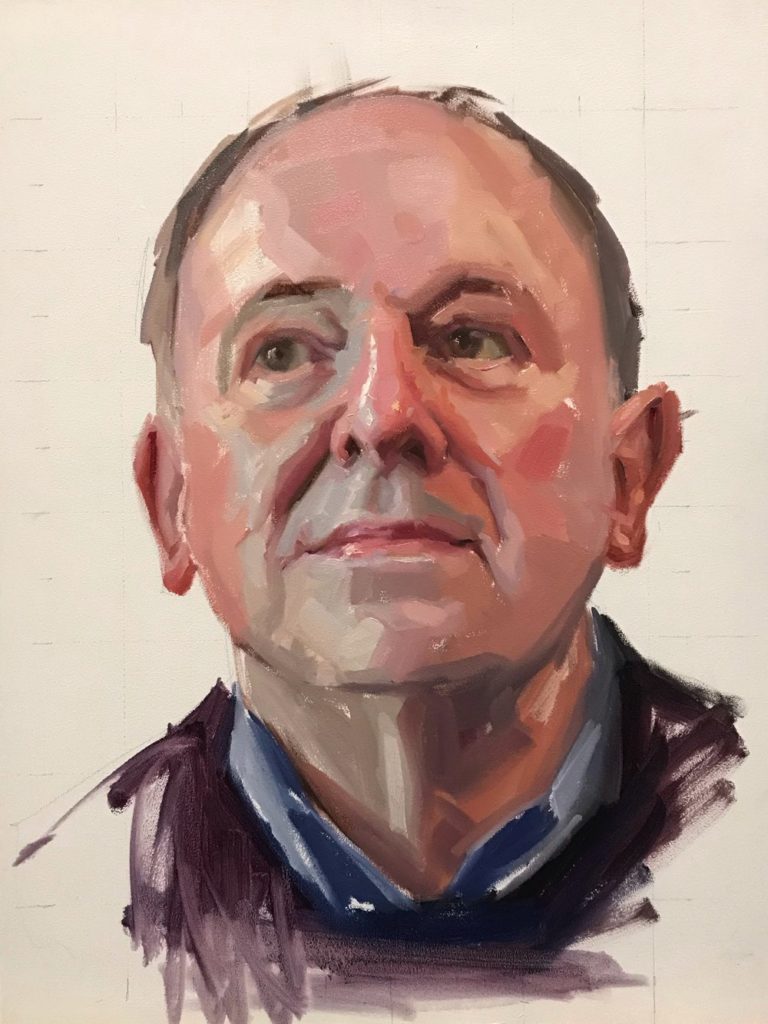
Stage 6 – Detail
With my initial block in complete, I can start to focus on smaller details. It’s up to you where you start, but I like to work on the features first. Using smaller brushes and slightly thinner brushstrokes than in the block in, I carefully paint in the eyes, nose, mouth and ears. I generally work from dark to light, and use the same principles as the previous stage – blocking in colour – only on a much smaller scale. Keep it simple and don’t be intimidated. Painting eyes and noses can be daunting, but if you treat them as a series of simple abstract shapes you’ll find them more manageable.
Pay close attention to the reference and the tonal value/hue of each part. Let your eyes inform your decision making rather than what your brain tells you something should look like – for example, the whites of the eyes rarely appear white, but a greyish blue or yellow. This subtle attention to detail will really help give that natural look. Finally, a well placed highlight on the eye and tip of the nose will instantly give them their shape.
Stage 7 – More detail!
With the features out of the way, I systematically work around the rest of the face with the exact same approach. I’m breaking down each block of colour into more parts and creating further detail, whilst constantly comparing each area of colour to the next. By guiding my brushstrokes in the same direction of the facial contours, I’m giving each part more form and solidity (For example, horizontal strokes across the forehead, vertical strokes down the side of the cheeks, and so on)
Repeat this stage with the same approach as much as you like until you’ve achieved the desired level of detail. Personally I like a loose finish with visible brushstrokes, but some might prefer a tighter photorealistic finish. Whatever level of finish you’re pursuing, ensure that every part is completed to the same degree of detail – an overall loose portrait with photorealistic eyes may be a little distracting and seem unfinished, so consistency is key.
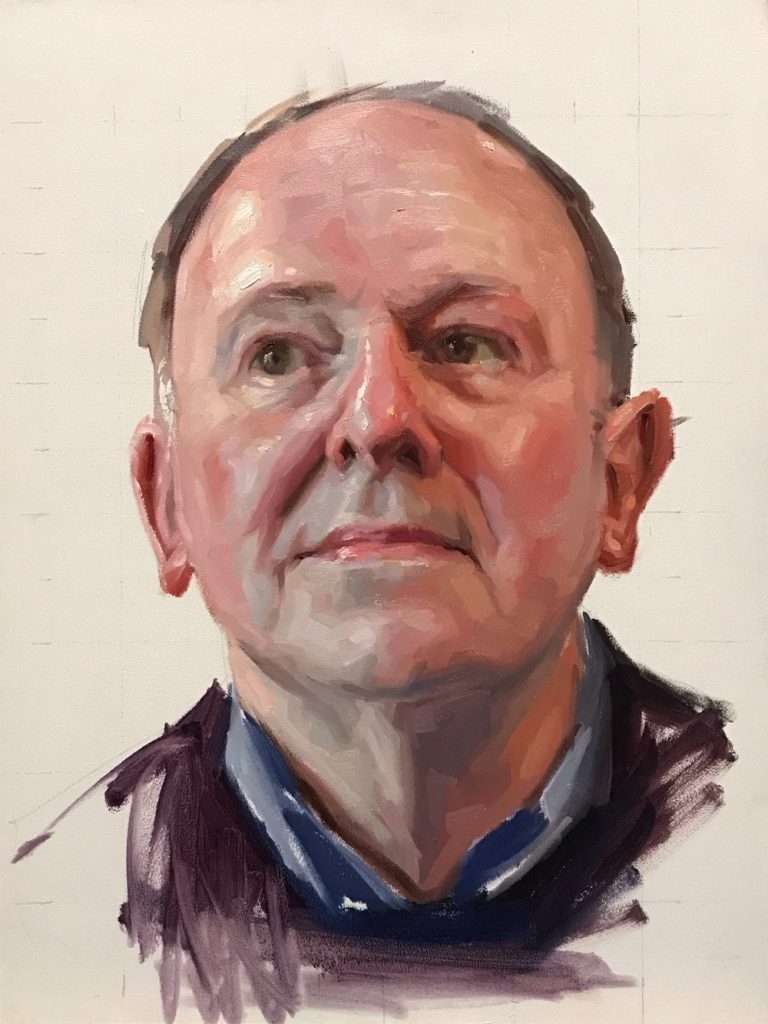
Stage 8 – Finishing off
To complete the portrait, I block in the background. Doing this can make the head look ‘cut out’, so I feather the edges to create a smoother transition, and use a finer brush to squiggle in some hair.
When you’re ‘finished’, it’s sometimes worth stepping away for an hour, then coming back with a fresh pair of eyes to pick out anything that might be a little off. Correct accordingly until you’re happy.

You can watch a timelapse of the Alla Prima Portrait Painting process in the video below.


Wooow – so nice – I wish i could paint like that 😀
Thanks for sharing
This is the dogs bollocks
Very interesting Portrait. The secret I believe is when to place your last brush stroke and not overwork the painting.The painting is very fresh in colour,Alive and well executed.
Going to be brave and go for it.
Thank you, extremely helpful . Do you tutor courses? Although I live in Scotland I could do a 3day/5 day course if you run such classes.
This is a brilliant lesson in portrait painting….how i wish I coukd do it as you do….but…Im certainly going to try!!
Thank you for this lesson! The painting is fantastic! I love to paint and try to learn from clever teacher’s 🤗👏
Well done.
Nicely broken down steps and stages of the process. The likeness is great.
If you use a watercolour pencil for the drawing, it will not dissolve in the oil paint.
Good idea – great tip. I’ll give this a try.
Really well laid out demo of your process – as well as a delightful portrait. I lreally ike the slightly thoughtful, far-away look you ‘ve captured. Was this done with layer drying time may I ask?
This portrait is so alive, wonderful. I should not use he word envy, but, how I wished Icould do a portrait as good as this. Does Liam tutor at all? I work too long and very tightly.very trying. My email given is correct [email protected]