
Paint Your Own Watercolour Nest Egg
Eggs are miracles of engineering – strong enough to withstand the adult bird sitting on them, yet weak enough for the tiny chick to make its escape. They provide the budding artist with a wealth of patterns, textures and colours to study. In this tutorial I will show you how to paint eggs in watercolour, I hope you share your finished pieces below in the comments!
Introduction
Bird eggs provide a wonderful inspiration and lesson to the watercolourist, with their beautiful patterns and camouflage:
- How to mix interesting muted colours
- How to paint a smooth transition from dark to light
- How to lift out a soft highlight
- How to achieve speckles and patterns
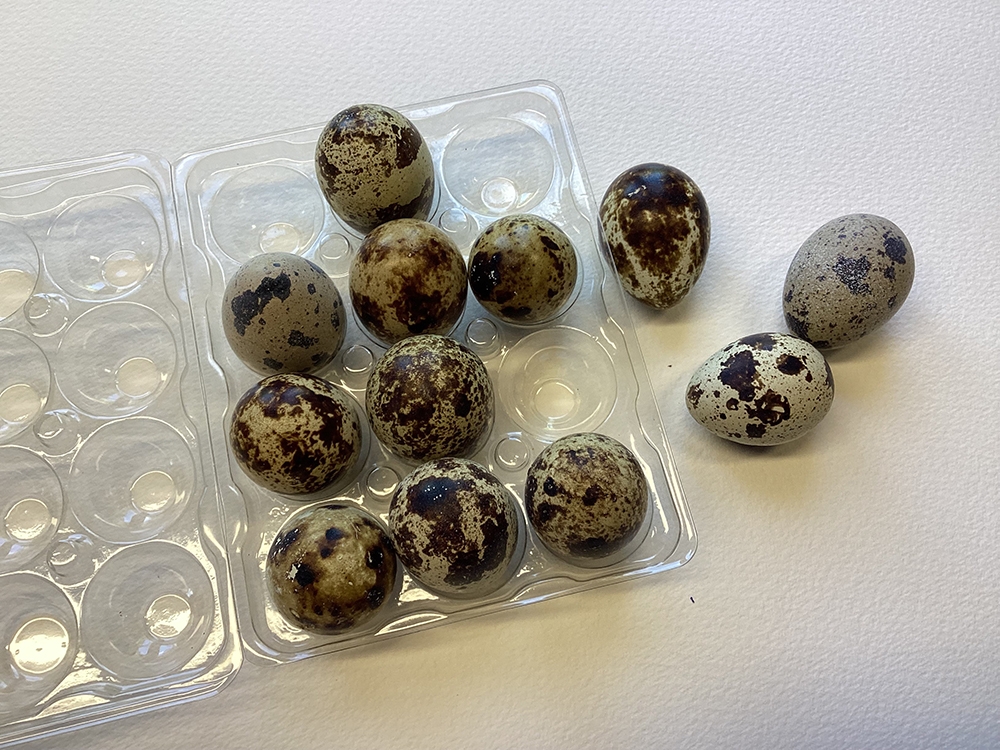
You should never disturb a bird’s nest, so where will you get a beautiful egg to study? Step forward the quail. Its little eggs, each with stunning markings, are often available in supermarkets. So grab a boxful and wonder at their beauty…
Colour Mixing
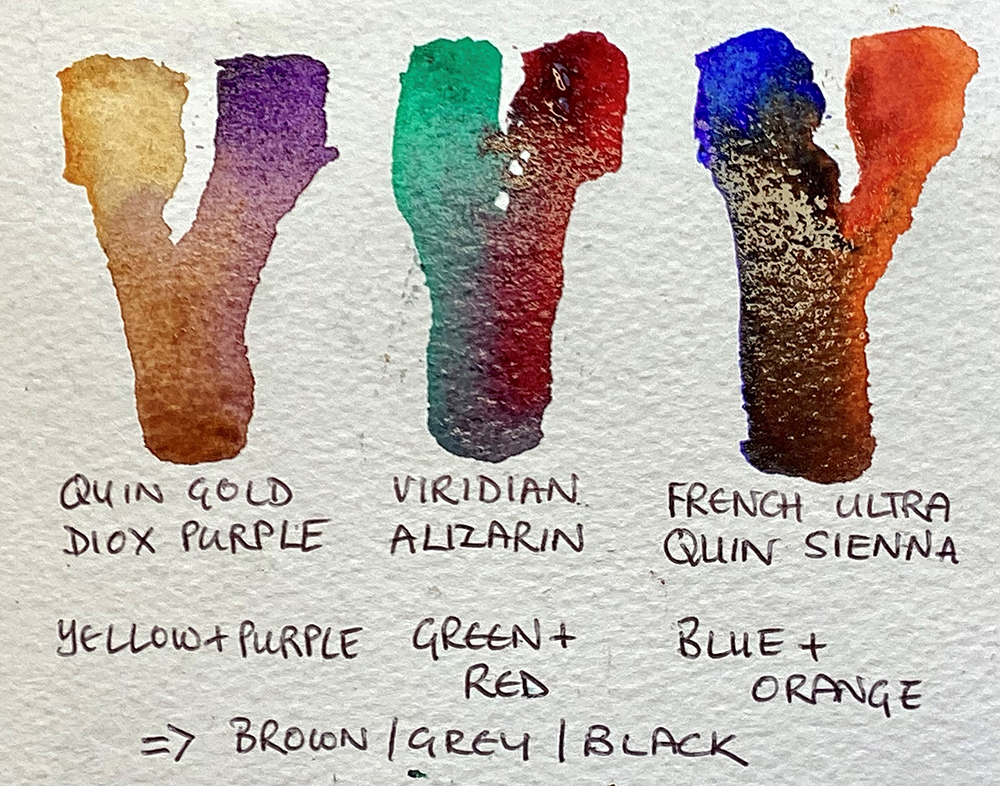
Did you know that birds see differently, so to them eggs appear brightly coloured? However to mammalian eyes, eggs are often muted so we need to mix colours which are still interesting without being overly bold.
Rather than reaching for a ready mixed colour, try mixing complementary colours (those found opposite each other on the colour wheel). You will find that in the right proportions the pairings of purple and yellow, green and red or blue and orange, will make subtle and beautiful shades of grey and brown. Have a go at mixing pairs to find which combinations give beautiful results.
Materials needed
- Watercolour paper 140lb/300gsm Not (Cold Pressed) surface
- Quail eggs – either real or photos are available from https://pixabay.com/photos/market-eggs-food-1261448/
- Size 8 round brush
- Quinacridone Gold and Dioxazine Purple watercolour paint, or a yellow/purple of your choosing. Alternatively you can use a ready mixed brown and add yellow.
- Watercolour pencils, sandpaper, Brusho Crystals (black), scrap paper
- Pencil, eraser, waterpots, kitchen towel
The sketch
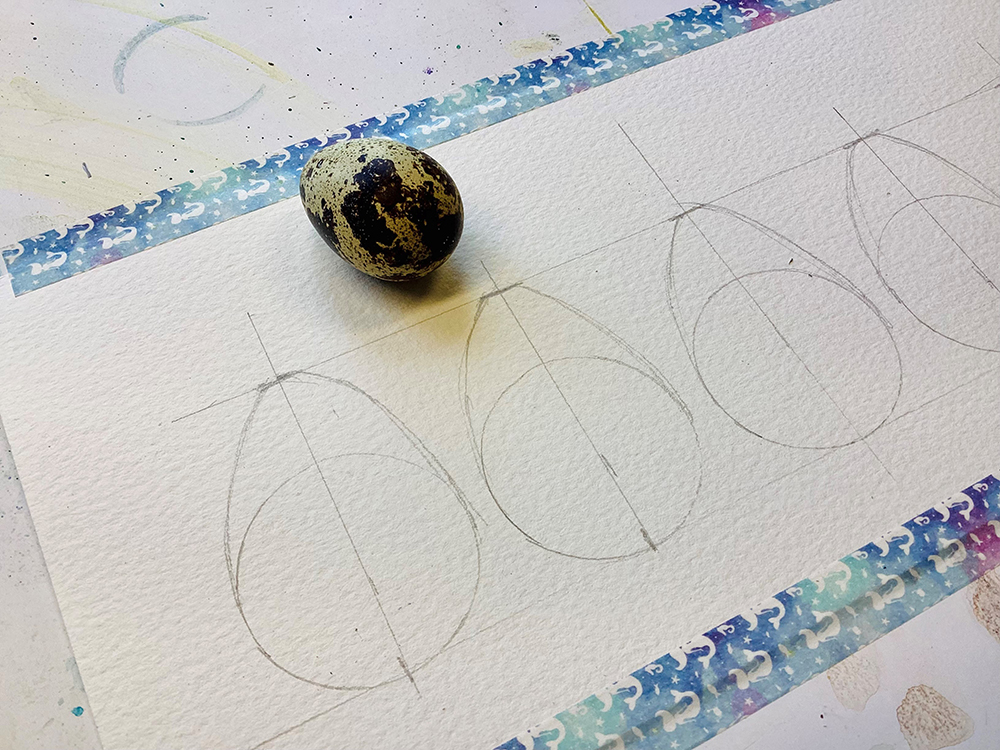
While you can find egg templates on the internet, they are easy to draw. First compare the width to length. I found the quail eggs were approximately one and a half the width long. Now use something round to draw a circle. Mark in the centre line and on that line mark the length of the egg with a short horizontal line. Draw an arc from the end of the short line to the widest point of the circle. Turn the paper round and draw a matching arc the other side. Adjust if they are a little wonky, rub out the construction lines and you now have your egg.
Painting the eggshell
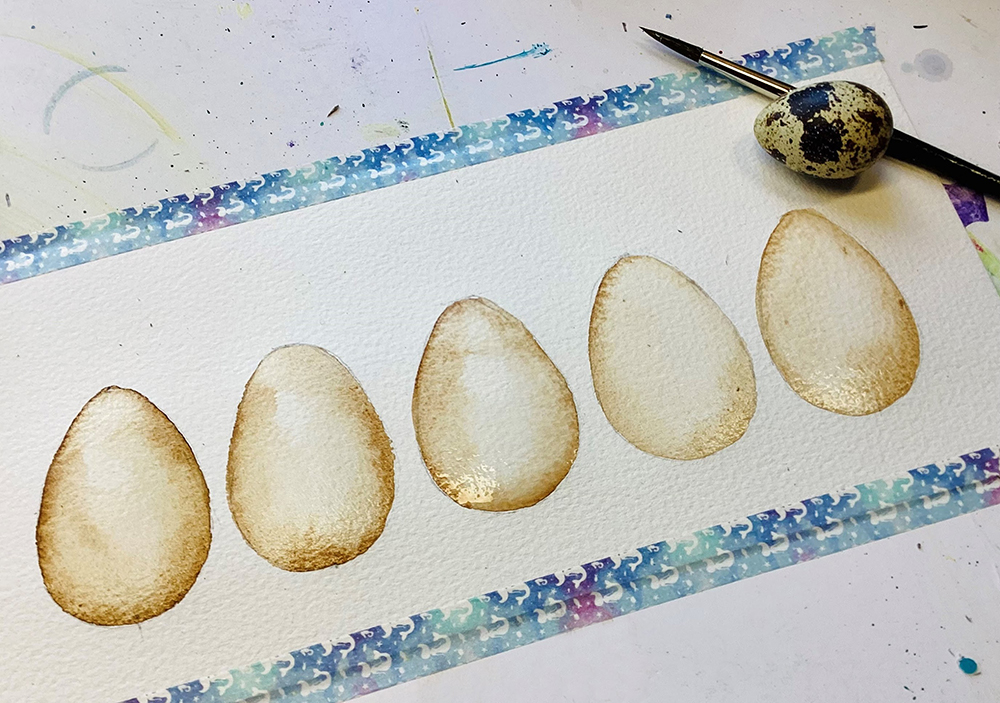
Eggs are beautifully smooth, so we need to ensure our washes are not blotchy. There are two ways of achieving this. First mix up your chosen combination of complementary colours.
If you are a fast worker with a steady hand, simply outline the egg shape in paint and then with a clean, wet brush blend into the middle. Observe where the highlight is and either blend to clean water or use a thirsty brush (a clean damp brush) to pull off some wet colour to create the soft highlight.
If you work more slowly or things dry too fast, you can pre wet the entire egg with clean water and then touch in colour around the edges. It will naturally blend through the water and you can gently even things out with your brush.
If your eggshell is not dark enough let it dry and layer.
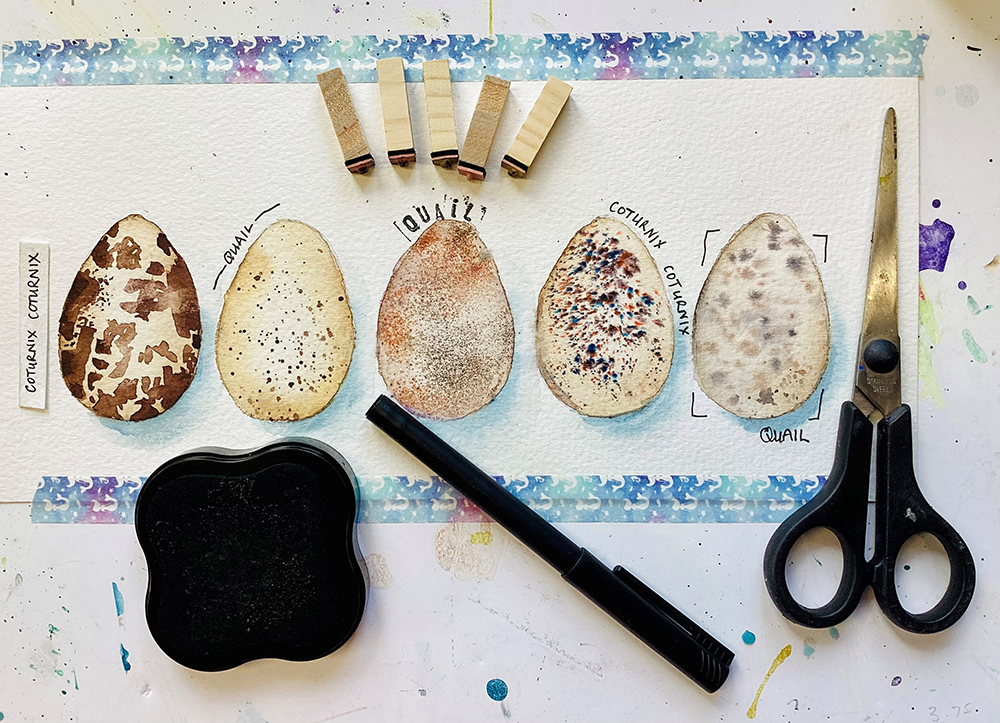
Creating the speckles
Technique 1 – Paint wet on dry
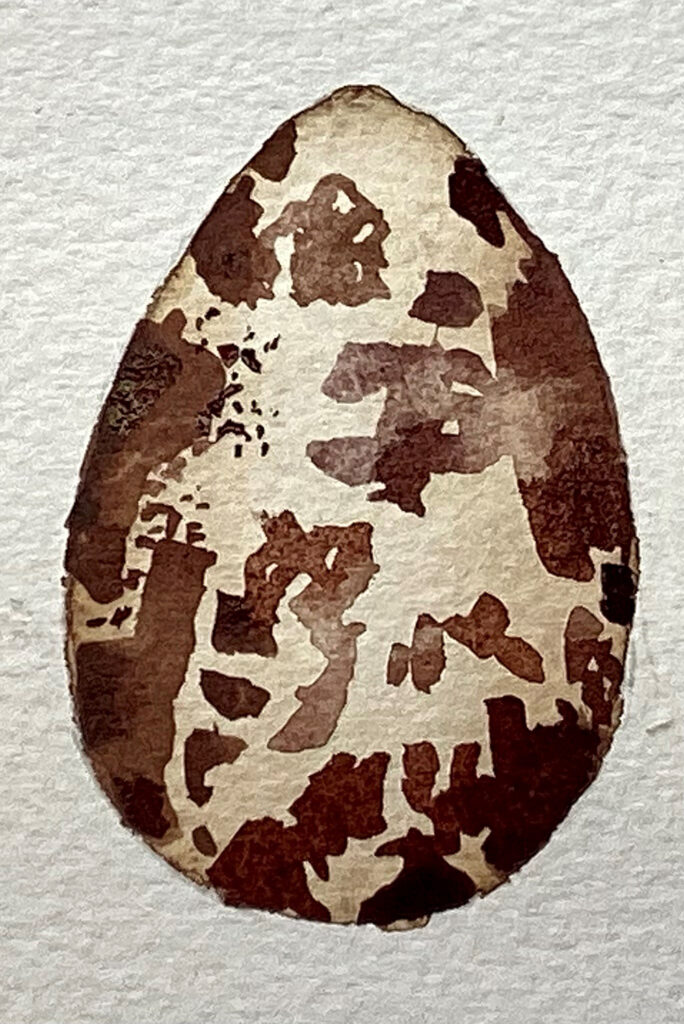
Observe the marking and paint them with a darker mix. Remember they will be lighter where the highlight is, so paint them in, let dry a little and then lift slightly with a piece of kitchen towel. Vary the size and shape as nothing is totally regular in nature!
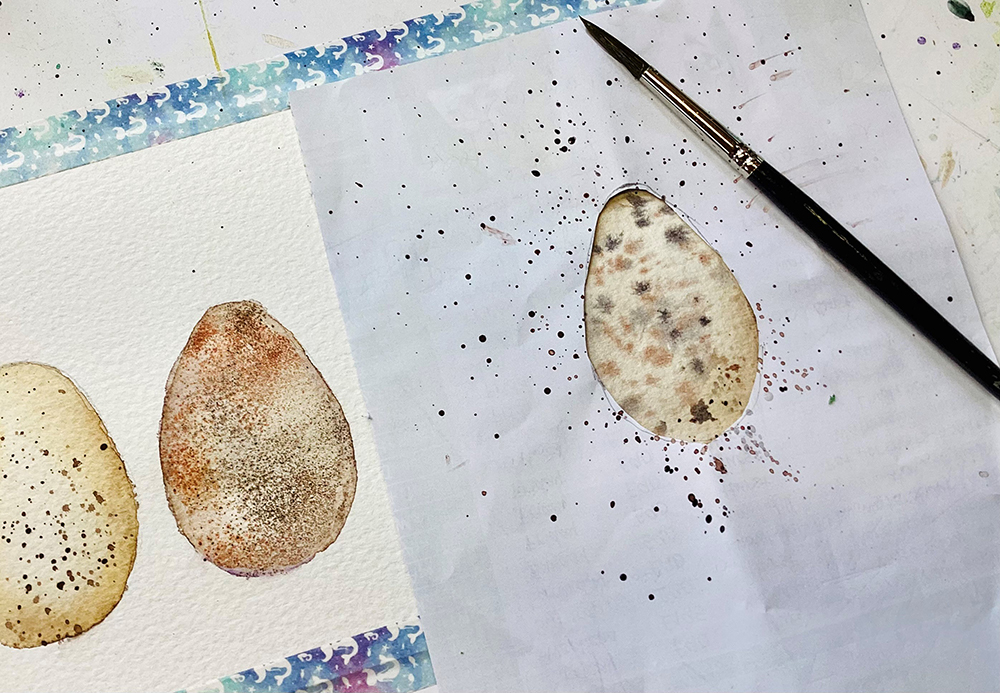
Technique 2 – Spatter wet on dry
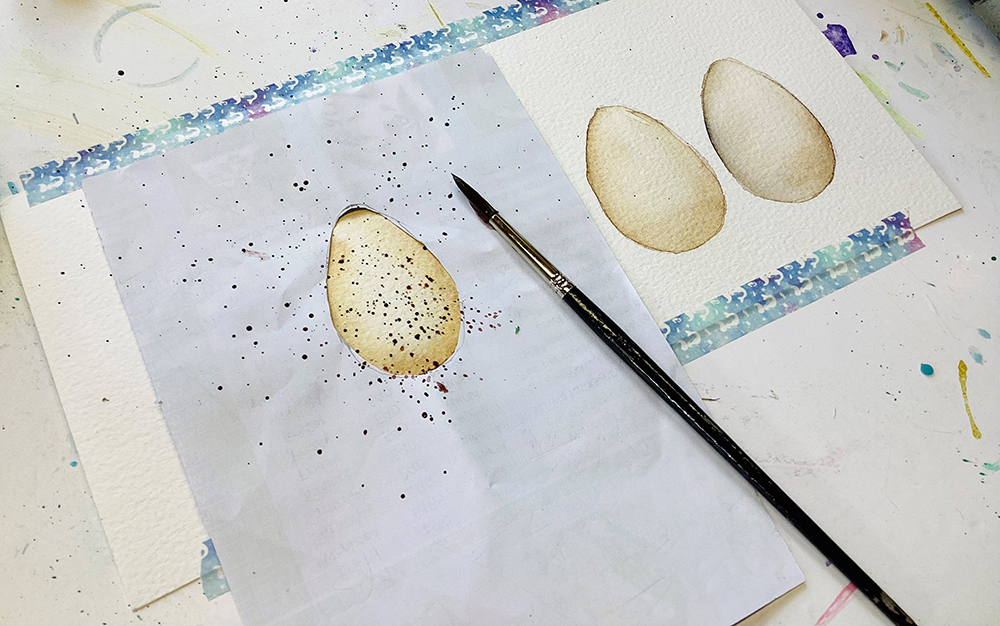
To avoid spattering the background, cut an egg shape out of a piece of paper and use it to mask your work. Load your brush and gently tap it on your finger to release small drops of paint. You can layer different colours. Let them dry between unless you want them to mix.
Technique 3 – Colour sanding
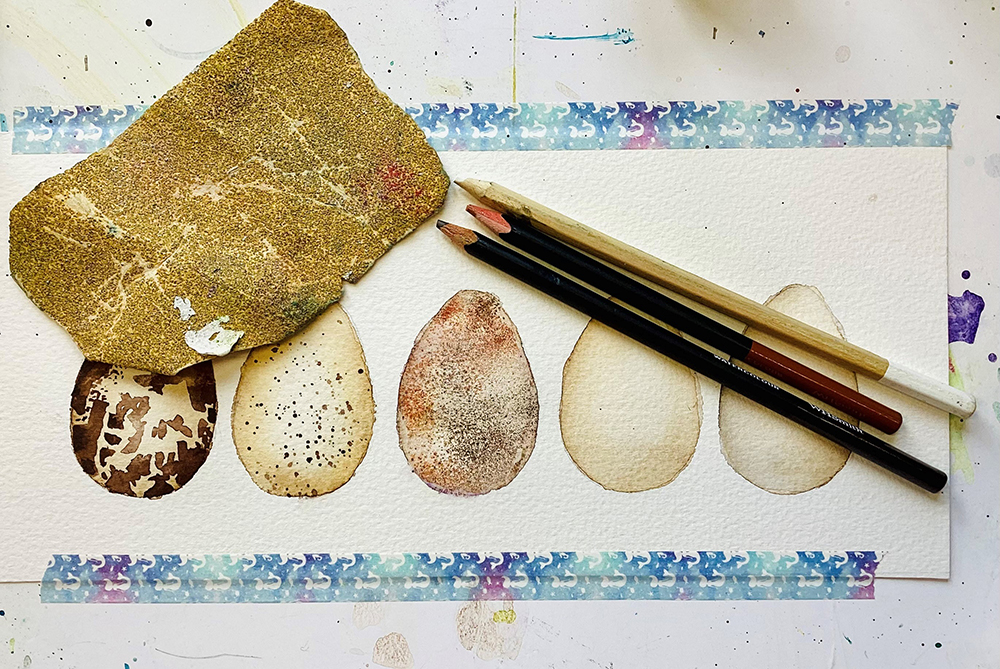
Dampen your egg with clean water and then take a watercolour pencil and sandpaper (or a nail file). Gently sand the tip of the pencil to release a fine dust. This will stick to the damp paper. Any excess can be blown away. If your paper is wet rather than damp, the pencil will start to dissolve giving larger softer marks. Don’t go back over with a wet brush as this will dissolve the speckles.
Technique 4 – Brusho

Brusho is crystal ink. It’s very intense and a little goes a long, long way. By putting a drawing pin through the lid you can create a tiny sprinkling hole and can seal it later. Some (not all) colours are a mix. Black is one of these, so when sprinkled onto damp paper you will see specks of blue, Sienna, brown etc. Once again dampen your egg shape, let the water sink in and then sprinkle in some Brusho and watch the magic happen. Blow away the excess.
Technique 5 – Splatter wet on wet
Dampen your egg and then mask as before. This time spatter into the wet and you will get soft edged marks. You could use a few colours to build interest.
Taking things further
- Combine techniques – Try combining the techniques in one egg – perhaps start with soft wet in wet, dry then paint wet on dry, before finishing with a fine colour sanding….
- Add in a shadow – mix up a blue grey (by adding a little orange/brown to your blue). Wet the shadow area and drop the colour in. Use a thirsty brush to achieve a soft edge.
- Add text – how about making your painting look like a museum collection? You could write directly on the painting, use printing blocks or collage.
- Varnish – you could use acrylic varnish to make your eggs shiny in contrast to the matte of the surround. Both Brusho and watercolour pencils will need fixing before brushing on varnish.
- Vary your eggs and create patterns – recreate a natural history museum exhibit by varying the egg size, colour and markings. A full step by step of this is in Chapter 8 of Liz’s new book (see below).


Love this article. I wouldn’t have thought of painting eggs.
Can’t wait to try all the different techniques.