
A Beginners Guide To Indian Ink
Indian ink, also known as Chinese ink or India ink, is a type of ink traditionally used in East Asia for writing, drawing, and painting. It has a long history and is still in use today for various artistic and calligraphic purposes. Indian ink is distinct from many other types of ink due to its composition and characteristics. It’s deep black colour and water resistance ensures Indian Ink has become a staple of many artists’ tool box. In this article we discover the unique properties of Indian Ink and share some tips on how to use it.
What is Indian Ink made from?
Indian ink is typically made from a few simple ingredients, including lampblack (a fine black soot that is a by-product of burning various materials, such as wood, oil, or resin), water, and a binding agent. Indian ink may also contain additional ingredients like gum arabic, shellac, or other thickeners and stabilizers.
Winsor & Newton’s Indian Ink contains gum arabic which is a natural gum obtained from the sap of the Acacia tree. It is used as a binder to hold the lampblack particles together in suspension in the water. This creates a stable ink that can be applied with a brush or pen.
Shellac is a natural resin secreted by the lac bug, which is native to India and Southeast Asia. The female lac bug produces a resinous substance on the branches of certain trees, particularly the host trees like the “lac tree” and the “kusum tree”. This resin is harvested and processed to create shellac. Shellac has been used for centuries in various applications due to its versatile properties.
Indian Ink has unique properties
Bold and expressive lines are synonymous with the rich velvety black colour of Indian Ink. Used with various tools including brushes, dip pens, quills, bamboo pens and even homemade mark making tools it’s a versatile medium. It is commonly used for traditional Asian calligraphy, sumi-e painting (Japanese ink painting), and other forms of ink-based art.
One of it’s main features is it’s water resistance. Once dried, Indian ink is generally water-resistant, making it suitable for applications where water may come into contact with the artwork or writing. This property is especially important in East Asian brush painting, where layers of ink washes are applied. It means it’s also a great base layer to build subsequent layers of water soluble media over the top. The Indian Ink marks are permanent and will not be disturbed.
While traditional Indian ink is still widely used, there are also modern variations and synthetic alternatives available today. These offer a wider range of colours and properties for artists and illustrators. Dr PH Martin’s Bombay Inks offer the same versatility as traditional black ink but with plenty of vibrant colour.
Getting started with Indian Ink
Using Indian Ink requires minimal equipment. A pot of ink, a tool to apply your ink and a surface to draw on. Considering the types of marks you want to make will dictate the mark making tool you use. Brushes will allow you to vary the width of your mark depending on the pressure you apply. Whereas pens will make a more uniform line, and the width can be changed by applying more pressure. Mark making tools are covered in more detail in my post ‘Make Your Mark With Ink’.
The surface you use is largely a personal choice. I like to use cold pressed watercolour paper as I apply lots of water too, so I find this the best paper to use. If you are working with dip pens you may want a smoother surface such as a hot pressed watercolour paper or a cartridge paper.
A note of warning before you begin – Indian Ink is permanent it will mark clothes and cannot be washed out. It will also stain hands but only for a few days.
Buy the right ink
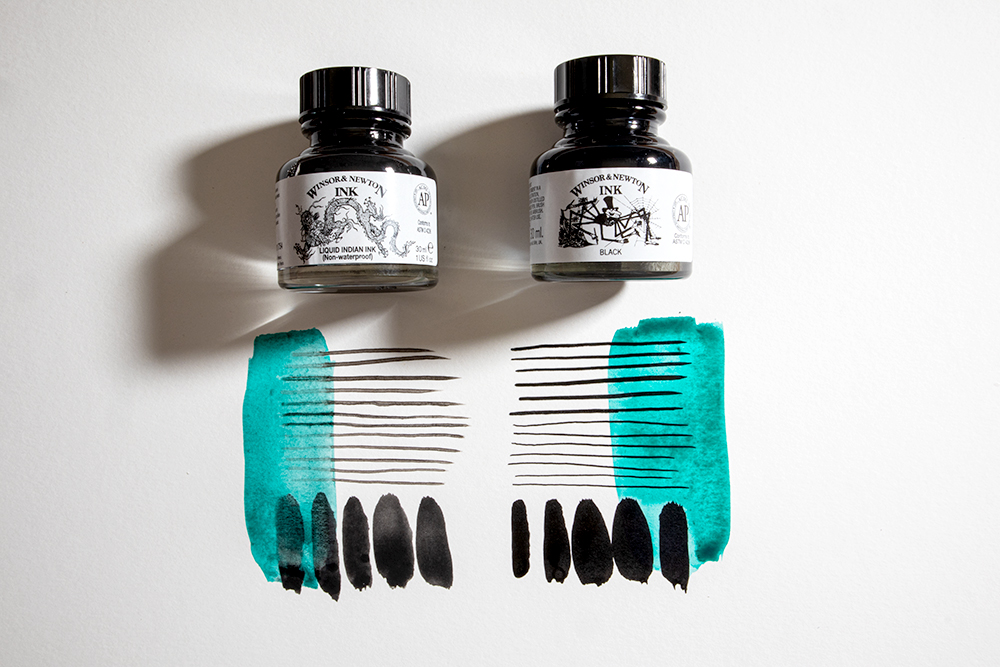
We sell two different types of professional quality Indian Inks made by Winsor & Newton. A common question I get asked in the shop is what the difference is between the two? Liquid Indian Ink (on the left) is a traditional formula of the Chinese sticks and is not waterproof. Black Indian Ink (on the right) uses a shellac binder, allowing the ink to have washes painted on top without bleeding. So if you are wanting the waterproof version make sure you buy the bottle with the iconic gentleman spider on the front.
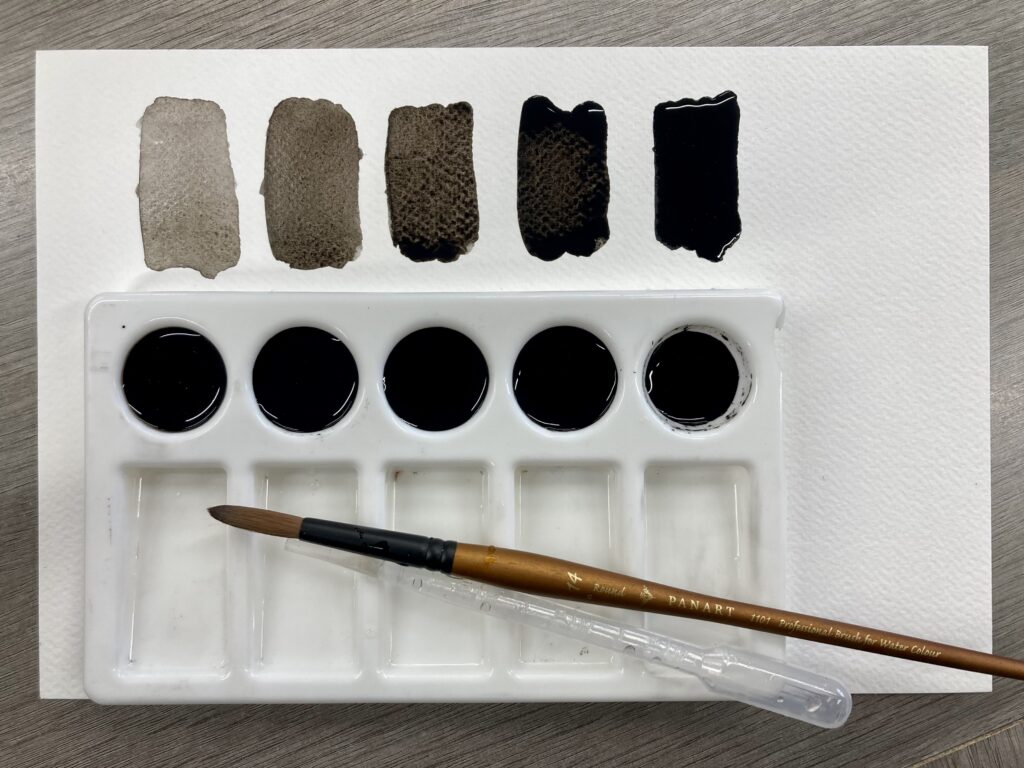
Create a greyscale
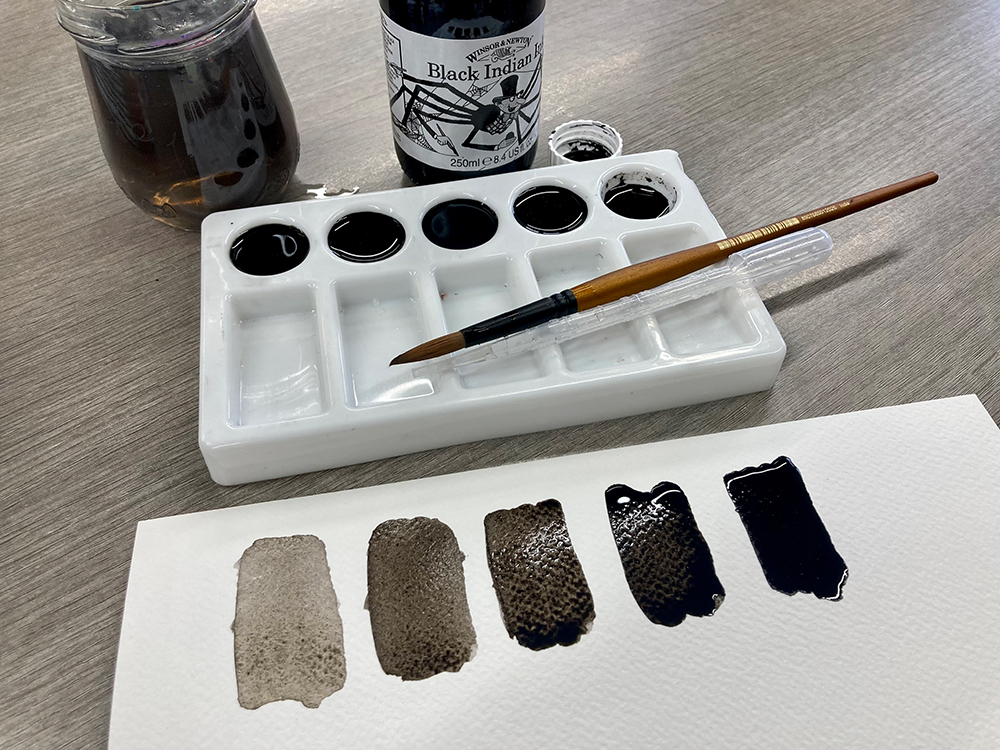
Value scales are often used by artists and designers as a reference to understand and work with the various values or tones in an image. They help in creating depth, contrast, and three-dimensionality in artworks. Removing colour can emphasize shapes, textures, and lighting in a unique way. Creating a grey scale with your Indian Ink is easy. I used a palette and, using a pipette, filled each well with water. I then added two drops of ink to the first well, then gradually increased the number of drops in each well. The last well on the right is pure Indian Ink. Paint each well out and adjust the water:ink ratio if necessary. There needs to be a noticeable difference in the values as you move up the scale from the lightest grey to the darkest. Remember you can add but you can’t take away so go easy with the ink!
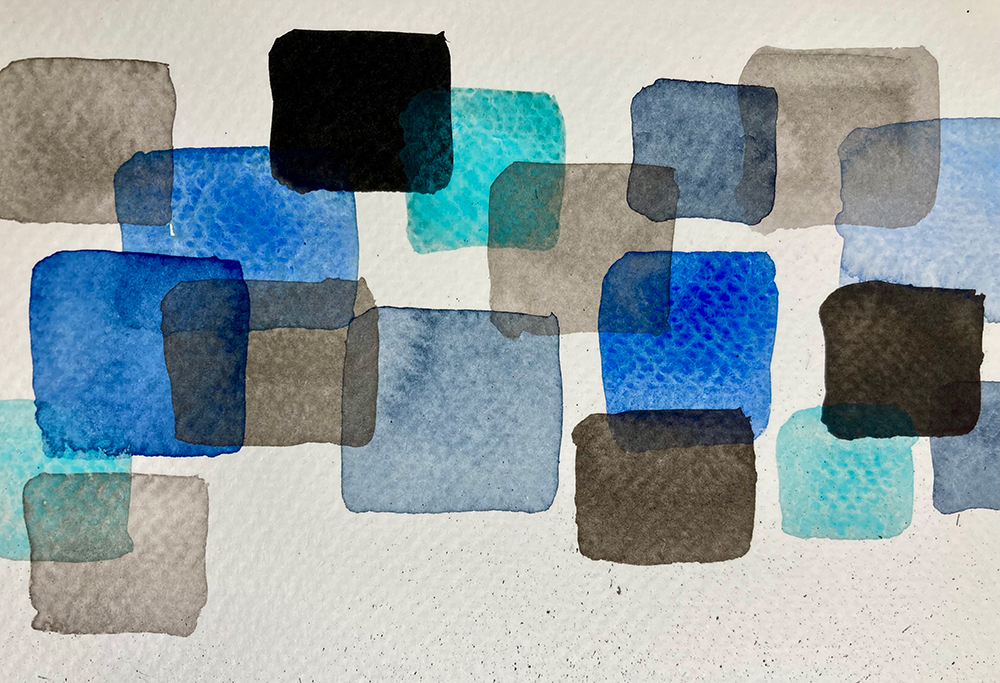
Techniques to try
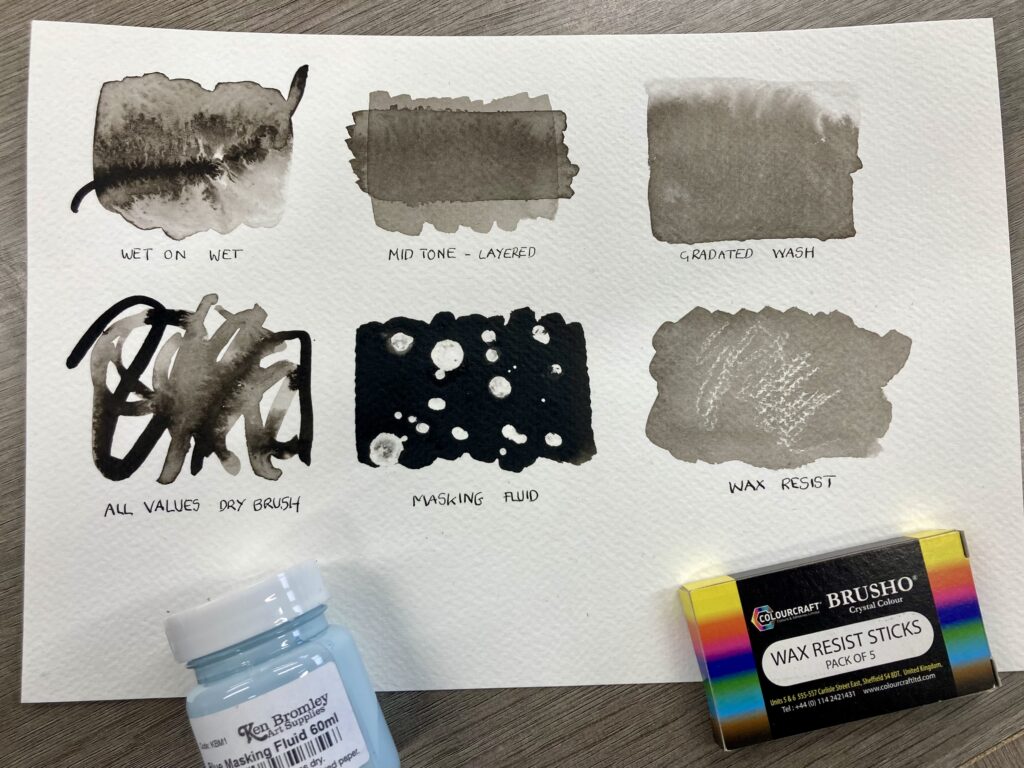
In the image I have included a few techniques for you to try. Wet on wet is one of my favourite ones, here I have brushed a mid tone wash onto the watercolour paper, then drawn through it with pure Indian Ink. Experiment with the values you have created; try using the same value and layering it or using all the values and apply with a dry brush.
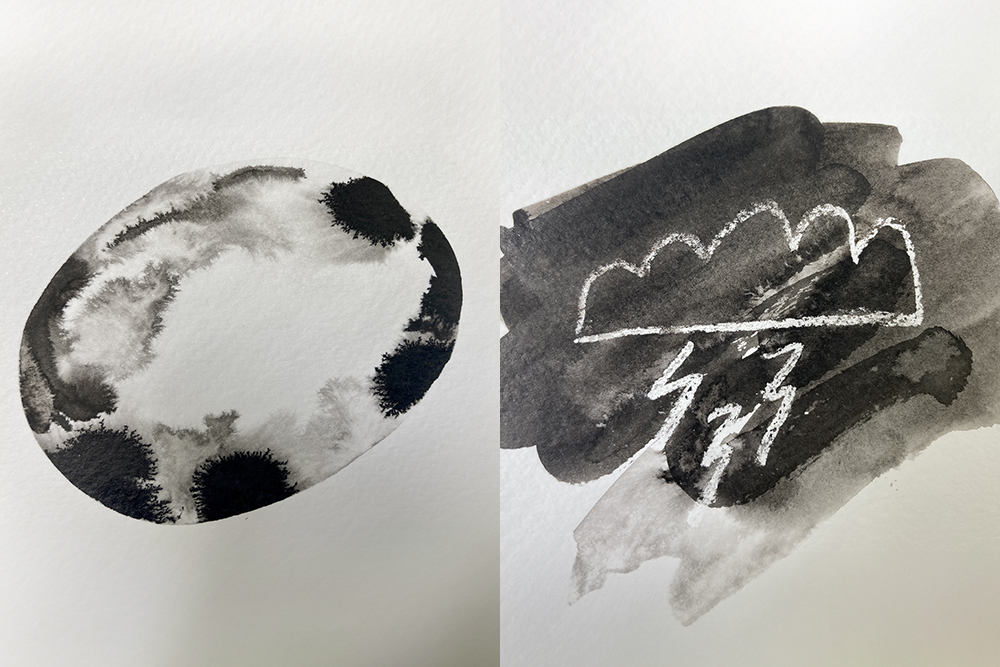
Resist techniques, similar to those in watercolour can be deployed. I have used a wax resist stick and masking fluid, you could also try Brushable Wax Resist. In the image above left I have created a puddle of water and then dropped some of the different values into it with the end of a brush.
Dropping salt onto wet Indian Ink will soak up some of the ink and leave you with a speckled texture. Leave the salt until everything is dry before removing. Experiment with table salt, rock salt and dishwasher salt all gives slightly different effects.
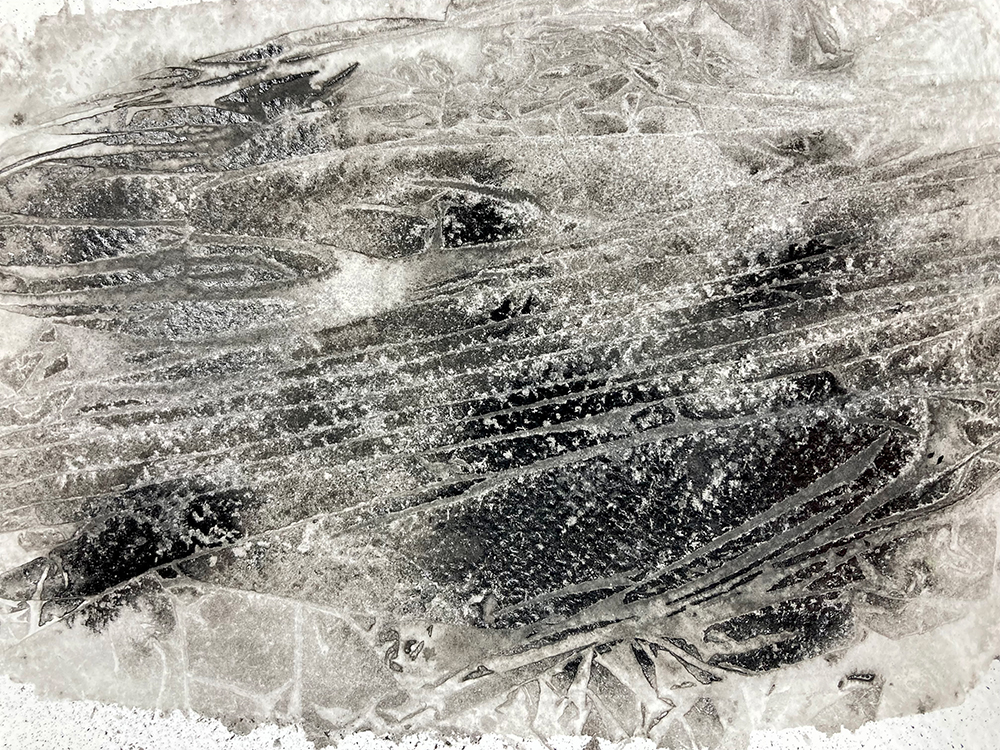
Another technique to try is using cling film. Simply stretch or scrunch the cling film over a wet Indian Ink wash and leave in place until completely dry. I like to use this method for creating interesting backgrounds and foliage effects which can then be overpainted with watercolour.
Need more inspiration? Here are my top picks for video demonstrations using Indian Ink.
Indian Ink Is Great For Trees!!! Wet in Wet Watercolour – Christopher Stephen
Inky Cat Step By Step – Anna Bucciarelli
Experiments in Mixed Media: Yupo, India Ink & Pitt Pens – Opus Art
If you enjoyed reading this article you might like to read Make Your Mark With Ink, A Beginners Guide To Artists Inks, Pen & Ink Drawing Ideas – 24 Curated Video Tutorials & Demonstrations.


Great article, thank you. Since the ink leaves stains on clothing, would it also stain a white porcelain palette? Also would it stain the sink when you rinse out the inky water? Thanks 🙂
Indian ink can indeed stain porous surfaces like clothing and some types of palettes, but you shouldn’t have too much of a problem with a porcelain palette. It’s advisable to test a small area of the palette first. As for the sink, if rinsed promptly, it shouldn’t leave a noticeable stain, especially if the sink surface is non-porous. However, it’s always a good practice to rinse the sink thoroughly after using inky water to prevent any potential staining. I hope this helps!
Thanks for the cola pen video. Interesting facts on Indian ink!
Top calligraphers never use waterproof ink as they wish the speed the line is drawn to show