£5 OFF Orders over £50 | Use Code 585C
 Paint
Paint Drawing & Illustration
 Paper & Canvas
 Brushes & Painting Tools
 Accessories
 Crafts
 Beginners
 Brands
 NEW
NEW Gifts
Gifts Offers
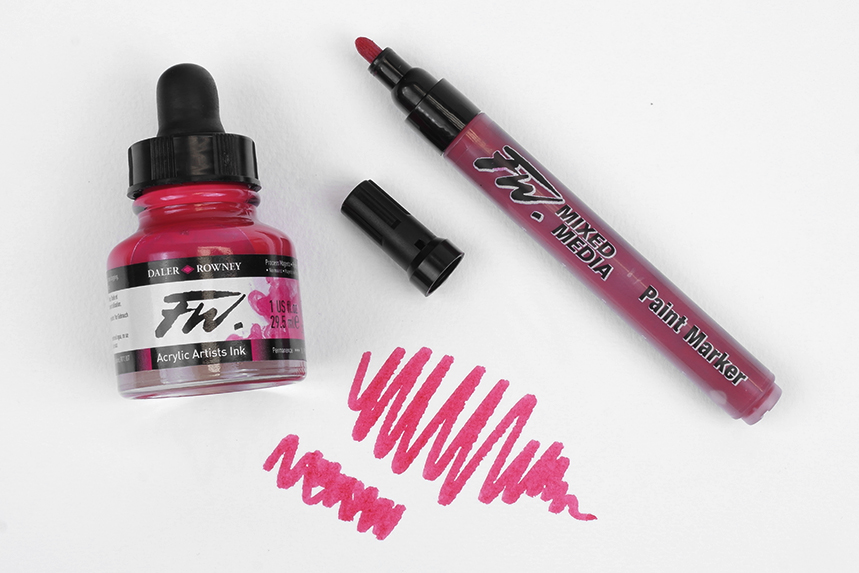
Filling & Cleaning Your Marker
FW Markers can br filled and re-filled with a whole variety of water-based media. No matter which medium you choose to fill your marker with both the filling and cleaning processes will remain the same. One of the distinguishing features of these markers is that they can be refilled over and over again, with inks and paints of many different colours. If you choose to refill a marker with a different colour then it is paramount that the marker is properly cleaned to prevent the cross-contamination of colours.
We have created useful step-by-step guides for both filling and cleaning your markers, so you get the best performance possible!
Filling Your Marker
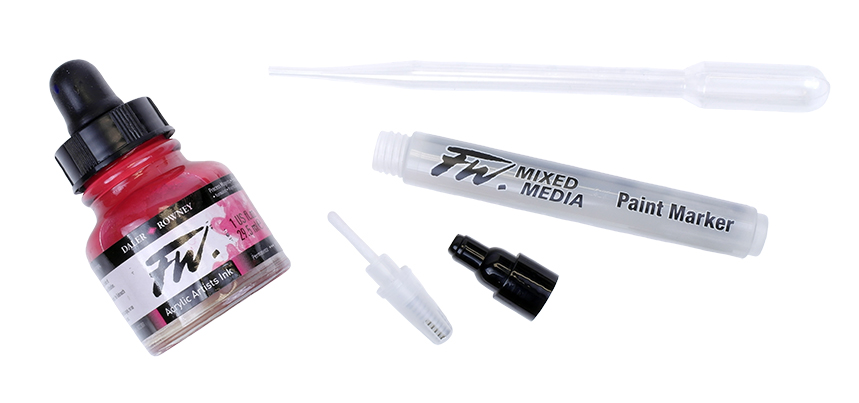
When filling or cleaning your marker you will notice that each of the markers are comprised of very similar parts, as the following image demonstrates. We also recommend having a few additional items to hand that will be useful during the filling and cleaning process.

- A pipette or dropper - To fill your marker with liquid media. Some inks may already come with a dropper in the lid, otherwise a pipette can be used.
- An empty marker barrel - You will put your ink or paint into here later.
- Black marker cap - Keeps the marker securely airtight to prevent the tip drying out.
- Black nib casing - This holds the nib in place.
- Two metal balls - They agitate the ink to make sure it is free flowing and ready for use.
- Clear plastic nib holder - The nib sits in this container. When you come to changing your nibs it can be easily plucked from here and be replaced.
- Ink or paint - Choose the medium that you wish to fill your marker with, there are many choices available.
- A piece of scrap paper - use this to test your marker on to get the ink flowing.
Filling your marker is a very quick and easy process. To fill your marker either follow the steps below, or see a visual walkthrough in our video also included below.
- Firstly you must remove the cap. Once you remove it you should be able to quickly and easily unscrew the nib casing. Remove the black casing and put to one side.
- Once the casing has been removed you will notice that the nib is held in a small plastic holder. Gently pull this plastic casing from the barrel of the marker. You'll also notice the detachable nib, which can also be replaced quickly and easily.
- When you are taking the marker pen apart be sure not to lose the two metal balls contained within the barrel! These balls are contained in the marker to agitate the liquid before use to make sure it is properly mixed.
- The barrel can now be filled with your chosen media, a whole range of paints and inks can be used. Most inks come with a handy dropper in the lid, which will make this task less messy. If you are mixing colour from diluted Busho or watercolour you may find a pipette useful to transfer your paint from your palette and into the barrel.
- Once the marker is full you can re-assemble the pen. Just put the nib holder back in and screw on the nib casing.
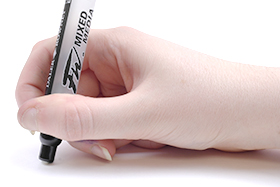
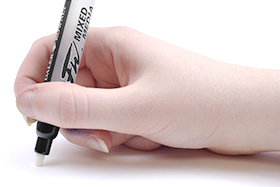
- You will now need to draw the colour through the marker tip. To do this hold the marker in your hand and rest the nib on a scrap piece of paper on a hard surface. Press down with the marker multiple times to create a pumping motion; this motion will draw the ink into the nib. Once the nib is fully saturated you can stop.
- The marker is now ready to use! Your markers can be stored with ink inside them; just make sure that the caps are put on tighly to prevent the nibs from drying out. If your markers have been in storage for a while you will find that you need to give them a good shake before using them!
 |
 |
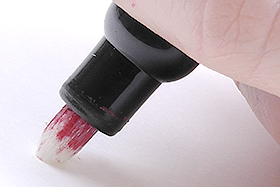 |
| To get the ink in your marker flowing you will first need to press the nib down firmly. | Release the nib fully. Repeat these two steps | You will have to repeat the first two steps a few times before you see the ink flowing into the nib. Continue until it is saturated. |
Cleaning Your Marker
FW Markers are fantastic in that they can be used and refilled over and over again. If you have used up the liquid in your pen, or maybe just want a change from the colour that you're using, taking the pen apart and cleaning it could not be easier! Just follow these simple instructions:
- If you are changing the contents of your marker it will need to be thoroughly cleaned first. To begin you must disassemble the marker as you did when you first filled it, by unscrewing the nib casing and taking out the nib holder.
- If you are using a sink to clean your markers it's a good idea to put the plug in so that you don't loose any of the small parts.
- Make sure to clean each individual part of the marker thoroughly; any small amounts of residual ink could taint the colour you refill your pen with. If you have had a strong colour in the marker you may need to soak the parts to make sure the colour rinses out.
- Fill the barrel with water, reassemble the marker and give it a good shake. Then take the marker apart again and rise out.
- Next you will flush out the marker using water. To do this refill the marker with water, turn the marker upside-down and place on a hard surface. You will then need to press the marker up and down to draw water into the nib. Draw with the marker to release more of the water through the tip.
- Continue drawing with the marker to flush out the water until it runs clear. With stronger colours this will take longer. Some very strong colours will leave a very pale residue, but it should not interfere with the colours you refill your pen with.