My Master Class in Portraiture with Sam Dalby
Portrait Painting, Oil on board or Canvas
Recently, I was invited to visit The Mall Galleries, London, for the opening of the Royal Society of Portrait Painters. Along with my two fellow artists Carl Jacobs and Lauren Carter Bridges, we were privileged to watch a master class in portraiture by Sam Dalby, the president of this society. He introduced us to a new technique in oil painting – one that works for him. I was so impressed I arranged to spend a weekend painting in his studio in Settle. It is this new approach I would like to share with you.

You will need:
- Canvas or board – smaller than you may usually use until you are used to the technique
- Palette
- White spirit
- Linseed oil
- Oil Paints – Ken Bromley’s Artists Oils are the ones I use and recommend.
- Paper towel /rags for cleaning
- Brushes – your own choice
My range of colours are as follows:
- Titanium White
- Cadmium Yellow
- Lemon Yellow
- Alizarin crimson
- Burnt Sienna
- Cobalt Blue
- Ivory Black
I like using purple and also sap green, but you can add any of your own favourites.
Preparation
Before you begin any serious work prepare your canvas. I prepared two just in case I messed up on the weekend! Use a primed canvas, mix Burnt Sienna with white spirit, and then slap it all over the canvas in a haphazard manner.
You are not painting yet, so leave this layer to dry, maybe overnight if needed. This will be your underpainting; it will influence what you later paint on top but won’t be seen at the end. Have fun be messy!
First Step
When dry, set up your easel in good light, make sure you are standing or sitting so that you can see your model or photograph without having to twist or turn. Good posture is essential or you will get very tired.
Don’t Panic; this is we’re it gets a little crazy! Mix a quantity of black with Linseed Oil, enough to cover the whole of your canvas. Follow the Goldilocks technique – make sure your mixture is just right and not too runny or too dry! You will know that your mixture has reached the ‘just right’ consistency when it goes on your canvas without running or dripping everywhere. Don’t feel daunted by the blackout stage, remember you have the lovely warm tones of burnt sienna underneath, and they will shine through giving warmth to your final finished work. Now you are ready to begin.

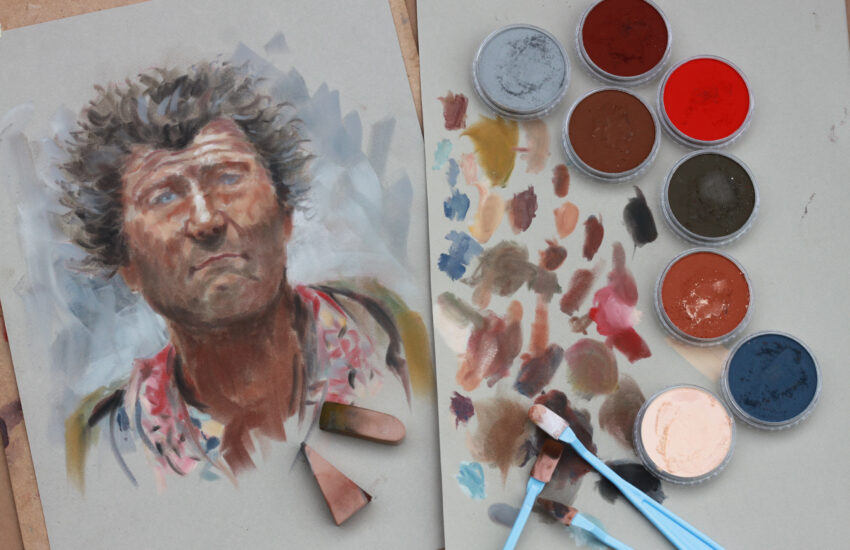
Prepare your palette of Colours
Squeeze your colours around the edge of your palette, then start to mix your range of skin tones. Check your mixes constantly against your model’s skin. I hold my brush up to check if my colour mix is the same as the area I’m about to paint on the model. Mix a good range of tones from light to dark, and then from warm to cool.
Now it is time for some serious observation. Plan your composition and decide the scale you are working to. Remember to check your light source.
Now we begin
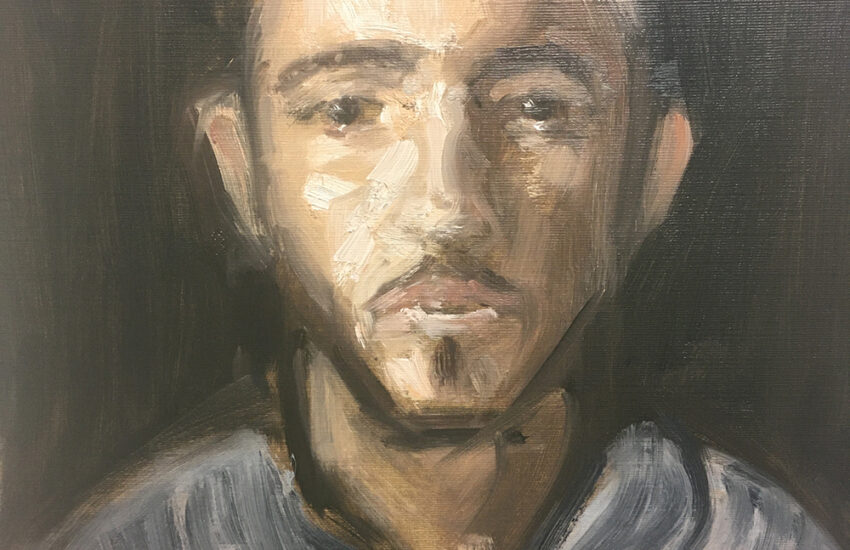
With a tissue or cotton bud, start to rub and remove the black paint from your canvas in areas that correspond to the parts of the face were the light falls. In doing this you will reveal the burnt sienna under painting. If you remove too much, don’t worry, just put more diluted black on with your brush.

Do not draw at this stage. Don’t use Line, just work through your tonal range. Take your time; this stage must be accurate or your finished portrait will be disappointing. Be patient and work through it. Do not leave this stage until you are happy that it is correct.
Next stage
Look at your range of skin tones on your prepared palette and select where you want to begin – I go for a sort of random scattering at first. It doesn’t matter if you decide to put on your dark tones first or your light tones first. The black paint will influence your colours, so you may need to apply your lightest lights and darkest darks in the latter stages to get the depth you require.

Dab your colours on and build up your tonal range. Check your cool and warm colours and keep on mixing and remixing; always noting the ever changing light in the room. Enjoy this stage but stop when you are tired and take a break. Your oils should stay pliable /workable for a couple of days.

This technique works for me. I tend to be messy anyway, so it keeps me under control and if I stick to my plan the painting soon starts to take shape. After trying this method, you must decide if it works for you, so practice, practice, practice and bend the rules a little to suit your working method. If it’s not for you, no matter, at least you tried!

Tips from the expert
Sam taught me something very important, it’s all about energy. Conserve your energies – stop, take a break, walk away, and then return with a fresh eye and renewed energy.
I used to work until I dropped, I now realise when you are tired, this is when you make mistakes, and can ruin a good painting. The number of perfectly good paintings I’ve wiped out at the end of a working day could fill the Albert Hall – all because of tiredness.
Think about every brushstroke. If you don’t know why you are doing it, STOP and take a break. I wish you every success.