
Low Winter Sun, Watercolour Tutorial
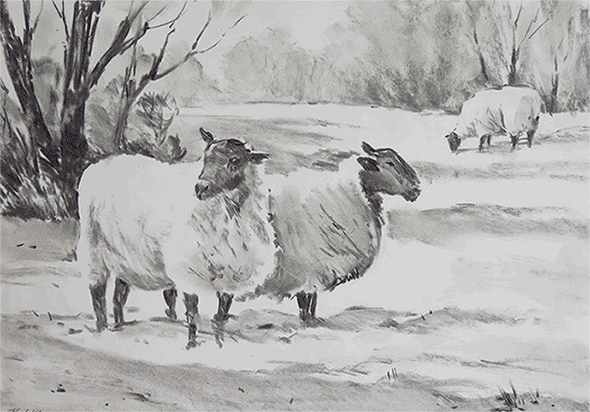
Animals add a sense of scale and movement to a landscape scene and the light tones of these sheep, seen against the morning light, dark trees and shadows on the snow, make a great subject.
As we all know, animals won’t stand still for long! I combined several studies of sheep from my sketch book in varied poses, trying different layouts until I was happy with my final composition. I then made a tonal sketch in charcoal to help me visualise what I was going to paint.
Materials Used
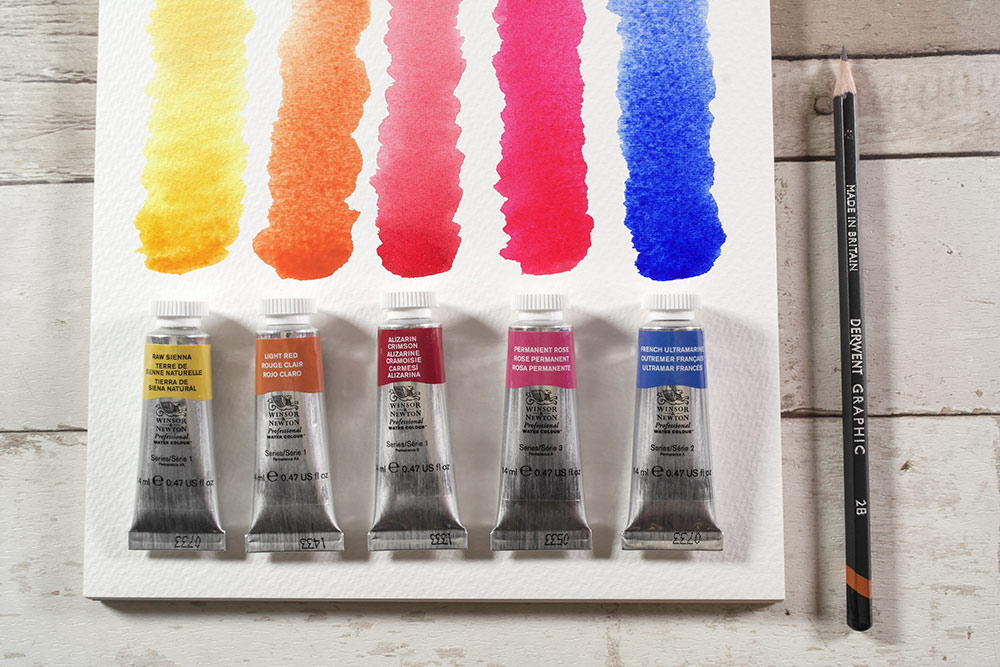
- 2B pencil
- Winsor & Newton Professional Watercolours
- Colours: Raw Sienna, Light Red, Permanent Rose, Alizarin Crimson, French Ultramarine.
- Paper: Bockingford 140lb/300gsm Rough.
Download a printable sketch if you prefer to trace rather than draw free hand.
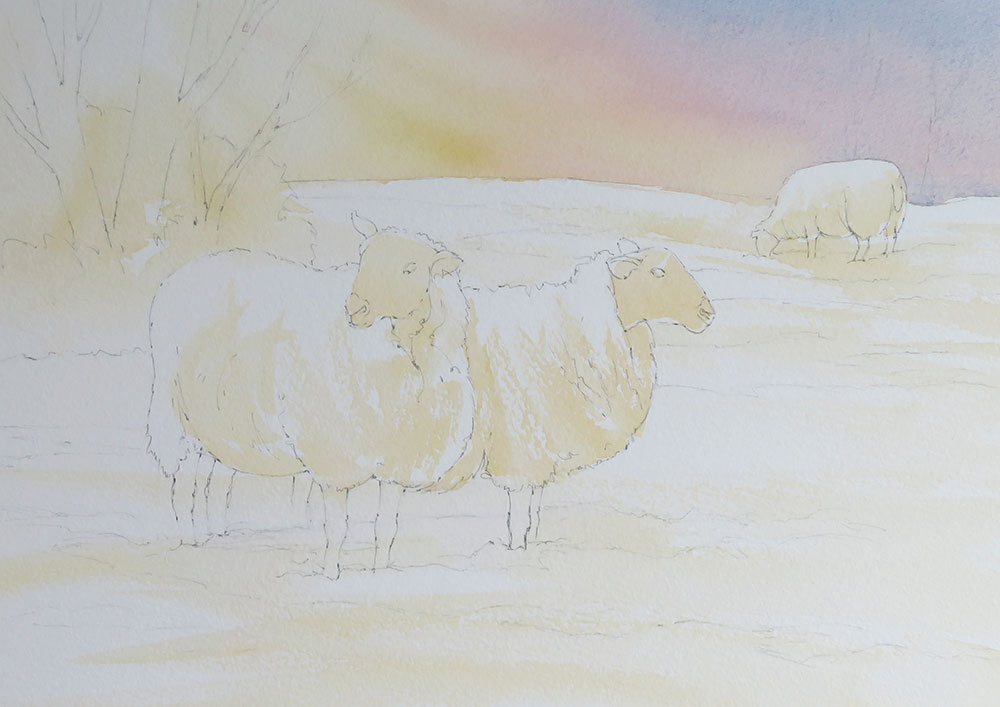
Step 1
With the main elements drawn onto the watercolour paper with a 2B pencil, I wet the sky area with clear water, followed by a pale wash of Raw Sienna, getting stronger to the right. While all was still wet, I added a touch of Permanent Rose to the right hand side, followed by French Ultramarine. A pale wash of Raw Sienna was brushed across the lower flanks of the sheep and patches of snow, using the side of the brush to create sparkle and texture.
Step 2
Once the sky was dry, I developed the background trees.
The left hand side was warmer, as this is where the sun is coming from. I used a mix of Raw Sienna with a touch of Light Red, gradually adding French Ultramarine to make a warm grey for the right hand side. This wash also defines the distant sheep. I softened the edges on the left to suggest the sun coming through, using dry brush strokes on the right for the distant winter twigs and branches.

Step 3
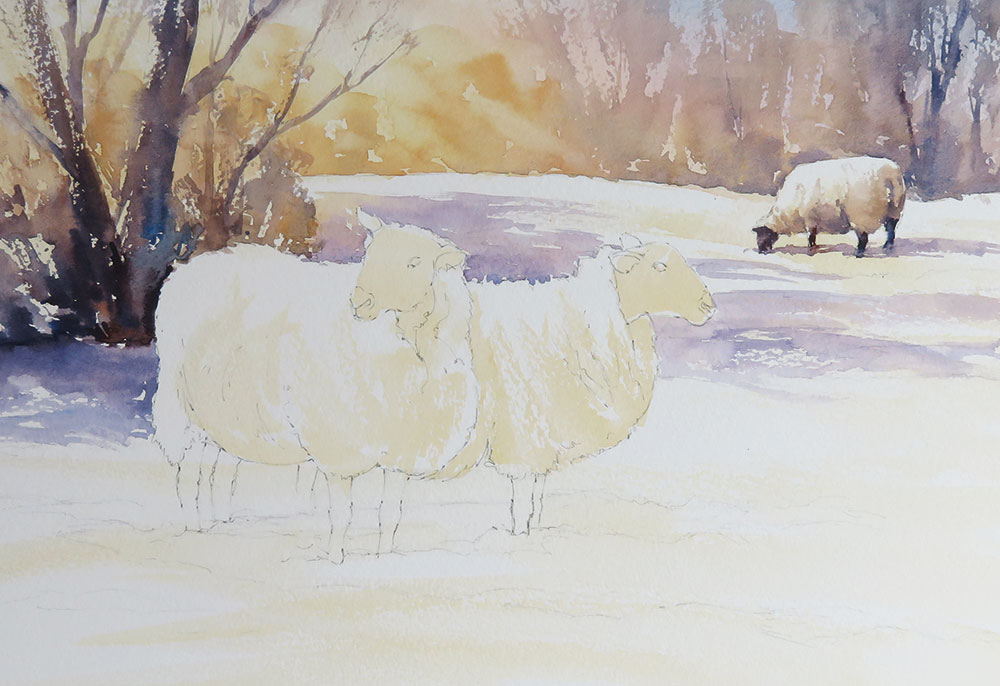
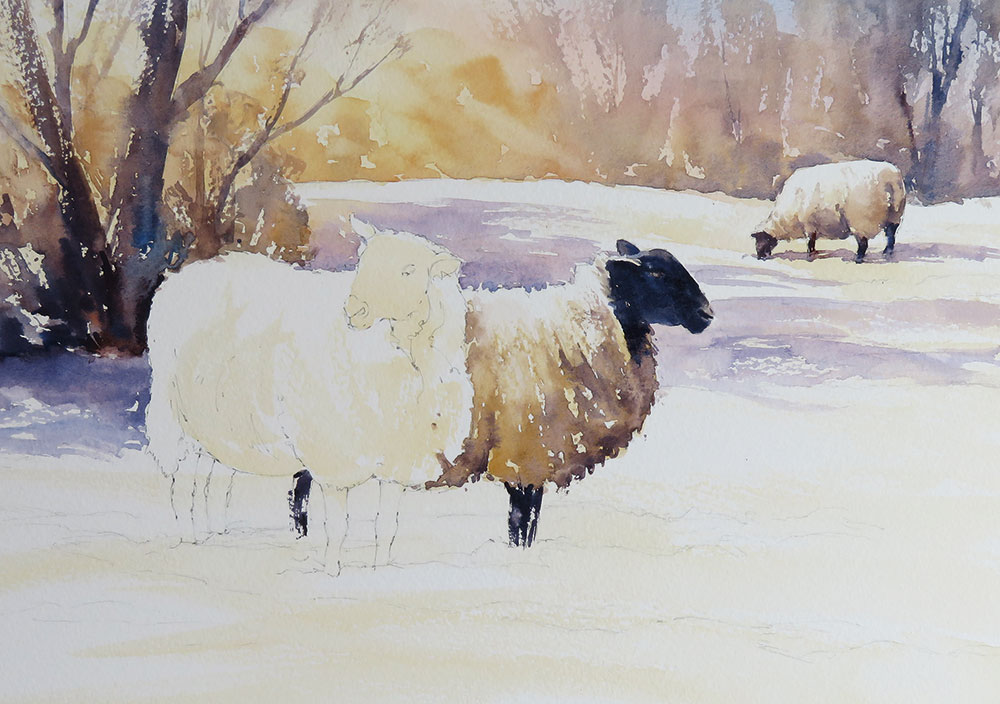
Once dry, I painted the middle distance trees and shadows. I always work from background to foreground, light to dark. I first added the shadows on the snow using a pale mix of Alizarin Crimson and French Ultramarine. Note how this helps to define the sunlit top edges of the sheep.
The darker bushes behind the sheep came next, using Raw Sienna and Light Red, followed by the trunks and branches with a stronger mix of French Ultramarine and Light Red. I combined dry brush and wet-in-wet to create a range of textures and edges. These dark shapes help define the sunlit edges on the sheep.
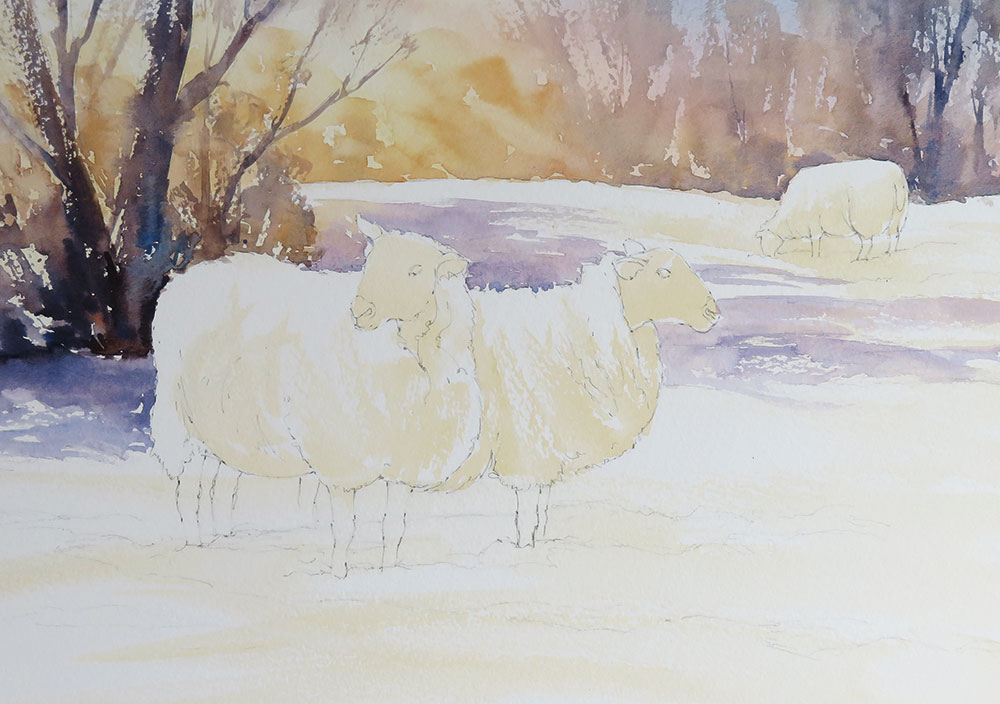
Step 4
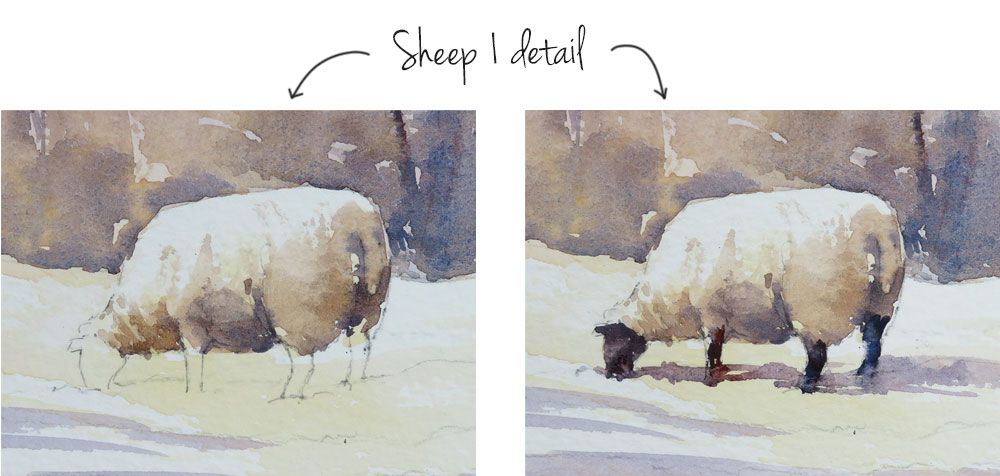
It was now time to add the sheep, starting with the distant one on the right. A warm grey mixed with Raw Sienna, Light Red and French Ultramarine was dry brushed around the rear and sides of the sheep. I darkened under the belly and tail with a thicker mix while this was wet. The head and legs were then added with a dark mix of French Ultramarine and Light Red, followed by the shadows on the snow.
Step 5
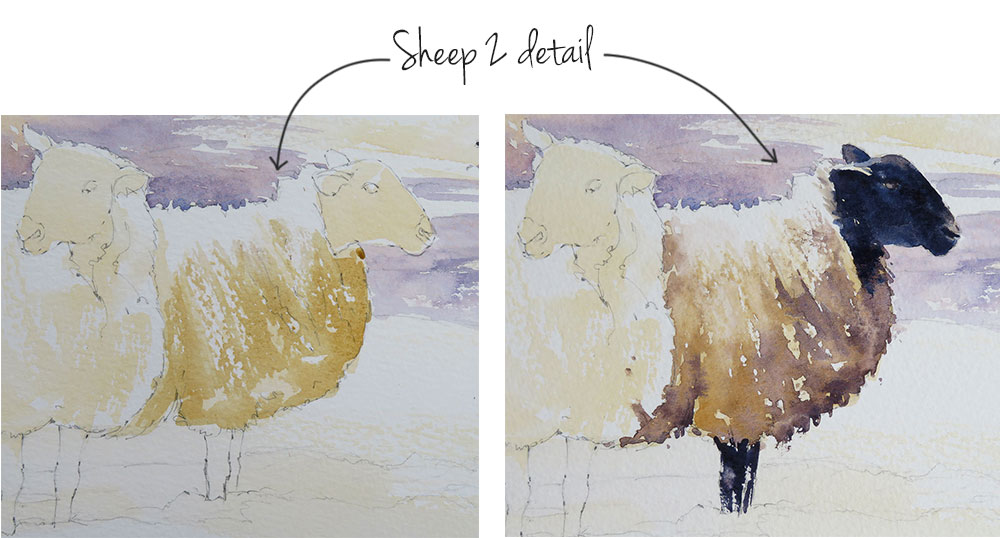
Moving forward, the same process was repeated with the next sheep, using more Raw Sienna in the grey wash and more dry brushing. I also spattered their woolly coats with water droplets from a toothbrush to create more texture. The head and legs were added with a thick mix of French Ultramarine and a little Light Red.
While this was wet, I lifted out the lighter tone on the nose with a damp brush, careful to leave the white of the paper along the sunlit back and edge of its ear.
Step 6
The last sheep was painted with the same techniques and colours, using curving brush strokes to suggest the rounded contours of its body. I combined dry brushing and wet-in-wet to suggest the texture of the wool, careful to leave white paper as before for the sunlit top edges. Finally, I added the foreground shadows with a pale mix of Alizarin Crimson and French Ultramarine, dragging the brush on its side to create sparkling edges against the snow. A few grasses were added here and there with a dark mix and a fine brush to complete the painting.

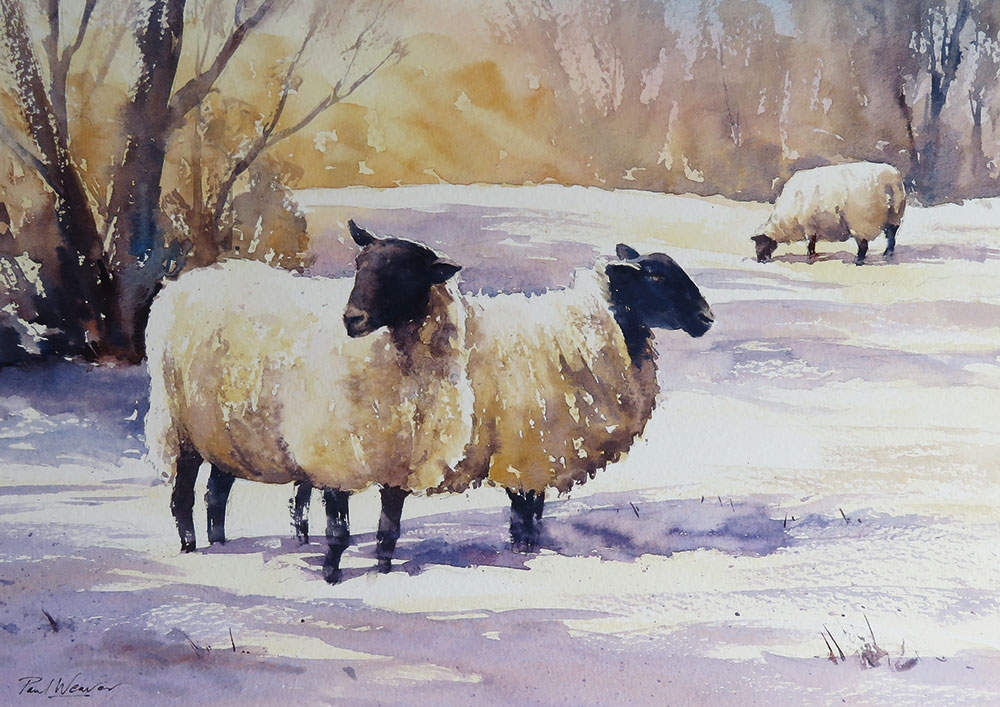
All work ©2021 Paul Weaver


Thank you Paul for this excellent tutorial. I’ve been painting for a couple of years and have had a few lessons, so this was the perfect follow on.
I’ve had a go and I think I got a good result – good enough to hang it on the wall in my guest bedroom! Followed your very clear instructions (almost) to the letter.
Two more of your tutorials are next on my list.
Thanks a bundle – you’ve really helped and inspired me!!!
Thank you David, so pleased that you have been inspired and achieved a great result with this tutorial. Let us know how you get on with the others!
I find it very confusing, as a beginner.
Hi Sergiy. Thanks for your comment. I’m sorry to hear that you’re finding the tutorial confusing. Please let us know which steps you’re having trouble with and we’d be more than happy to clarify!
Excellent tutorial seeing how to compose a painting. I’m self taught but always learning.
I’m a novice too and have really enjoyed this tutorial. It’s going to take me a few attempts to get it looking like Paul’s but I’m learning a lot about colour, light and shadows. Thankyou.
Haven’t done any painting for more than a month now, when the new catalogue came with info about tutorial, I felt I just had to have a go. Spent all day today and was quite pleased with the result after a lay off , ( I am still very much a novice). Lovely project. Thank-you to Paul for making it available, it has kickstarted me back to the art works again.
Amazing Job!! Keep up the good work.